

![]()


Note
The Aignostics Python SDK is in alpha, with Atlas H&E-TME and the Aignostics Platform in early access. Watch or star this repository to receive updates on new features and improvements of the SDK.
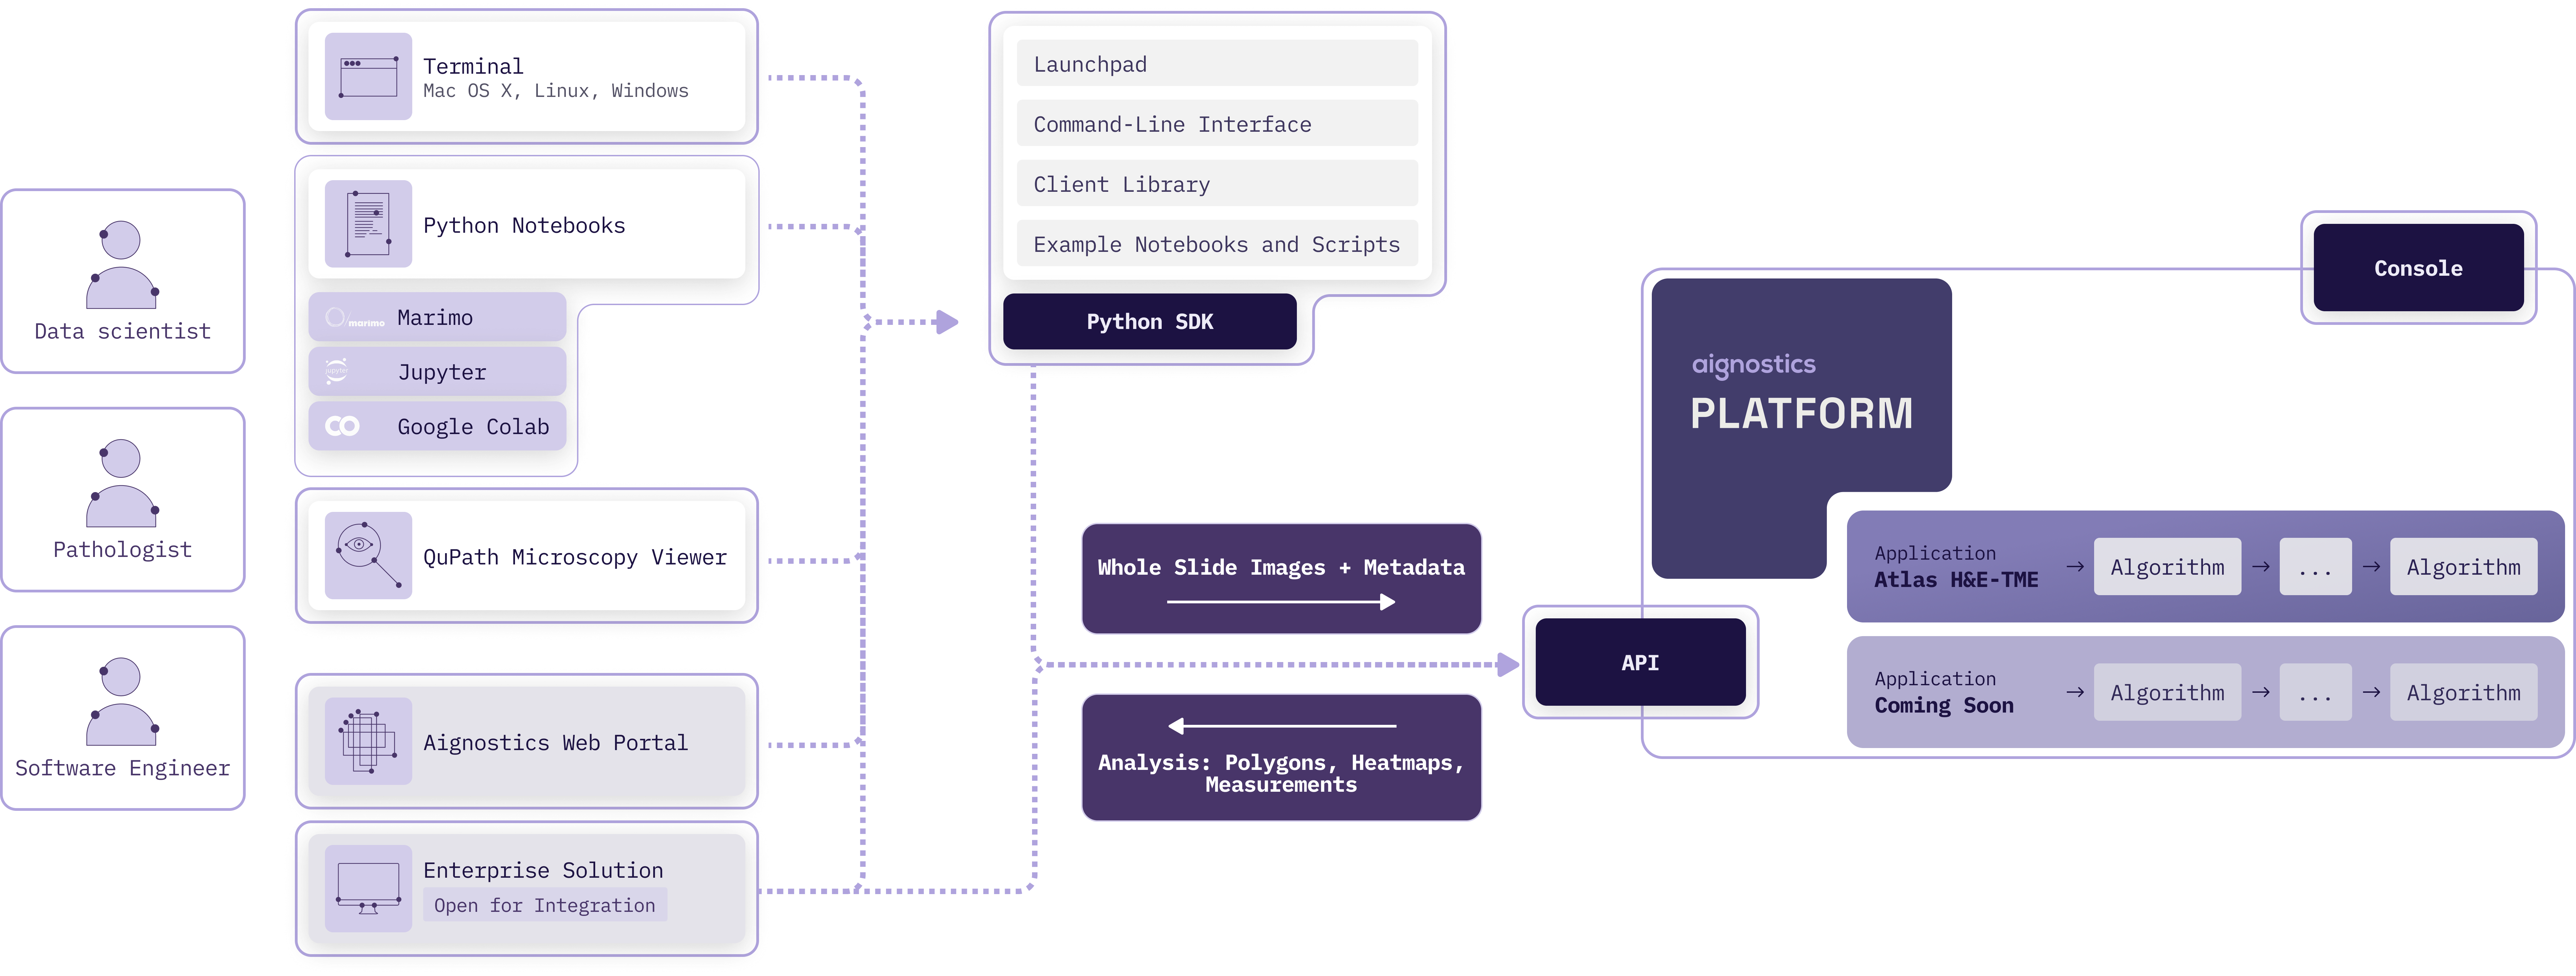
The Aignostics Python SDK provides multiple ways to interact with the Aignostics Platform for running advanced computational pathology applications like Atlas H&E-TME, which analyzes tumor microenvironments in H&E-stained tissue samples.
We know you take quality and security as seriously as we do. That's why the Aignostics Python SDK is built following best practices and with full transparency. This includes (1) making the complete source code of the SDK available on GitHub, maintaining a (2) A-grade code quality with high test coverage in all releases, (3) achieving A-grade security with active scanning of dependencies, and (4) providing extensive documentation. Read more about how we achieve operational excellence and security.
The Aignostics Python SDK can be installed via the uv package manager. The installation process sets up the SDK along with the necessary dependencies, including the uv package manager itself if not already present.
Before proceeding, ensure you have an Aignostics Platform account. You can get access either through your organization admin (if your organization has an Aignostics account) or directly from Aignostics. Check your email for an invitation before proceeding.
- Python 3.11, 3.12, 3.13, or 3.14
- macOS 11.0+, Linux, or Windows
- Homebrew (only if you previously installed
uvvia Homebrew)
The installation will:
- Install or update uv (Python package installer)
- Install the Aignostics Python SDK (includes Launchpad, CLI, and Python Library)
Copy and paste the appropriate command below into your terminal (macOS/Linux) or PowerShell (Windows):
Linux/macOS:
if ! command -v uv &> /dev/null; then
    echo "uv not found, installing..."
    curl -LsSf https://astral.sh/uv/install.sh | sh
    source $HOME/.local/bin/env
else
    UV_VERSION=$(uv --version | cut -d' ' -f2)
    if [ "$(printf '%s\n' "0.6.17" "$UV_VERSION" | sort -V | head -n1)" != "0.6.17" ]; then
        echo "Updating uv to the latest version..."
        UV_PATH=$(which uv)
        if [[ "$UV_PATH" == *"brew"* ]]; then
            echo "Updating uv using Homebrew..."
            brew upgrade uv
        else
            echo "Updating uv using the installer..."
            uv self update
        fi
    else
        echo "uv is up to date"
    fi
fi
Windows (PowerShell):
winget install --id=Microsoft.VCRedist.2015+.x64 -e
powershell -ExecutionPolicy ByPass -c "irm https://astral.sh/uv/install.ps1 | iex"
Verify your installation by running:
uvx aignostics --helpYou should see the Aignostics CLI help output.
You can then proceed by choosing your preferred user interface below.
Choose your preferred interface for working with the Aignostics Platform. Each interface is designed for different user roles and use cases:
| What it is | Graphical application for analyzing slides and viewing results in QuPath or Python notebooks |
| Best for | Pathologists and researchers who want to analyze slides without writing code |
| Use when | Running analyses on individual cases or small cohorts (1-20 slides) and exploring results interactively |
| Get started | Install and run your first analysis |
| What it is | Terminal tool for scripting and automation |
| Best for | Bioinformaticians and technical researchers who work with terminal-based workflows |
| Use when | Processing large cohorts (10s-100s of slides), automating repetitive analyses, or integrating with computational pipelines |
| Get started | Manage datasets and application runs from your terminal |
| What it is | Python library for programmatic access in scripts, notebooks, and applications |
| Best for | Data scientists and developers who want to integrate the platform into Python-based workflows |
| Use when | Building custom analysis pipeline in Python for repeated usage and processing large datasets (10s-1000s of slides) |
| Get started | Run example notebooks or call the Aignostics Platform API from your Python scripts |
💡 Launchpad and CLI handle authentication automatically. Python Library requires manual setup (see authentication section).
The Aignostics Launchpad is a graphical desktop application that allows you to run applications on whole slide images (WSIs) from your computer, and inspect results with QuPath and Python Notebooks with one click. It is designed to be user-friendly and intuitive, for use by Research Pathologists and Data Scientists.
New to Launchpad? See Installation section above to get started.
This tutorial uses Atlas H&E-TME with a public lung cancer dataset from the NCI Image Data Commons.
Step 1: Start Aignostics Launchpad
- Open a terminal or command prompt
- Run the command:
uvx aignostics launchpadThis starts the Launchpad application.
Step 2: Download a Sample Dataset
- Click the menu icon (☰) in the top right corner
- Click "Download Datasets". The system displays the dataset download interface.
- Click "EXAMPLE DATASET". The system populates the dataset ID field with a TCGA lung adenocarcinoma sample.
- Click "DATA". The system shows a folder selection dialog.
- Click "OK"
- Click "DOWNLOAD". The system downloads the DICOM dataset. A progress indicator shows download status.
- Click the menu icon and select "Run Applications"
Step 3: Select Atlas H&E-TME
- Click "Atlas H&E-TME" in the left sidebar. The system displays the application workflow with six steps.
- Click the version dropdown to view available versions. The system shows all available versions with release notes accessible via the "RELEASE NOTES" button.
- Keep the default version (latest)
- Click "NEXT"
Step 4: Select Slides and Provide Metadata
- Click "DATA". The system opens a folder selection dialog showing the Launchpad datasets directory.
- Navigate to the downloaded dataset folder (e.g.,
/datasets/idc/tcga_luad/) - Click "OK". The system displays the selected folder path and scans the folder, showing a table with all compatible slides. Each row shows thumbnail preview, technical metadata (file size, MPP resolution, dimensions), and status indicators.
- The system automatically extracts technical file metadata. You must provide the required medical metadata by double-clicking the red cells in the "Tissue" column. The system displays a dropdown menu with tissue types.
- Select the tissue type (e.g., "LUNG") and disease (e.g., "LUNG_CANCER") by double-clicking in the red cells and selecting the value from the dropdown. The system marks these cells green indicating valid metadata.
- Review the "Staining" column. The system shows "H&E" if this information was extracted from the DICOM file.
- Click "NEXT"
Step 5: Add Notes and Tags (Optional)
- The system displays the notes and tags screen.
- Enter an optional note in the text field (e.g., "TCGA lung sample analysis")
- Add optional tags by typing and pressing Enter (e.g., "TCGA", "lung")
- Click "NEXT"
Step 6: Set Schedule (Optional)
- The system displays scheduling options with soft due date and hard deadline pickers.
- Click "NEXT" to leave the default settings.
The soft due date indicates when the platform will attempt to complete processing. The hard deadline is when the platform may cancel the run if resources are unavailable.
Step 7: Submit Your Run
- The system displays the submission screen showing number of slides to be analyzed, full file paths, and upload and submit button.
- Review the slide information
- Click "UPLOAD AND SUBMIT". The system uploads your slides to the Aignostics Platform and submits the analysis run. A progress indicator shows upload status.
The left sidebar now shows your submitted run with application name and version, submission timestamp, running status icon (🏃), and any tags you added.
Step 8: Monitor Your Run
Atlas H&E-TME processing time depends on slide size and system load. Depending on the file size and the number of files, processing can take minutes to many hours.
Click on your run in the sidebar to view run details and metadata, slide thumbnails, and processing status for each slide. The status icon updates as processing progresses.
When processing completes, Atlas H&E-TME provides comprehensive tumor microenvironment analysis results for each processed slide:
What You'll Receive:
- Tissue analysis: Identification of tissue regions (tumor, stroma, necrosis, etc.) with quality assessment in GeoJSON format
- Cell analysis: Individual cells detected and classified by type (tumor cells, immune cells, stromal cells, etc.) in GeoJSON format
- Visual segmentation maps: Color-coded images showing spatial distribution of tissue and cell types
- Quantitative measurements: Cell counts, densities, spatial relationships, and statistical summaries provided in CSV format
Downloading Results:
When processing completes, the status icon changes to show completion. To download results:
- Click the "Download Results" button
- The system downloads a ZIP file containing all outputs to your computer
Inspecting Results in QuPath:
QuPath integration provides the most powerful way to visualize and interact with your results:
- Click "Open in QuPath" (requires QuPath extension - see Advanced Setup below)
- The system automatically creates a QuPath project with your slides and annotations loaded
- In QuPath, you can:
- View tissue and cell annotations overlaid on your slides
- Explore cell classifications and measurements
- Analyze spatial relationships between different cell types
- Export annotations or perform additional analysis
Congratulations! You have successfully downloaded a public dataset, submitted an Atlas H&E-TME analysis run, and learned how to access and inspect your results.
💡 The Launchpad features a growing ecosystem of extensions that seamlessly integrate with standard digital pathology tools. To use the Launchpad with all available extensions, run
uvx --from "aignostics[qupath,marimo]" aignostics launchpad. Currently available extensions are:
The Python SDK includes the Aignostics CLI, a Command-Line Interface (CLI) that allows you to interact with the Aignostics Platform directly from your terminal or shell script.
New to CLI? See Installation section above to get started.
Common workflows:
- Download public datasets from NCI Image Data Commons
- Submit batch processing runs for multiple slides
- Monitor run status and download results incrementally
- Automate repetitive tasks with shell scripts
See as follows for a simple example where we download a sample dataset for the Atlas H&E-TME application, submit an application run, and download the results.
- Open a terminal or command prompt
- Use the following commands to run the Atlas H&E-TME application on a sample dataset:
# Download a sample dataset from the NCI Image Data Commons (IDC) portal to your current working directory
# As the dataset id refers to the TCGA LUAD collection, this creates a directory tcga_luad with the DICOM files
uvx aignostics dataset idc download 1.3.6.1.4.1.5962.99.1.1069745200.1645485340.1637452317744.2.0 data/
# Prepare the metadata for the application run by creating a metadata.csv, extracting
# the required metadata from the DICOM files. We furthermore add the required
# information about the tissue type and disease.
uvx aignostics application run prepare he-tme data/tcga_luad/run.csv data/
# Edit the metadata.csv to insert the required information about the staining method, tissue type and disease
# Adapt to your favourite editor
nano tcga_luad/metadata.csv
# Upload the metadata.csv and referenced whole slide images to the Aignostics Platform
uvx aignostics application run upload he-tme data/tcga_luad/run.csv
# Submit the application run and print the run id
uvx aignostics application run submit he-tme data/tcga_luad/run.csv
# Check the status of the application run you submitted
uvx aignostics application run list
# Incrementally download results when they become available
# Fill in the id from the output in the previous step
uvx aignostics application run result download APPLICATION_RUN_ID
For convenience the application run execute command combines preparation, upload, submission and download.
The below is equivalent to the above, while adding additionally required metadata using a mapping:
uvx aignostics dataset idc download 1.3.6.1.4.1.5962.99.1.1069745200.1645485340.1637452317744.2.0 data/
uvx aignostics application run execute he-tme data/tcga_luad/run.csv data/ --mapping ".*\.dcm:staining_method=H&E,tissue=LUNG,disease=LUNG_CANCER"
The CLI provides extensive help:
uvx aignostics --help                           # list all spaces such as application, dataset, bucket and system,
uvx aignostics application --help               # list subcommands in the application space
uvx aignostics application run --help           # list subcommands in the application run sub-space
uvx aignostics application run list --help      # show help for specific command
uvx aignostics application run execute --help   # show help for another command
Check out our CLI reference documentation to learn about all commands and options available.
The Python SDK includes the Aignostics Python Library for integration with your Python codebase.
New to Python Library? See Installation section above to get started.
Add the Aignostics Python SDK to your Python project:
Install with uv:
uv add aignosticsInstall with pip:
# Add Python SDK as dependency to your project
pip install aignosticsThe following snippet shows how to use the Client to submit an application run:
from aignostics import platform

# initialize the client
client = platform.Client()
# submit an application run
application_run = client.runs.submit(
   application_id="test-app",
   items=[
      platform.InputItem(
         external_id="slide-1",
         input_artifacts=[
            platform.InputArtifact(
               name="whole_slide_image",
               download_url="<a signed url to download the data>",
               metadata={
                  "checksum_base64_crc32c": "AAAAAA==",
                  "resolution_mpp": 0.25,
                  "width_px": 1000,
                  "height_px": 1000,
               },
            )
         ],
      ),
   ],
)
# wait for the results and download incrementally as they become available
application_run.download_to_folder("path/to/download/folder")
Please look at the notebooks in the example folder for a more detailed example
and read the
client reference documentation
to learn about all classes and methods.
Important
Before you get started, you need to set up your authentication credentials if
you did not yet do so! Please visit
your personal dashboard on the Aignostics Platform website
and follow the steps outlined in the Use in Python Notebooks section.
The Python SDK includes ready-to-use Marimo notebooks that demonstrate platform interaction patterns. These notebooks are ideal for:
- Learning the API through interactive examples
- Prototyping custom analysis workflows
- Integrating with existing data science pipelines
The example notebooks use our "Test Application" (free for all users). To run them, please follow the steps outlined in the snippet below to clone this repository and start the Marimo (examples/notebook.py) notebook:
# clone the `python-sdk` repository
git clone https://github.com/aignostics/python-sdk.git
# within the cloned repository, install the SDK and all dependencies
uv sync --all-extras
# show marimo example notebook in the browser
uv run marimo edit examples/notebook.py
💡 You can also run a notebook within the Aignostics Launchpad. To do so, select the Run you want to inspect in the left sidebar, and click the button "Open in Python Notebook".
The following sections provide technical details for advanced use cases. These examples use the "Test Application" - a free application available to all users for testing and development purposes.
When creating an application run, you need to specify the application_id and optionally the
application_version (version number) of the application you want to run. If you omit the version,
the latest version will be used automatically. Additionally, you need to define the input items you
want to process in the run. The input items are defined as follows:
platform.InputItem(
    external_id="1",
    input_artifacts=[
        platform.InputArtifact(
            name="whole_slide_image", # defined by the application version's input artifact schema
            download_url="<a signed url to download the data>",
            metadata={ # defined by the application version's input artifact schema
                "checksum_base64_crc32c": "N+LWCg==",
                "resolution_mpp": 0.46499982,
                "width_px": 3728,
                "height_px": 3640,
            },
        )
    ],
),
For each item you want to process, you need to provide a unique reference
string. This is used to identify the item in the results later on. The
input_artifacts field is a list of InputArtifact objects, which defines what
data & metadata you need to provide for each item. The required artifacts depend
on the application version you want to run - in the case of test application,
there is only one artifact required, which is the image to process on. The
artifact name is defined as whole_slide_image for this application.
The download_url is a signed URL that allows the Aignostics Platform to
download the image data later during processing.
To make the whole slide images you want to process available to the Aignostics Platform, you
need to provide a signed URL that allows the platform to download the data.
Self-signed URLs for files in google storage buckets can be generated using the
generate_signed_url
(code).
We expect that you provide the required credentials for the Google Storage Bucket
Now that you have an overview of the Aignostics Python SDK and its interfaces, here are some recommended next steps to deepen your understanding and get the most out of the platform:
- Understand the platform: Read the Aignostics Platform Overview to learn about architecture and core concepts
- Review detailed documentation: See the CLI reference and Python Library reference
- Explore QuPath integration: Use the QuPath extension to visualize and interact with your results
- Get support: Contact support@aignostics.com or check the full documentation
The Aignostics Platform is a comprehensive cloud-based service that allows organizations to leverage advanced computational pathology applications without the need for specialized expertise or complex infrastructure. Via its API it provides a standardized, secure interface for accessing Aignostics' portfolio of advanced computational pathology applications. These applications perform machine learning based tissue and cell analysis on histopathology slides, delivering quantitative measurements, visual representations, and detailed statistical data.
Aignostics Platform offers key features designed to maximize value for its users:
- Run Aignostics applications: Run Aignostics advanced computational pathology applications like Atlas H&E-TME on your whole slide images (WSIs) and receive results in a easy to inspect formats.
- Multiple Access Points: Interact with the platform via various pathways, from Aignostics Launchpad (desktop application for MacOS, Windows and Linux), Aignostics CLI (command-line interface for your terminal or shell scripts), Example Notebooks (we support Jupyter and Marimo), Aignostics Client Library (for integration with your Python codebase), or directly through the API of the Aignostics Platform (for integration with any programming language). Contact your business partner at Aignostics if you are interested to discuss a direct integration with your Imaging Management Systems (IMS) and Laboratory Information Management Systems (LIMS).
- Secure Data Handling: Maintain control of your slide data through secure self-signed URLs. Results are automatically deleted after 30 days, and can be deleted earlier by the user.
- High-throughput processing with incremental results delivery: Submit up to 500 whole slide images (WSI) in one batch request. Access results for individual slides as they completed processing, without having to wait for the entire batch to finish.
- Standard formats: Support for commonly used image formats in digital pathology such as pyramidal DICOM, TIFF, and SVS. Results provided in standard formats like QuPath GeoJSON (polygons), TIFF (heatmaps) and CSV (measurements and statistics).
To start using the Aignostics Platform and its advanced applications, your organization must be registered by our business support team:
- Access to the Aignostics Platform requires a formal business agreement. Once an agreement is in place between your organization and Aignostics, we proceed with your organization's registration. If your organization does not yet have an account, please contact your account manager or email us at support@aignostics.com to express your interest.
- To register your organization, we require the name and email address of at least one employee, who will be assigned the Administrator role for your organisation. Your organisation's Administrator can invite and manage additional users.
Important
- All user accounts must be associated with your organization's official domain. We do not support the registration of private or personal email addresses.
- For security, Two-Factor Authentication (2FA) is mandatory for all user accounts.
- We can integrate with your IDP system (e.g. SAML, OIDC) for user authentication. Please contact us to discuss the integration.
- Registering your organistation typically takes 2 business days depending on the complexity of the signed business agreement and specific requirements.
The web-based Aignostics Console is a user-friendly interface that allows you to manage your organization, applications, quotas, and users registered with the Aignostics Platform.
- The Console is available to users registered for your organisation to manage their profile and monitor usage of their quota.
- Administrators of your organization can invite additional users, manage the organisation and user specific quotas and monitor usage.
- Both roles can trigger application runs.
An application is a fully automated advanced machine learning based workflow composed of one or more specific tasks (e.g. Tissue Quality Control, Tissue Segmentation, Cell Detection, Cell Classification and predictive analysis). Each application is designed for a particular analysis purpose (e.g. Tumor Micro Environment analysis or biomarker scoring). For each application we define input requirements, processing tasks and output formats.
As contracted in your business agreement with Aignostics your organisation subscribes to one or more applications. The applications are available for your organization in the Aignostics Platform. You can find the list of available applications in the Console of the Aignostics Platform.
Each application can have multiple versions. Please make sure you read dedicated application documentation to understand its specific constraints regarding acceptable formats, staining method, tissue types and diseases.
Once registered to the Platform, your organization will automatically gain access to the "Test Application". This application can be used to configure the workflow and to make sure that the integration works correctly.
To trigger the application run, users can use the Aignostics Launchpad, Aignostics CLI, Example Notebooks, our Client Library, or directly call the REST API. The platform expects the user payload, containing the metadata and the signed URLs to the whole slide images (WSIs). The detailed requirements of the payload depend on the application and are described in the documentation, and accessible via the Info button in the Launchpad, as well as via the CLI and /v1/applications endpoint in the API.
When the application run is created, it can be in one of the following states:
- received: the application run received from the client
- scheduled: the application run request is valid and is scheduled for execution
- running: the application run execution started
- completed: the application run execution is done and all outputs are available for download
- completed: the application run execution is done, but some items end up in the failed state
- rejected: the application run request is rejected before it is scheduled
- cancelled by the system: the application run failed during the execution with the number of errors higher than the threshold
- cancelled by the user: the application run is cancelled by the user before it is finished
The status and operations of an application run are private to the user who triggered the run.
When the processing of whole slide image is successfully completed, the resulting outputs become available for download. To assess specifics of application outputs please consult our application specific documentation, which you can find in the Console. Please note that you access to documentation is restricted to those applications your organisation subscribed to.
Application run outputs are automatically deleted 30 days after the application run has completed. However, the owner of the application run (the user who initiated it) can use the API to manually delete outputs earlier, once the run has reached a final state - completed, cancelled by the system or cancelled by the user. The Launchpad and CLI provide enable to delete results with one click resp. command.
Every organization has a limit on how many WSIs it can process in a calendar month. The following quotas exist:
- Per organization: as defined in your business agreement with Aignostics
- Per user: defined by your organization Admin
When the per month quota is reached, an application run request is denied.
Other limitations may apply to your organization:
- Allowed number of users an organization can register
- Allowed number of images user can submit per application run
- Allowed number of parallel application runs for the whole organization
Additionally, we allow organization Admin to define following limitations for its users:
- Maximum number of images the user can process per calendar month.
- Maximum number of parallel application runs for a given user
Visit the Console to check your current quota and usage. The Console provides a clear overview of the number of images processed by your organization and by each user, as well as the remaining quota for the current month.
The Aignostics Platform API is a RESTful web service that allows you to interact with the platform programmatically. It provides endpoints for submitting whole slide images (WSIs) for analysis, checking the status of application runs, and retrieving results.
You can interact with the API using the Python client, which is a wrapper around the RESTful API. The Python client simplifies the process of making requests to the API and handling responses. It also provides convenient methods for uploading WSIs, checking application run status, and downloading results.
For integration with programming languages other than Python, you can use the RESTful API directly. The API is designed to be language-agnostic, meaning you can use any programming language that supports HTTP requests to interact with it. This includes languages like Java, Kotlin, C#, Ruby, and Typescript.
Every WSI processed by the Platform generates a cost. Usage of the "Test Application" is free of charge for any registered user. The cost for other applications is defined in your business agreement with Aignostics. The cost is calculated based on the number of slides processed. When an application run is cancelled, either by the system or by the user, only processed images incur a cost.
Read the API reference documentation or use our Interactive API Explorer to dive into details of all operations and parameters.
- Inspect our security policy with detailed documentation of checks, tools and principles.
- Inspect how we achieve operational excellence with information on our modern toolchain and software architecture.
- Check out the CLI reference with detailed documentation of all CLI commands and options.
- Check out the library reference with detailed documentation of public classes and functions.
- Check out the API reference with detailed documentation of all API operations and parameters. See as well the OpenAPI Specification in JSON and YAML, and the API Explorer.
- Our release notes provide a complete log of recent improvements and changes.
- We gratefully acknowledge the numerous open source projects that this project builds upon. Thank you to all these wonderful contributors!
Administrator Role
A user role within an organization that has permissions to invite and manage additional users, define user-specific quotas, and monitor organizational usage.
Aignostics CLI
Command-Line Interface that allows interaction with the Aignostics Platform directly from terminal or shell scripts, enabling dataset management and application runs.
Aignostics Client Library
Python library for seamless integration of the Aignostics Platform with enterprise image management systems and scientific workflows.
Aignostics Console
Web-based user interface for managing organizations, applications, quotas, users, and monitoring platform usage.
Aignostics Launchpad
Graphical desktop application (available for Mac OS X, Windows, and Linux) that allows users to run computational pathology applications on whole slide images and inspect results with QuPath and Python Notebooks.
Aignostics Platform
Comprehensive cloud-based service providing standardized, secure interface for accessing advanced computational pathology applications without requiring specialized expertise or complex infrastructure.
Aignostics Platform API
RESTful web service that allows programmatic interaction with the Aignostics Platform, providing endpoints for submitting WSIs, checking application run status, and retrieving results.
Aignostics Python SDK
Software Development Kit providing multiple pathways to interact with the Aignostics Platform, including the Launchpad, CLI, Client Library, and example notebooks.
Application
Fully automated advanced machine learning workflow composed of specific tasks (e.g., Tissue Quality Control, Tissue Segmentation, Cell Detection, Cell Classification) designed for particular analysis purposes.
Application Run
The execution instance of an application on submitted whole slide images, which can be in various states: received, scheduled, running, completed, rejected, cancelled by system, or cancelled by user.
Application Version
Specific version of an application with defined input requirements, processing tasks, and output formats. Each application can have multiple versions.
Atlas H&E-TME
Advanced computational pathology application for Hematoxylin and Eosin-stained Tumor Microenvironment analysis.
Base MPP (Microns Per Pixel)
Metadata parameter specifying the resolution of whole slide images, indicating the physical distance represented by each pixel.
Business Agreement
Formal contract between an organization and Aignostics required for platform access, defining quotas, applications, and terms of service.
Checksum CRC32C
Cyclic Redundancy Check used to verify data integrity of uploaded whole slide images.
Client
The main class in the Aignostics Python SDK used to initialize connections and interact with the platform API.
Computational Pathology
Field combining digital pathology with artificial intelligence and machine learning to analyze histopathology slides quantitatively.
Aignostics Console
Web-based user interface for managing organizations, applications, quotas, users, and monitoring platform usage.
DICOM (Digital Imaging and Communications in Medicine)
Standard format for medical imaging data, supported by the Aignostics Platform for whole slide images.
Download URL
Signed URL that allows the Aignostics Platform to securely download image data during processing.
GeoJSON
Standard format used by QuPath for representing polygonal annotations and results.
Google Storage Bucket
Cloud storage service where users can store whole slide images and generate signed URLs for platform access.
H&E (Hematoxylin and Eosin)
Common histological staining method for tissue visualization, used in Atlas H&E-TME application.
Heatmaps
Visual representations of analysis results provided in TIFF format showing spatial distribution of measurements.
IDC (NCI Image Data Commons)
Public repository of medical imaging data that can be queried and downloaded through the Aignostics CLI.
IMS (Imaging Management Systems)
Enterprise systems for managing medical imaging data that can be integrated with the Aignostics Platform.
Input Artifact
Data object required for application processing, including the actual data file and associated metadata.
Input Item
Individual unit of processing in an application run, containing one or more input artifacts with a unique reference identifier.
Interactive API Explorer
Tool for exploring and testing API endpoints and parameters interactively.
Jupyter
Popular notebook environment supported by the Aignostics Platform for interactive analysis and visualization.
LIMS (Laboratory Information Management Systems)
Laboratory systems that can be integrated with the Aignostics Platform for workflow automation.
Marimo
Modern notebook environment supported by the Aignostics Platform as an alternative to Jupyter.
Metadata
Descriptive information about whole slide images including dimensions, resolution, tissue type, and disease information required for processing.
MPP (Microns Per Pixel)
See Base MPP.
NCI Image Data Commons (IDC)
See IDC.
Operational Excellence
Aignostics' commitment to high-quality software development practices including A-grade code quality, security scanning, and comprehensive documentation.
Pyramidal
Multi-resolution image format that stores the same image at different zoom levels for efficient viewing and processing.
Python SDK
Software Development Kit providing multiple pathways to interact with the Aignostics Platform through Python programming language.
QuPath
Open-source software for bioimage analysis that can be launched directly from the Aignostics Launchpad to view results.
Quota
Limit on the number of whole slide images an organization or user can process per calendar month, as defined in business agreements.
Reference
Unique identifier string for each input item in an application run, used to match results with original inputs.
Results
Output data from application processing, including measurements, statistics, heatmaps, and annotations, automatically deleted after 30 days.
RESTful API
Architectural style for web services that the Aignostics Platform API follows, enabling language-agnostic integration.
Self-signed URLs
Secure URLs with embedded authentication that allow the platform to access user data without exposing credentials.
SVS
Aperio ScanScope Virtual Slide format, commonly used for whole slide images and supported by the platform.
Test Application
Free application automatically available to all registered organizations for workflow configuration and integration testing.
TIFF (Tagged Image File Format)
Standard image format supported for both input whole slide images and output heatmaps.
Tissue Segmentation
Computational process of identifying and delineating different tissue regions within histopathology slides.
TME (Tumor Microenvironment)
The cellular environment surrounding tumor cells, analyzed by the Atlas H&E-TME application.
Two-Factor Authentication (2FA)
Mandatory security requirement for all user accounts on the Aignostics Platform.
UV
Modern Python package manager used for dependency management and project setup in the SDK documentation.
UVX
Tool for running Python applications directly without explicit installation, used to execute Aignostics CLI commands.
Whole Slide Image (WSI)
High-resolution digital image of an entire histopathology slide, the primary input format for computational pathology applications.
Workflow
Sequence of automated processing steps within an application that transform input images into analytical results.