
Assetto Corsa is a racing simulation game that allows players to drive a variety of cars on different tracks. AC Interface lets robots drive cars in Assetto Corsa.
To define your own and allow it to control a car in the game create a class that inherits from aci.interface.AssettoCorsaInterface and define a function named behaviour(self, observation: Dict) -> np.array.
To test your agent create a main method that instances your new Agent class and calls agent.run().
As an example here is an agent that does nothing:
from aci.interface import AssettoCorsaInterface

class MyCoolAgent(AssettoCorsaInterface):
	def behaviour(self, observation: Dict) -> np.array:
		return np.array([0.0, 0.0, 0.0])

if __name__=="__main__":
	agent = MyCoolAgent()
	agent.run()
More examples of how to do this can be found in the /examples folder.
An example of using our interface to record a game session is:
from aci.recorder import AssettoCorsaRecorder


if __name__ == "__main__":
    save_path = "./test/monza_audi_r8_lms_1"
	recorder = AssettoCorsaRecorder()
    recorder.run(save_path)
To finish recording use a keyboard interrupt (crt+c) on the terminal running the script.
As Assetto Corsa is a windows native application it needs be run using a compatibility tool. Currently we support using CrossOver or Steam's Proton.
Instructions
We support running Assetto Corsa with a compatability tool called Crossover by the CodeWeavers team. They offer a 14-day trial. A perpetual license is $74 USD at the time of writing, this licsense can be used for all operating systems according to their FAQ.
- Once CrossOver is installed, go to the "Install" tab and search for "Assetto Corsa". You should see the image below.
- Click yes to everything. .NET 2.0 does not install correctly so just skip this step when prompted.
- It will build a 'container' (this is called a "bottle", see Wine for details).
- IMPORTANT when prompted to start steam during the install, click yes and sign in. Not doing this step will result in installation being broken. Once you have signed in it will prompt you to install AC.
- If you do not have Assetto Corsa, then it is available via Humble Bundle or Steam.

Open AC and drive a car to check that everything is working as expected.
To write out image files faster we need to make sure an additional package is installed by running sudo apt-get install libturbojpeg prior to running make build.
AC has to run in WINE which means we cannot directly access the game state via shared memory.
To get around this we use a python script running inside the same WINE instance as the game to access the game state which it then makes available to the host OS via a socket.
Crossover doesn't come with python so first we need to install that using the Install an unlisted application button in the Install tab.
When installing python select to install it for all users in the Advanced Menu.
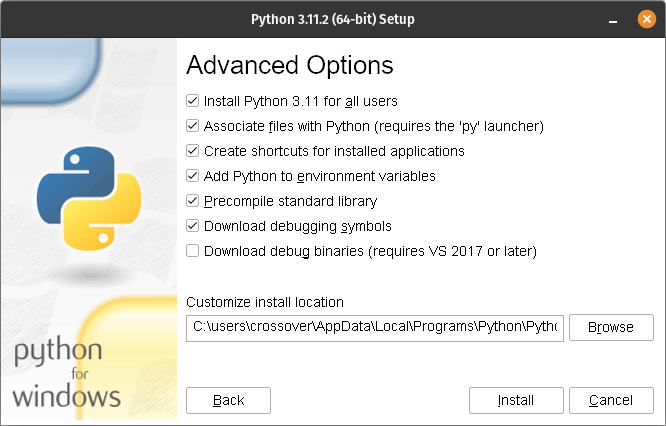
Now we should be able to call python and its related packages from the bottle's command line.
To verify this, in crossover click Run Commnad and in the Command field type python, this should launch your Python (version 3.11 in our example) interactive terminal.
NOTE: Python 3.12 seems top cause issues with WINE so stick to versions 3.11 and under
Next install git using the same approach by hitting Install an unlisted application button in the Install tab.
Selecting the git windows installer you downloaded and follow the prompts.
If the installer hangs on "Running post install sciprts" feel free to terminate the process from your task monitor.
Crossover will complain that the program did not install sucessfully but git will still work.
Install the state server into the bottle by ruinning:
/opt/cxoffice/bin/wine --bottle Assetto_Corsa --cx-app pip install git+https://github.com/Adelaide-Autonomous-Racing-Challenge/ac-state.git
In linux, do this to make sure the python uinput module has access to the kernel uinput module.
sudo modprobe uinput
sudo chmod a+r+w /dev/uinputContent Manager and Mods
Content Manager (CM) replaces the original game launching menu with a much better one with many additional features. CM gives the ability to easily install mods such as new cars, tracks, visual improvements, and python apps to the game. Although it is possible to do this without CM there is a free version with many features. CM also makes it easy to install two important visual improvement mods Custom Shaders Patch and Sol. These two mods update the games graphics, textures, and functionality to include more weather and times of day. You can find more information on Custom Shaders Patch (CSP) discord and Sol-Pure discord. There are two versions of CM and CSP, free and paid. Both are relatively cheap for the amount of work that has gone into them only being a few dollars each. You can get away with free CSP but RainFX will not be available.
I have tested the install in the Assetto Corsa bottle with Windows 10 64-bit. First you will need to install all the dependencies of CM in the crossover bottle. This includes Visual C++ Redistributable x86, DirectX Runtime June 2010, and DirectX 10/11 for 3D-related functions. I didn't have any success getting DirectX 10/11 installed but this didn't seem to effect the rest of the installation.
Next we want to download CM from here. Extract the .exe file and rename it Content Manager Safe.exe. This stops CM from using hardware acceleration for the GUI. In Crossover select the bottle and then Install Application into Bottle then Install unlisted application. Select Content Manager Safe.exe as the installed file and click install. A menu should pop-up, I didn't need to select anything on this menu at all, just click 'OK' down the bottom. Don't click on Make desktop icon as this closes the menu without finishing the install. CM should then open up. In CM go to the Settings tab and navigate to Settings->Content Manager->Appearance->System and tick 'Disable windows transparency' and 'Disable hardware acceleration for UI'. Once this is done we no longer need to have 'Safe' in the .exe file to run. You can now close CM, beware that the install doesn't finish. This is fine you can cancel the install.
Next we want to navigate to the Assetto Corsa root folder which should be something like this: ~/.cxoffice/Assetto_Corsa/drive_c/Program Files (x86)/Steam/steamapps/common/assettocorsa. Rename the original launcher AssettoCorsa.exe to AssettoCorsa_original.exe. Then copy in the Content Manager Safe.exe and rename it AssettoCorsa.exe. Now when launching Assetto Corsa it will launch CM as the default launcher.
We are now ready to install CSP and Sol. Open Crossover and go to the Assetto Corsa bottle. Go to Control Panels->Wine Configuration->Libraries and add in dwrite.dll (it should be in the drop down menu). This is needed for CSP to work. Open Assetto Corsa (which should open with CM as the launcher now) and go to Settings->Custom Shaders Patch and install it. I have tested with both 0.1.79 and 0.1.80-preview115 (paid version). With this installed we can also install Sol, you will need to signup to Racedepartment and download the instructions. Make sure to follow the instructions in the pdf.
To check if this is working go into a practice race and set the time to 22:00. If the track is dark and the time doesn't default to 18:00 all should be good to go.
Instructions
- Install the linux native version of steam from here.
- In Steam, right-click Assetto Corsa, go to Properties --> Compatibility, check the 'Force the use of a specific Steam Play compatibility tool' checkbox. click Proton experimental
- Install Assetto Corsa
- After installation, hit play and wait for Assetto Corsa to crash
- Run
scripts/assetto_corsa_ge.sh - Restart Steam
- In Steam, right-click Assetto Corsa, go to Properties --> Compatibility, check the 'Force the use of a specific Steam Play compatibility tool' checkbox. click GE-Proton9-2
- Launch Assetto Corsa
- Download the Assetto Corsa State server executable,
ac-state.exe, from the latest github release - Place
ac-state.exeinto$HOME/.local/share/Steam/steamapps/common/assettocorsaThis will make the state server available to when Assetto Corsa is launched
Installation of Content Manager with proton can be done using the procedure outlined in this gist.
It will be nessicary to substitute paths containing GE-Proton7-55 with the version used by ACI GE-Proton9-2.
You will also need to install three additional fonts into the proton prefixes c drives:
These fonts should be downloaded and placed into $HOME/.local/share/Steam/steamapps/compatdata/244210/pfx/drive_c/windows/Fonts.
If you use ACI in your research please cite us in your work:
@misc{bockman2024aarkopentoolkitautonomous,
      title={AARK: An Open Toolkit for Autonomous Racing Research},
      author={James Bockman and Matthew Howe and Adrian Orenstein and Feras Dayoub},
      year={2024},
      eprint={2410.00358},
      archivePrefix={arXiv},
      primaryClass={cs.RO},
      url={https://arxiv.org/abs/2410.00358},
}