The goal of this project was to create a user-friendly solution to generate segmentation maps using deep learning based semantic image segmentation in an automated way that requires minimal manual labeling by the user.
The goal of semantic image segmentation is to label every single pixel of an image according to what is being shown in the image. In other words, we want to segment, or group, the pixels of an image in a semantic, or meaningful, way. There are a number of use cases for which you might need to have labels for every pixel of an image. We won’t go into all of those use cases here, except to mention the particular use case that motivated this project.
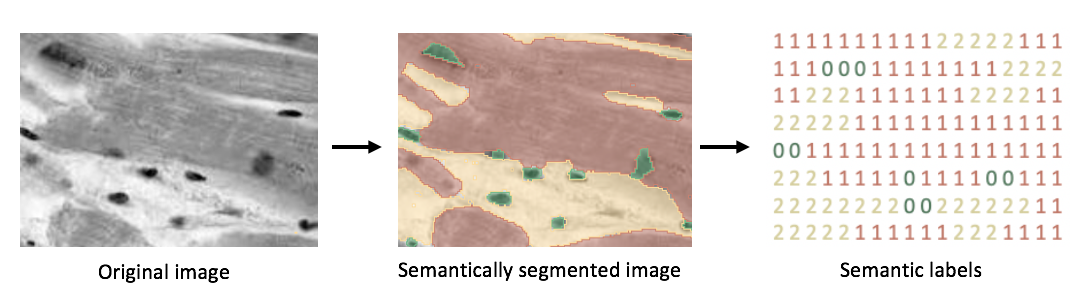
We were given a set of 2D images of mouse heart tissue (essentially slices of heart tissue). These images show collagen, cells, and what we call “background”. We wanted to label every pixel of each image as either collagen, cell, or background. The image on the left below is an image of heart tissue (this is just an example, and not one of the actual images we used). The image in the middle shows the same image after semantic segmentation. The color green corresponds to pixels that are labeled collagen, red corresponds to pixels labeled cell, and yellow corresponds to pixels labeled background. On the right is our desired output, a segmentation map where each pixel is represented by a class label (0 for collagen, 1 for cell, and 2 for background). Please note that this segmentation map is just for demonstration purposes and is not to scale; the size of the segmentation map would actually be the same as the resolution of the original image.
First, let’s consider why you would want to label every pixel of a 2D image of heart tissue as either collagen, cell, or background. Perhaps the proportion of collagen in a heart could tell you something about the well-being of a subject. That single numeric value (proportion of collagen in a heart) could be used as an indicator of whether a subject is in heart failure. Or, even better, that single numeric value (proportion of collagen in a heart) could be used in combination with other information about a subject (age, sex, etc.) in a machine learning model to predict whether or not a subject is in heart failure. Another way to think of it is: we have all of these great images, but how do we turn them into something we can actually use?
Now we know why we want to do semantic image segmentation on these heart images, but how do we actually go about doing it? One way would be to have a person zoom into the image and literally type a label in a matrix (think a 460x460 cell excel sheet) for every pixel. They would look at the pixel in the first row and column of the image, and if that pixel was background, they would type a 2 in the first row and column of the matrix, and then they would move on to the next pixel. This is obviously absurd and would make for a very tedious process. Another way would be for a person to use some kind of paint software to “paint” labels on to an image. They would paint all of the collagen one color, the cells another color, and the background a third color, and then those colors could be easily transformed into a matrix the same size as the original image with values 0, 1, and 2 in it. This process, though very slow and expensive (especially when you consider paying a person to label hundreds or thousands of images), could have been the process used to create the semantically segmented image and semantic labels shown above.
In more recent years, however, people have found ways to make this process even easier and faster by using various types of convolutional neural networks to predict the labels. There are many techniques that are being used to do this, and there are quite a few tools available that do one or more of these techniques inside a nice user interface. Our goal was to find or create a user-friendly solution that integrated some manual labeling by a user with a model we had written to predict the rest of the labels for a set of images. Before deciding to create our own solution, we researched and extensively tested the currently available options. We looked at Supervisely, Labelbox, RectLabel, LabelMe, ilastik, VGG Image Annotator, LabelImg to name a few. While some of these tools have some amazing features and beautiful user interfaces, each of them was lacking something that we needed. Many did not have a paintbrush tool and erase tool, some required paid subscriptions to access all the features (which we were trying to stay away from as this was an academic project), some had free versions but were not open source (which we wanted to stay away from in case we wanted to customize anything in the future), and some simply did not do a good job predicting the labels for our heart images using their built-in algorithms, and didn’t allow us to easily integrate our own custom algorithm.
We then attempted to build our own GUI (graphical user interface) so that it would have exactly the features we wanted and could be easily integrated with our model. We began building GUIs in Tkinter (a Python binding to the Tk GUI toolkit), PyQT5 (a Python binding to the Qt GUI toolkit), and OpenCV’s HighGUI. We quickly learned that building a GUI from scratch in Python is no small feat, and some of the features that were necessary to have in our solution were simply not possible to code in Python. To be more specific, some aspects of the underlying APIs are not exposed via Python, and we would have needed to use C++ instead.
Then, through a fortunate coincidence, we were introduced to 3D Slicer. 3D Slicer is an open source tool for (primarily medical) image processing and visualization. Our final solution leverages 3D Slicer to generate segmentation maps using deep learning based semantic image segmentation in an automated way that requires minimal manual labeling by the user.
Our solution works as follows: first, a user will load images into 3D Slicer, which allows the user to visualize and paint labels on the images. The user will then paint a few labels onto a few of the images. Then the original images and sparse labels will be fed into a UNET deep learning model, which will predict the labels for the rest of the pixels in the rest of the images. Then the original images and new segmentation maps are loaded back into 3D Slicer, and the user will continue to edit some of the labels by hand to help the model learn and make better predictions. Then the original images and newly updated labels are fed back into the model, and even better labels are predicted. This process continues until the user is satisfied with the labels.
At the end of this process the user will have two things: a model that is well trained to perform semantic segmentation on similar images the user may want to label in the future, and very accurate labels for every single pixel of your original images (segmentation maps).
These instructions will help you set up and use our solution on your local machine.
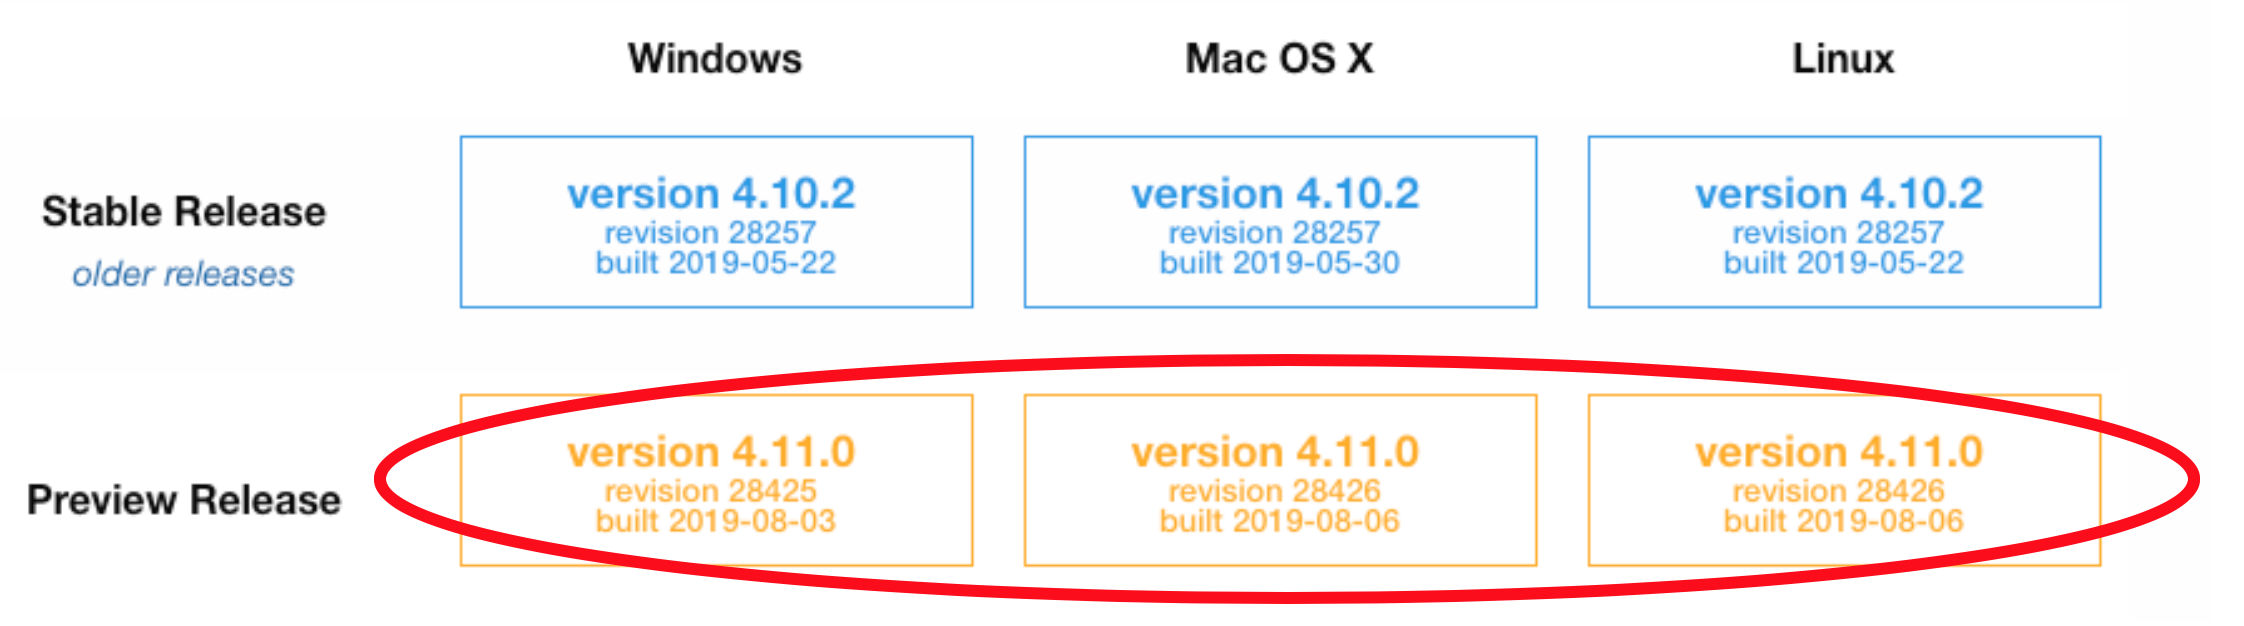
- 3D Slicer Preview Release
- Images of a similar type (saved as .tiff files) that you would like to create segmentation maps for
- Entire
project_folderdownloaded/cloned from this repository
Download 3D Slicer here. You must download the preview release for your operating system! This is because, as of August 2019, the stable release (version 4.10.2) is still using Python 2.
On Mac, do not forget to actually drag the 3D Slicer icon and drop into the Applications folder.
Downloading and installing 3D Slicer will not overwrite or affect any of your other Python installations or libraries.
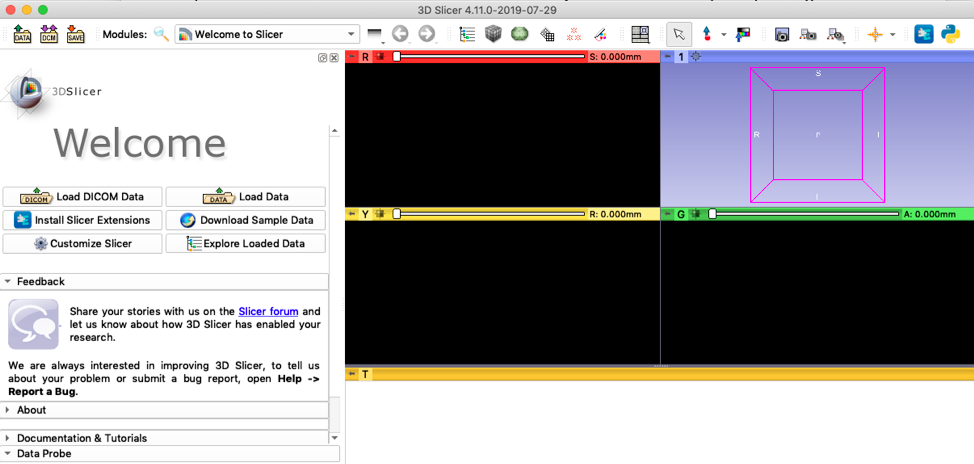
Open 3D Slicer (from inside your Applications folder), and display the Python Interactor by clicking the button at the top right:
On Mac, you may see a pop up stating that 3D Slicer was blocked from opening because it is not from an identified developer. To fix this, go to your System Preferences, Security & Privacy, and click the button that says "Open Anyway".
Download/clone the project_folder located here and put it somewhere where you can easily find it on your computer.
It is very important to set up your file structure in the right way in order for the scripts to run correctly. Go to the project_folder you just downloaded. The files in the project_folder are necessary for the scripts to run, so don’t change the names or delete any files! You can change the name project_folder to something else, but make sure that is reflected in step 7 below.
All you need to do is go to the data folder and add the images you would like to analyze. In the original folder, add your original images. In the reference folder, add any image labels that you happen to have. The reference images are used by the model to compute the accuracy during the optional model testing/validation mentioned in step 15. If you don’t have any previously labeled images to put in the reference folder, that is ok, just leave this folder empty. You cannot leave the original folder empty, however, otherwise the system will not know what images you are trying to analyze!

The images must be .tiff files. If they are not, convert them to .tiff files before placing them in the data folder. They also must use some kind of ordered naming convention, as this is necessary for 3D Slicer to load and reload the images and labels in the correct order. For example, label your images img_0001, img_0002, etc.
We anticipate that you will use this solution for multiple images. However, if you if you have less than three images in your original folder, please see the advanced tip in step 8, as you will need to make some changes to the default settings.
In the Python Interactor, type the following:
pip_install("scipy")
pip_install("matplotlib")
pip_install("tifffile")
pip_install("pynrrd")
pip_install("image")
pip_install("torchvision")
This needs to be done because 3D Slicer comes with its own Python instance (it does not use any other local version of Python you have installed!). It comes with a few packages installed already, but some we need to install ourselves. You will only need to do this once on your local computer.
The steps above are the installation steps that only need to be completed once on your local computer. Below we show you how to use the tool.
Start by opening your 3D Slicer application, if you don't already have it open from the previous steps.
The os package is already installed by default in 3D Slicer, but we need to import it. In the Python Interactor, type the following:
import os
Set the project_path. You will need to change the project path to reflect where your project folder is located on your local computer. For me, I would type this into the Python Interactor:
project_path = "/Users/ericamoreira/Desktop/project_folder"
os.chdir(project_path) # change current directory
Next, we need to do some additional behind the scenes set up, which is all taken care of by typing this into the Python Interactor:
exec(open("scriptsPY/setup.py").read())
Advanced tip: The default settings used by our model are 100 epochs, 3 training images, 3 validation images, and a random seed of 2 (used to select the training and validation images randomly from all images you provide). If you would like to change any of these settings, type the following into the Python Interactor (changing the numbers as desired):
epochs = 100          # number of epochs the model will train for
numbertrainingimg = 3 # number of random examples on which the model is trained
numbervalidimg = 3    # number of random examples on which the model is tested
seed = 2              # random seed
The larger the numbertrainingimg is, the more images your model will learn from. If the model is trained on more images the outcome might be improved, but it will also take more time. numbertrainingimg should never be more than the number of images you provided.
If you don’t understand the advanced tip, don’t worry! You can safely ignore it and the model will just use the default settings.
Finally, we are ready to load the images into 3D Slicer! Type this into the Python Interactor:
exec(open("scriptsPY/loadFiles.py").read())
You will see that your images have been loaded into 3D Slicer. The next step is going to be to paint labels onto your image, but first, let’s quickly go through how to use 3D Slicer. There are a lot of buttons and options on the screen, but most of them you will not need to touch. Here are the buttons you will need to use:

Also, here are some very handy hotkeys to keep in mind:
- Ctrl + click and pull image down: zoom in
- Ctrl + click and pull image up: zoom out
- Shift + click and pull image: drag image
- Ctrl + z: undo
Now that you are familiar with how to use 3D Slicer, you are ready to label your image. Select what you would like to label (collagen/background/cells) and begin to draw on your image using your mouse/trackpad. Here are a few very important points to keep in mind:
- You do not need to label (draw over with the paintbrush) every pixel in your image. In fact, quality is more important than quantity! Since we are doing this initial labeling to “teach” our algorithm how to predict the rest of the labels, we want to give it the best, most efficient examples to learn from.
- To do that, try to label an equal surface area of the image with each of your labels.
- Make sure you use the slider (see picture above) to scroll through and actually label all of your training images.
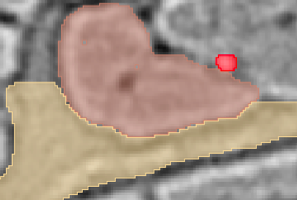
- Try to focus on carefully labeling the shape that you are trying to teach your algorithm, like this:
Once you have labeled all of your training images, save the labels you have drawn by typing the following in the Python Interactor:
exec(open(saveLabels).read())
We need to do some setup in order to run our model to predict the rest of the labels. Type the following in the Python Interactor:
exec(open(startModel).read())
Run the model by typing the following in the Python Interactor:
exec(open(runModel).read())
This may take a while depending on the number of epochs you have chosen! If you use the default of 100 epochs, this should take around 5 minutes. Your 3D Slicer screen will appear frozen, but it is not. Just let it sit and eventually the model will finish running.
Advanced tip: If you want to see the progress of the model, look at the example.png files in the project_folder/results folder. These are just the predictions that the model is making for cropped portions of the original images while the model is training. If you watch them while the model is running, you will actually be able to see how they update as the model is learning!
Again, if you don’t understand the advanced tip, don’t worry! You can safely ignore it.
Once the model has finishing running, if you would like to see how it performed, type the following into the Python Interactor:
exec(open(testModel).read())
This will tell you the accuracy of your model on the set of testing images. The testing set is the set of images that the model did not use to learn how to label. The accuracy tells us how well the model will do on unseen images. This will only work if you provided reference image labels in step 4. If you didn’t, that is not a problem, you can safely move on to step 16.
Predict the labels for the rest of the training images by typing the following into the Python Interactor:
exec(open(predictLabels).read())
This will only predict labels for your training set of images. This is what we want for now.
Load those newly predicted (and hopefully improved) labels into 3D Slicer. Type the following into the Python Interactor:
exec(open(loadFilesLabeled).read())
You will see that the original training images along with the newly predicted labels are displayed in 3D Slicer. Now you can use the paintbrush and eraser to improve upon the labels that the model predicted. We want the model to continue to learn, so essentially, we want to correct the mistakes that the model made and help it do a better job in the next round!
Once you have made some corrections to the labels, save the labels by again typing the following into the Python Interactor:
exec(open(saveLabels).read())
Repeat steps 13 through 19 until you are satisfied with the predictions that your model is making!
Once you are all done, you have trained this model to accurately label the original images that you started with (or images similar to those original images). The last step in the process is to have the model make predictions on ALL of the images so that you have a complete set of segmentation maps (all of your original images have labels for every pixel). To do that, type the following into the Python Interactor:
exec(open(predictAllLabels).read())
The labels will be saved into the results folder.
PLEASE NOTE: The model that you have trained will be saved after every time you run the model (step 14). This way, if you quit and start again the next day, for example, you will not lose the work you have done.
- Erica Moreira - Development - Erica Moreira GitHub
- Maja Garbulinska - Development - Maja Garbulinska GitHub
- Radhakrishna Achanta - Supervision
We would like to acknowledge the contributions of
- Christine Choirat
- Laura Levin-Gleba
as well as the 3D Slicer community for the open source software platform they created and their commitment to facilitating a welcoming user and developer community.
-
Kikinis R, Pieper SD, Vosburgh K (2014) [3D Slicer: a platform for subject-specific image analysis, visualization, and clinical support] (https://link.springer.com/chapter/10.1007/978-1-4614-7657-3_19). [Intraoperative Imaging Image-Guided Therapy] (https://link.springer.com/book/10.1007/978-1-4614-7657-3), Ferenc A. Jolesz, Editor 3(19):277–289 ISBN: 978-1-4614-7656-6 (Print) 978-1-4614-7657-3 (Online)
-
Fedorov A., Beichel R., Kalpathy-Cramer J., Finet J., Fillion-Robin J-C., Pujol S., Bauer C., Jennings D., Fennessy F.M., Sonka M., Buatti J., Aylward S.R., Miller J.V., Pieper S., Kikinis R. 3D Slicer as an Image Computing Platform for the Quantitative Imaging Network. Magn Reson Imaging. 2012 Nov;30(9):1323-41. PMID: 22770690. PMCID: PMC3466397.