The first HEVC style Vision Transformer with advanced multimodal capabilities
📝 Homepage 🤗 Models | 📄 Tech Report (coming) | 📋 Model Card | 📊 Data Card
Video understanding models face a fundamental trade-off: incorporating more frames enables richer temporal reasoning but increases computational cost quadratically. Conventional approaches mitigate this by sparsely sampling frames, however, this strategy discards fine-grained motion dynamics and treats all spatial regions uniformly, resulting in wasted computation on static content.
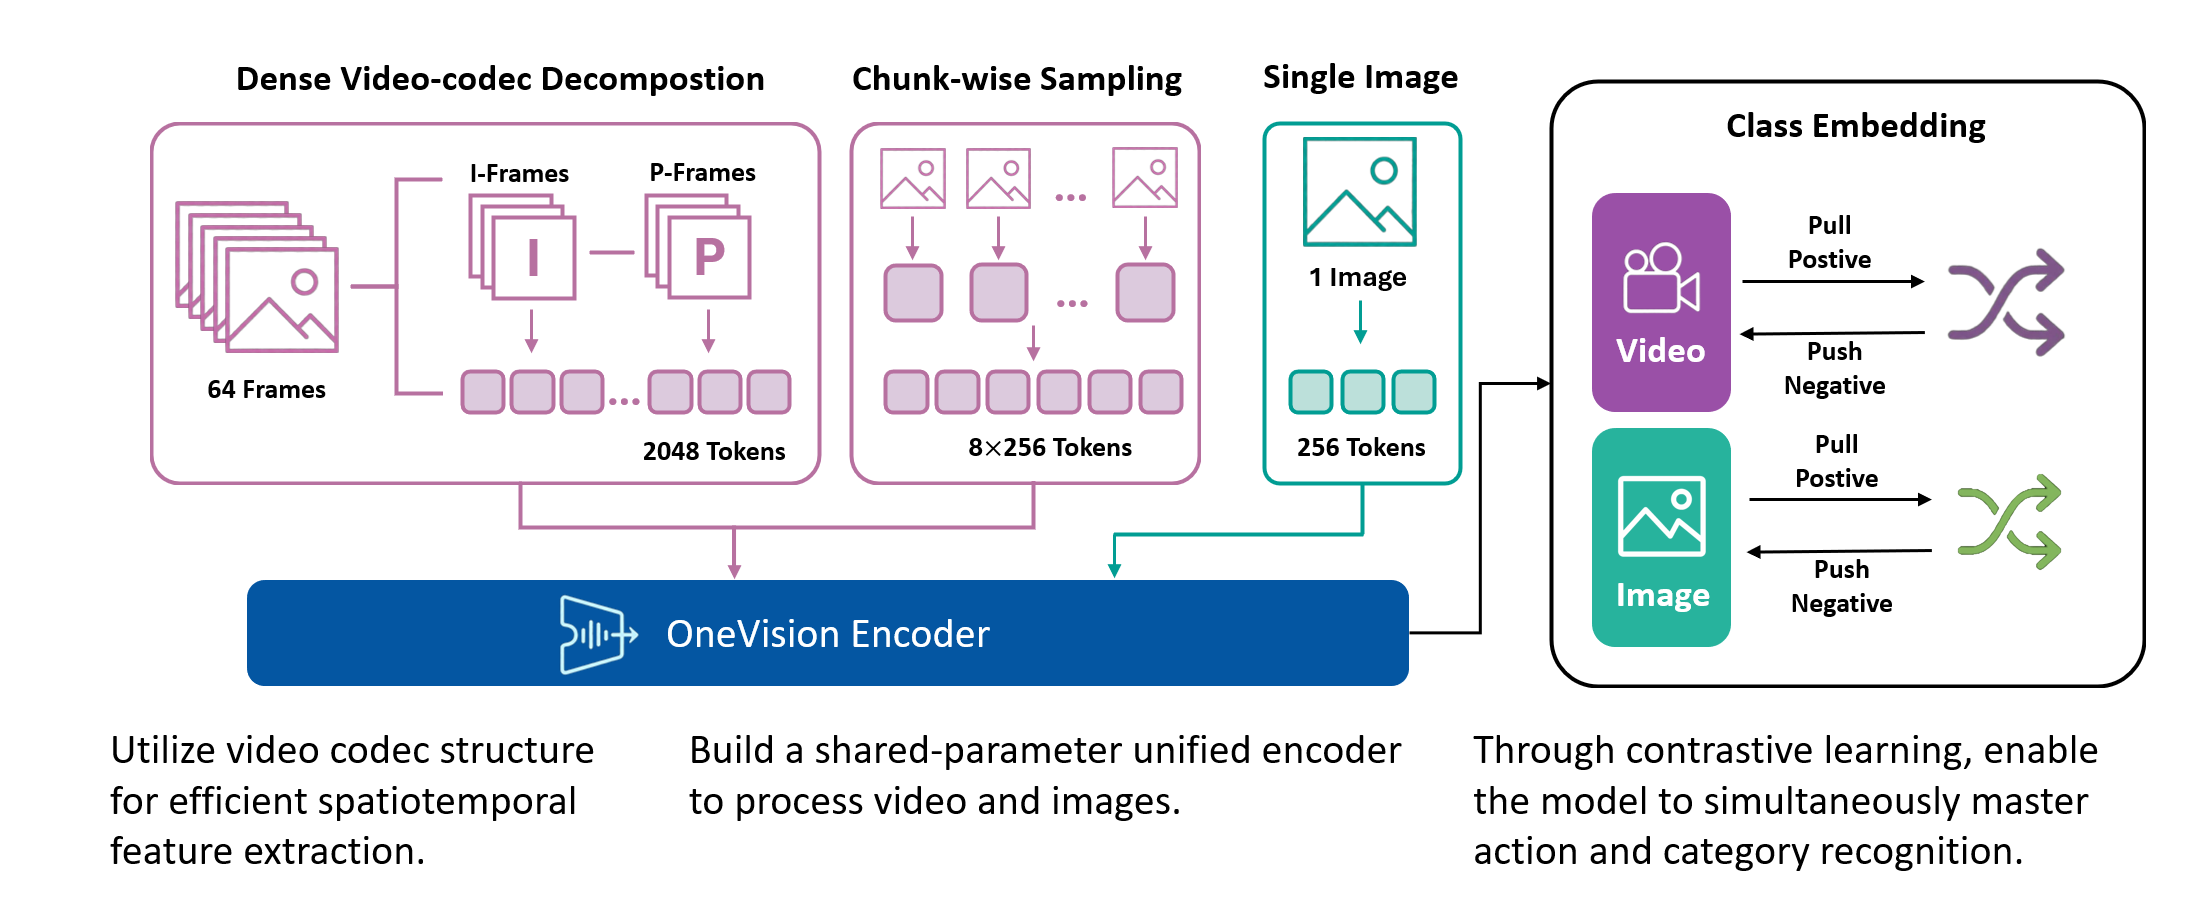
We introduce OneVision Encoder, a vision transformer that resolves this trade-off by drawing inspiration from HEVC (High-Efficiency Video Coding). Rather than densely processing all patches from a few frames, OneVision Encoder sparsely selects informative patches from many frames. This codec-inspired patch selection mechanism identifies temporally salient regions (e.g., motion, object interactions, and semantic changes) and allocates computation exclusively to these informative areas.
Coupled with global contrastive learning over a 2M-scale concept memory bank, OneVision Encoder achieves state-of-the-art performance across major video benchmarks (MVBench, VideoMME, Perception Test), while also delivering strong results on image understanding tasks (DocVQA, ChartQA, and OCRBench).
- Unified Vision Foundation: A single base model for consistent understanding of images, videos, and OCR.
- Codec-Style Patch Selection: Instead of sampling sparse frames densely (all patches from few frames), OneVision Encoder samples dense frames sparsely (important patches from many frames).
- 3D Rotary Position Embedding: Uses a 4:6:6 split for temporal, height, and width dimensions to capture spatiotemporal relationships.
- Global Contrastive Learning: Trained with a 2M concept bank for better-separated semantic clusters.
- Native Resolution Support: Supports native resolution input without tiling or cropping.
- Open Training Data & Pipeline: In addition to the model and code, we will open-source the curated training dataset and the full data processing pipeline.
The visualization below illustrates four different video processing pipelines.
1. Original Video: a continuous 64-frame sequence that preserves the complete temporal context.
2. Uniform Frame Sampling: a conventional strategy that selects 4–8 evenly spaced frames; while simple and efficient, it is inherently lossy and fails to capture fine-grained inter-frame motion.
3. Temporal Saliency Detection: a global analysis of all 64 frames to identify regions rich in temporal information, including motion patterns, appearance variations, and semantic events.
4. Codec-Style Patch Extraction: selective extraction of the temporally salient patches in a zigzag order, achieving 75–98% compression while retaining critical temporal dynamics.
| (1) | (2) | (3) | (4) |
|---|---|---|---|
 |
|||
 |
|||
Standard contrastive learning methods (e.g., CLIP) are fundamentally constrained by batch size, as negative samples are drawn only from the current batch, typically limited to 32K–64K examples. This restriction yields a narrow and incomplete view of the embedding space, often resulting in suboptimal representation learning. In contrast, our approach maintains a global concept bank comprising 2M clustered centers, allowing each training sample to contrast against a diverse and representative set of negatives independent of batch composition. This global contrasting mechanism leads to more discriminative embeddings and well-separated semantic clusters.
We train the model on a mixed dataset comprising 740K samples from LLaVA-OneVision and 800K samples from LLaVA-Video SFT, proceeding directly to Stage-2 fine-tuning. Following a streamlined native-resolution strategy inspired by LLaVA-OneVision, input frames that match the model’s native resolution are fed directly into the network without tiling or cropping, allowing us to fully evaluate the ViT’s native-resolution modeling capability.
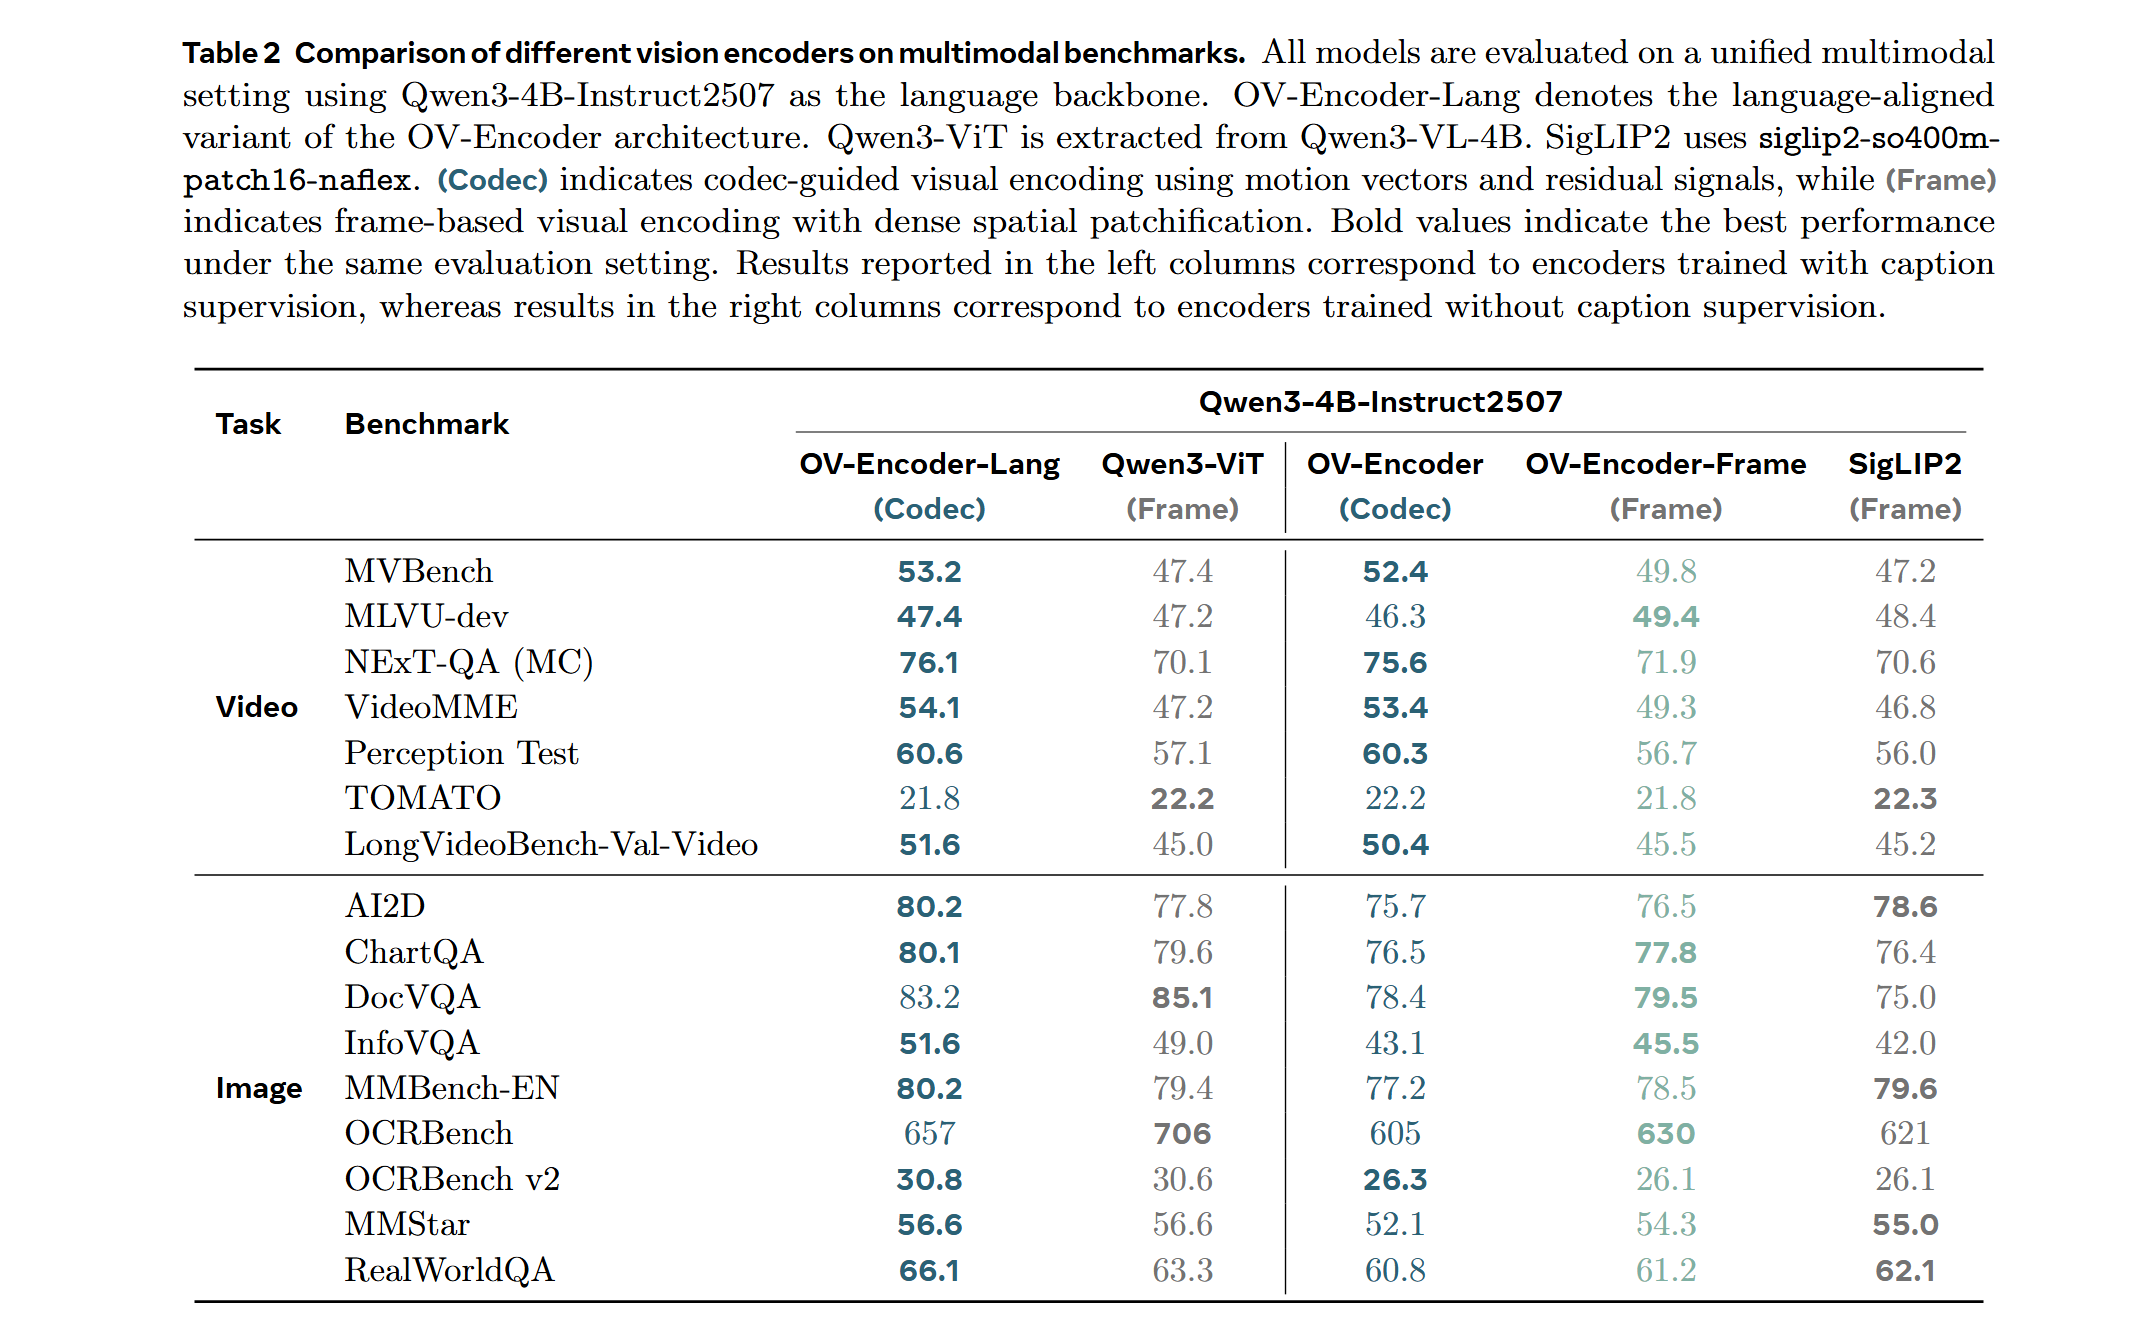
We compare the performance of different vision encoders using the Attentive Probe evaluation protocol. All models are evaluated with a single-clip input and trained for 10 epochs across eight action recognition datasets. The results report both the average accuracy and per-dataset performance under 8-frame and 16-frame input configurations.
Important
Transformers Version Compatibility:
- ✅
transformers==4.53.1(Recommended): Works withAutoModel.from_pretrained() ⚠️ transformers>=5.0.0: Not currently supported. We are actively working on a fix.
Note: This model supports native resolution input. For optimal performance:
- Image: 448×448 resolution (pre-trained)
- Video: 224×224 resolution with 256 tokens per frame (pre-trained)
Use CLIP preprocessing from the model repository.
from transformers import AutoModel, AutoImageProcessor
from PIL import Image
import torch

# Load model and preprocessor
model = AutoModel.from_pretrained(
    "lmms-lab-encoder/onevision-encoder-large",
    trust_remote_code=True,
    attn_implementation="flash_attention_2"
).to("cuda").eval()

preprocessor = AutoImageProcessor.from_pretrained(
    "lmms-lab-encoder/onevision-encoder-large",
    trust_remote_code=True
)

# Image inference: [B, C, H, W]
image = Image.open("path/to/your/image.jpg")  # Replace with your image path
pixel_values = preprocessor(images=image, return_tensors="pt")["pixel_values"].to("cuda")
with torch.no_grad():
    outputs = model(pixel_values)
    # outputs.last_hidden_state: [B, num_patches, hidden_size]
    # outputs.pooler_output: [B, hidden_size]

# Video inference: [B, C, T, H, W] with visible_indices
num_frames, frame_tokens, target_frames = 16, 256, 64
# Load video frames and preprocess each frame (replace with your video frame paths)
frames = [Image.open(f"path/to/frame_{i}.jpg") for i in range(num_frames)]
video_pixel_values = preprocessor(images=frames, return_tensors="pt")["pixel_values"]
# Reshape from [T, C, H, W] to [B, C, T, H, W]
video = video_pixel_values.unsqueeze(0).permute(0, 2, 1, 3, 4).to("cuda")

# Build visible_indices for temporal sampling
frame_pos = torch.linspace(0, target_frames - 1, num_frames).long().cuda()
visible_indices = (frame_pos.unsqueeze(-1) * frame_tokens + torch.arange(frame_tokens).cuda()).reshape(1, -1)
# visible_indices example (with 256 tokens per frame):
#   Frame 0 (pos=0):  indices [0, 1, 2, ..., 255]
#   Frame 1 (pos=4):  indices [1024, 1025, 1026, ..., 1279]
#   Frame 2 (pos=8):  indices [2048, 2049, 2050, ..., 2303]
#   ...
#   Frame 15 (pos=63): indices [16128, 16129, ..., 16383]

with torch.no_grad():
outputs = model(video, visible_indices=visible_indices)git clone https://github.com/EvolvingLMMs-Lab/OneVision-Encoder.git
cd OneVision-Encoder
pip install -e .from onevision_encoder import OneVisionEncoderModel, OneVisionEncoderConfig
from transformers import AutoImageProcessor
model = OneVisionEncoderModel.from_pretrained(
"lmms-lab-encoder/onevision-encoder-large",
trust_remote_code=True,
attn_implementation="flash_attention_2"
).to("cuda").eval()
preprocessor = AutoImageProcessor.from_pretrained(
"lmms-lab-encoder/onevision-encoder-large",
trust_remote_code=True
)Add codec-style input documentation for temporal saliency-based patch selection.
You can set up the environment using one of the following two methods:
conda env create -f environment.yml -n ov_encoder
pip install torch==2.7.0 torchvision==0.22.0 torchaudio==2.7.0 --index-url https://download.pytorch.org/whl/cu118
pip install --extra-index-url https://pypi.nvidia.com --upgrade nvidia-dali-cuda110
pip install -r requirements.txtdocker build -t onevision-encoder:2601 .
docker run -it --rm --gpus all --ipc host --net host --privileged \
-v "$(pwd)":/workspace/OneVision-Encoder \
-w /workspace/OneVision-Encoder \
onevision-encoder:2601 bashInside the container, install the package in editable mode:
pip install -e .bash shells/ov_encoder_base_stage1_si_dry_run.shbash shells/ov_encoder_base_stage1_si.shDownload the Stage-1 checkpoint from HuggingFace:
git clone https://huggingface.co/lmms-lab-encoder/onevision-encoder-large-siDownload the pretraining data and prepare the data directory as per the instructions in data/README.md.
More documentation will be added soon.
bash shells/ov_encoder_large_stage2_residual_8gpus.shTraining configurations and hyperparameters will be documented soon. For now, please refer to --help for available options.
To evaluate the encoder with uniform frame sampling, first navigate to the evaluation directory:
pip install -e .
cd eval_encoder
Then run the following command:
bash shells_eval_ap/eval_ov_encoder_large_16frames.shSampling-Specific Parameters:
frames_token_num: Number of tokens per frame (e.g., 256 tokens for standard sampling).
To evaluate the encoder with codec-style patch selection, first navigate to the evaluation directory:
cd eval_encoderThen run the following command:
bash shells_eval_ap/eval_ov_encoder_large_2kpatches_codec.shCodec-Specific Parameters:
K_keep: Number of patches to keep.cache_dir(optional): Directory for cached codec patches. Use this to specify where codec-selected patches are stored/loaded when you want to persist or reuse them.
The following parameters are common to both evaluation methods:
dataset: Dataset to evaluate on (e.g.,diving48,ssv2,kinetics400). Prepare the dataset according to the Attentive Probe format.num_frames: Total number of frames in the video sequence (e.g., 8 for sampling, 64 for codec).model_weight: Path to the pre-trained model. Uselmms-lab-encoder/onevision-encoder-largeto load directly from HuggingFace, or provide a local path.model_name: Model architecture name (e.g.,hf_llava_vit_large_ln).embedding_size: Size of the embedding dimension (e.g., 1024).batch_size: Training batch size (varies by evaluation type).default_lr_list: Learning rate for the probe training.default_weight_decay: Weight decay for optimization.eval_freq: Evaluation frequency during training.dali_py_num_workers: Number of DALI data loading workers.data_root: Root directory containing your prepared dataset (codec evaluation only).
This project is released under the Apache 2.0 License.
- Model Card - Detailed documentation for OneVision Encoder Large model
- Data Card - Training dataset information and statistics
- nano-hevc – A minimal and educational HEVC (H.265) encoder written in Python, designed to expose the full encoding pipeline and core design principles.