Skip to content
Merged
Show file tree
Hide file tree
Changes from all commits
Commits
Show all changes
15 commits
Select commit Hold shift + click to select a range
3939b31
Remove Individual Workspace references from help pages
MelvinBot Feb 27, 2026
aec734d
Address review feedback: improve consistency and readability in help …
MelvinBot Feb 27, 2026
3c95d9c
Update FAQ to align with simplified plan terminology
MelvinBot Feb 27, 2026
4b9d062
Add New Expensify Personal Karma help page and link from classic article
MelvinBot Mar 11, 2026
9e0c5f5
Update Personal-Karma.md
stephanieelliott Mar 13, 2026
29d2734
Update docs/articles/expensify-classic/expensify-billing/Change-Plan-…
garrettmknight Mar 13, 2026
65c888a
Update docs/articles/expensify-classic/expensify-billing/Change-Plan-…
garrettmknight Mar 13, 2026
e3a63e5
Update docs/articles/expensify-classic/expensify-billing/Change-Plan-…
garrettmknight Mar 13, 2026
71eca4c
Update docs/articles/expensify-classic/expensify-billing/Change-Plan-…
garrettmknight Mar 13, 2026
9e45df6
Update docs/articles/expensify-classic/expensify-billing/Change-Plan-…
garrettmknight Mar 13, 2026
fd5115e
Update docs/articles/expensify-classic/expensify-billing/Change-Plan-…
garrettmknight Mar 13, 2026
4cc4de8
Update docs/articles/expensify-classic/expensify-billing/Change-Plan-…
garrettmknight Mar 13, 2026
35ac1df
Update docs/articles/expensify-classic/expensify-billing/Change-Plan-…
garrettmknight Mar 13, 2026
467c8e5
Update docs/articles/expensify-classic/expensify-billing/Change-Plan-…
garrettmknight Mar 13, 2026
63dd390
Update docs/articles/expensify-classic/expensify-billing/Change-Plan-…
garrettmknight Mar 13, 2026
File filter

Filter by extension

Filter by extension

Conversations
Failed to load comments.
Loading
Jump to
Jump to file
Failed to load files.
Loading
Diff view
Diff view
Original file line number Diff line number Diff line change
Expand Up @@ -69,7 +69,7 @@ Use filters to narrow down the data:
2. Adjust the filters at the top of the page:
- **Date Range** – Select a specific time frame.
- **Merchant Name** – Find expenses from a particular vendor (partial searches work).
- **Workspace** – View expenses for a specific Group or Individual Workspace.
- **Workspace** – View expenses for a specific workspace.
- **Categories** – Filter by category to refine your search.
- **Tags** – Locate expenses based on assigned tags.
- **Submitters** – Find expenses by employee or vendor.
Expand Down
Original file line number Diff line number Diff line change
Expand Up @@ -5,35 +5,14 @@ keywords: [Expensify Classic, workspace plan, subscription]
---


Expensify offers several plans based on your needs: **Track, Submit, Collect, Control,** and **Free**. Your choice depends on whether you manage expenses individually, for a group, or for a company. You may need to upgrade if you hire employees who need access to a **Group Workspace** or require features exclusive to paid plans.
Expensify offers several plans based on your needs: **Collect, Control,** and **Free**. You may need to upgrade if you hire employees who need access to your workspace or require features exclusive to paid plans.

---

# Change a Subscription on an Individual Plan
# Changing Your Subscription

**Web:**
1. Go to **Settings > Workspaces > Individual > [Workspace Name]**.
2. Click **Overview** and select **Switch** under your desired plan.

**Mobile:**
1. Open the Expensify app.
2. Tap the **hamburger menu** (three lines) on the top left.
3. Tap **Settings**.
4. Tap **View All** under your Workspace.
5. Select the Workspace under the **Individual** tab.
6. Tap **Current Plan**.
7. Tap **Switch** to change plans.

## Upgrade to a Group Workspace
1. Go to **Settings > Workspaces > Group**.
2. Select a **Collect** or **Control** plan.

---

# Changing a Subscription on a Group Plan

**Web:**
1. Go to **Settings > Workspaces > Group > [Your Group Workspace]**.
1. Go to **Settings > Workspaces > [Your Workspace]**.
2. Click **Overview** and select **Switch** under your desired plan.

**Mobile:**
Expand All @@ -42,48 +21,32 @@ Expensify offers several plans based on your needs: **Track, Submit, Collect, Co

---

## Adjust Subscription Size
1. Go to **Settings > Workspaces > Group > Subscription**.
## Adjust Annual Subscription Size
1. Go to **Settings > Workspaces > Subscription**.
2. Enter the desired number in the **Subscription size** field.
- If left blank, your subscription size will be set automatically:
- **New Workspaces**: Based on active users in the first month.
- **Existing Workspaces Switching to Annual**: Based on the last month's active users.

## Auto-Increase Subscription Size
1. Go to **Settings > Workspaces > Group > Subscription**.
2. Toggle **Auto-increase annual seats**.
1. Go to **Settings > Workspaces > Subscription**.
2. Toggle **Auto Increase Subscription Size**.
3. When enabled, your subscription size will adjust automatically based on usage, triggering a new 12-month commitment for the updated size.

## Auto-Renew Subscription
1. Go to **Settings > Workspaces > Group > Subscription**.
2. Toggle **Auto-renew** off before your current subscription ends if you do not want it to renew.
- If **Auto-renew** is disabled, your final bill at the annual rate will be issued on the date listed under **Subscriptions**.

---

# Downgrading to a Free Account from an Individual Plan

**Web:**
1. Log in via a web browser.
2. Go to **Settings > Workspaces > Individual > Subscription**.
3. Click **Cancel Subscription**.
- **Note**: The subscription is prepaid for 30 days of unlimited **SmartScanning**. No refunds are issued, but you retain access until the period ends.

**App Store (iOS Users):**
1. Go to the **App Store**.
2. Tap your **Apple ID** > **Subscriptions**.
3. Cancel your Expensify subscription.
- **Note**: This cannot be done within Expensify. Downgrading to a free account must happen from the App Store.
1. Go to **Settings > Workspaces > Subscription**.
2. Toggle **Auto Renew** off before your current subscription ends if you do not want it to renew.
- If **Auto Renew** is disabled, your final bill at the annual rate will be issued on the date listed under **Subscriptions**.

---

# Downgrading to a Free Account from a Group Plan
# Downgrading to a Free Account

## Pay-Per-Use Plan
1. Go to **Settings > Workspaces > Group**.
1. Go to **Settings > Workspaces**.
2. Click the **cog icon** next to your Workspace name.
3. Select **Delete**.
- **Note**: Deleting a Workspace removes its settings and members but does not delete their Expensify accounts.
- **Note**: Only the Billing Owner can delete a Workspace. Deleting a Workspace removes its settings and members but does not delete members' Expensify accounts.
- If any members were active that month (submitted, approved, or edited reports), you will be billed for their usage.

## Annual Subscription
Expand All @@ -99,11 +62,11 @@ Once downgraded, your Workspace will be deleted, and a refund line item will app

# FAQ

## Will I be charged for a monthly subscription even if I don't use SmartScans?
## Will I be charged for my subscription even if I don't use SmartScans?

Yes, monthly subscriptions are prepaid and not usage-based, so you will be charged regardless of activity.
Yes, Collect and Control subscriptions are prepaid and not usage-based, so you will be charged regardless of activity.

## I'm in a Group Workspace. Do I need the monthly subscription too?
## I'm in a workspace. Do I need my own subscription too?

No, Group Workspace members already have unlimited **SmartScans**. However, you can keep a subscription for personal use if you leave your company's Workspace.
No, workspace members already have unlimited **SmartScans**. However, you can keep a subscription for personal use if you leave your company's workspace.

Original file line number Diff line number Diff line change
Expand Up @@ -20,13 +20,7 @@ The fund from your Personal Karma is determined by the expense's MCC (Merchant C

## Setting Up Personal Karma Donations
Copy link
Contributor

Choose a reason for hiding this comment

The reason will be displayed to describe this comment to others. Learn more.

I think we need to create a new help page for this one. We're changing Personal Karma to only be downgraded via New Expensify. Users will be able do enable/disable in Settings > Save the World > Personal Karma. That's being implemented here: https://github.com/Expensify/Expensify/issues/601130

Copy link
Contributor

Choose a reason for hiding this comment

The reason will be displayed to describe this comment to others. Learn more.

Then we'll want to link that help page here.

Copy link
Contributor Author

@MelvinBot MelvinBot Mar 11, 2026

Choose a reason for hiding this comment

The reason will be displayed to describe this comment to others. Learn more.

Created a new help page at docs/articles/new-expensify/settings/Personal-Karma.md documenting the New Expensify path (Settings > Save the World > Personal Karma) for enabling/disabling Personal Karma.

Updated the classic article's "Setting Up Personal Karma Donations" section to link to the new page instead of showing the old workspace setup instructions.

Copy link
Contributor Author

@MelvinBot MelvinBot Mar 11, 2026

Choose a reason for hiding this comment

The reason will be displayed to describe this comment to others. Learn more.

Done — the classic article now links to the new help page at articles/new-expensify/settings/Personal-Karma.


You can enable Personal Karma donations from your personal workspace settings.

1. [Sign in](www.expensify.com) to your web account.
2. Go to **Settings > Workspace > Individual**.
3. Under the **Subscription** section, enable Karma donations.

![Settings > Workspaces > Individual workspace > enable Personal Karma in settings](https://help.expensify.com/assets/images/ExpensifyHelp_OldDot_Karma_Individual.png){:width="100%"}
Personal Karma is now managed in New Expensify. To enable or disable Personal Karma donations, see the [Personal Karma](https://help.expensify.com/articles/new-expensify/settings/Personal-Karma) help page.

---

Expand All @@ -40,11 +34,11 @@ The fund to which your Corporate Karma goes is determined by the expense's MCC (

## Setting Up Corporate Karma Donations

As a [workspace billing owner](https://help.expensify.com/articles/expensify-classic/workspaces/Assign-billing-owner-and-payment-account), you can enable Corporate Karma from the group workspace settings.
As a [workspace billing owner](https://help.expensify.com/articles/expensify-classic/workspaces/Assign-billing-owner-and-payment-account), you can enable Corporate Karma from your workspace settings.

1. [Sign in](www.expensify.com) to your web account.
2. Go to **Settings > Workspace > Group**.
3. Under the **Subscription** section, enable Karma donations.
1. [Sign in](https://www.expensify.com) to your web account.
2. Go to **Settings > Workspace > [Your Workspace Name] > Subscription**.
3. Enable Karma donations.
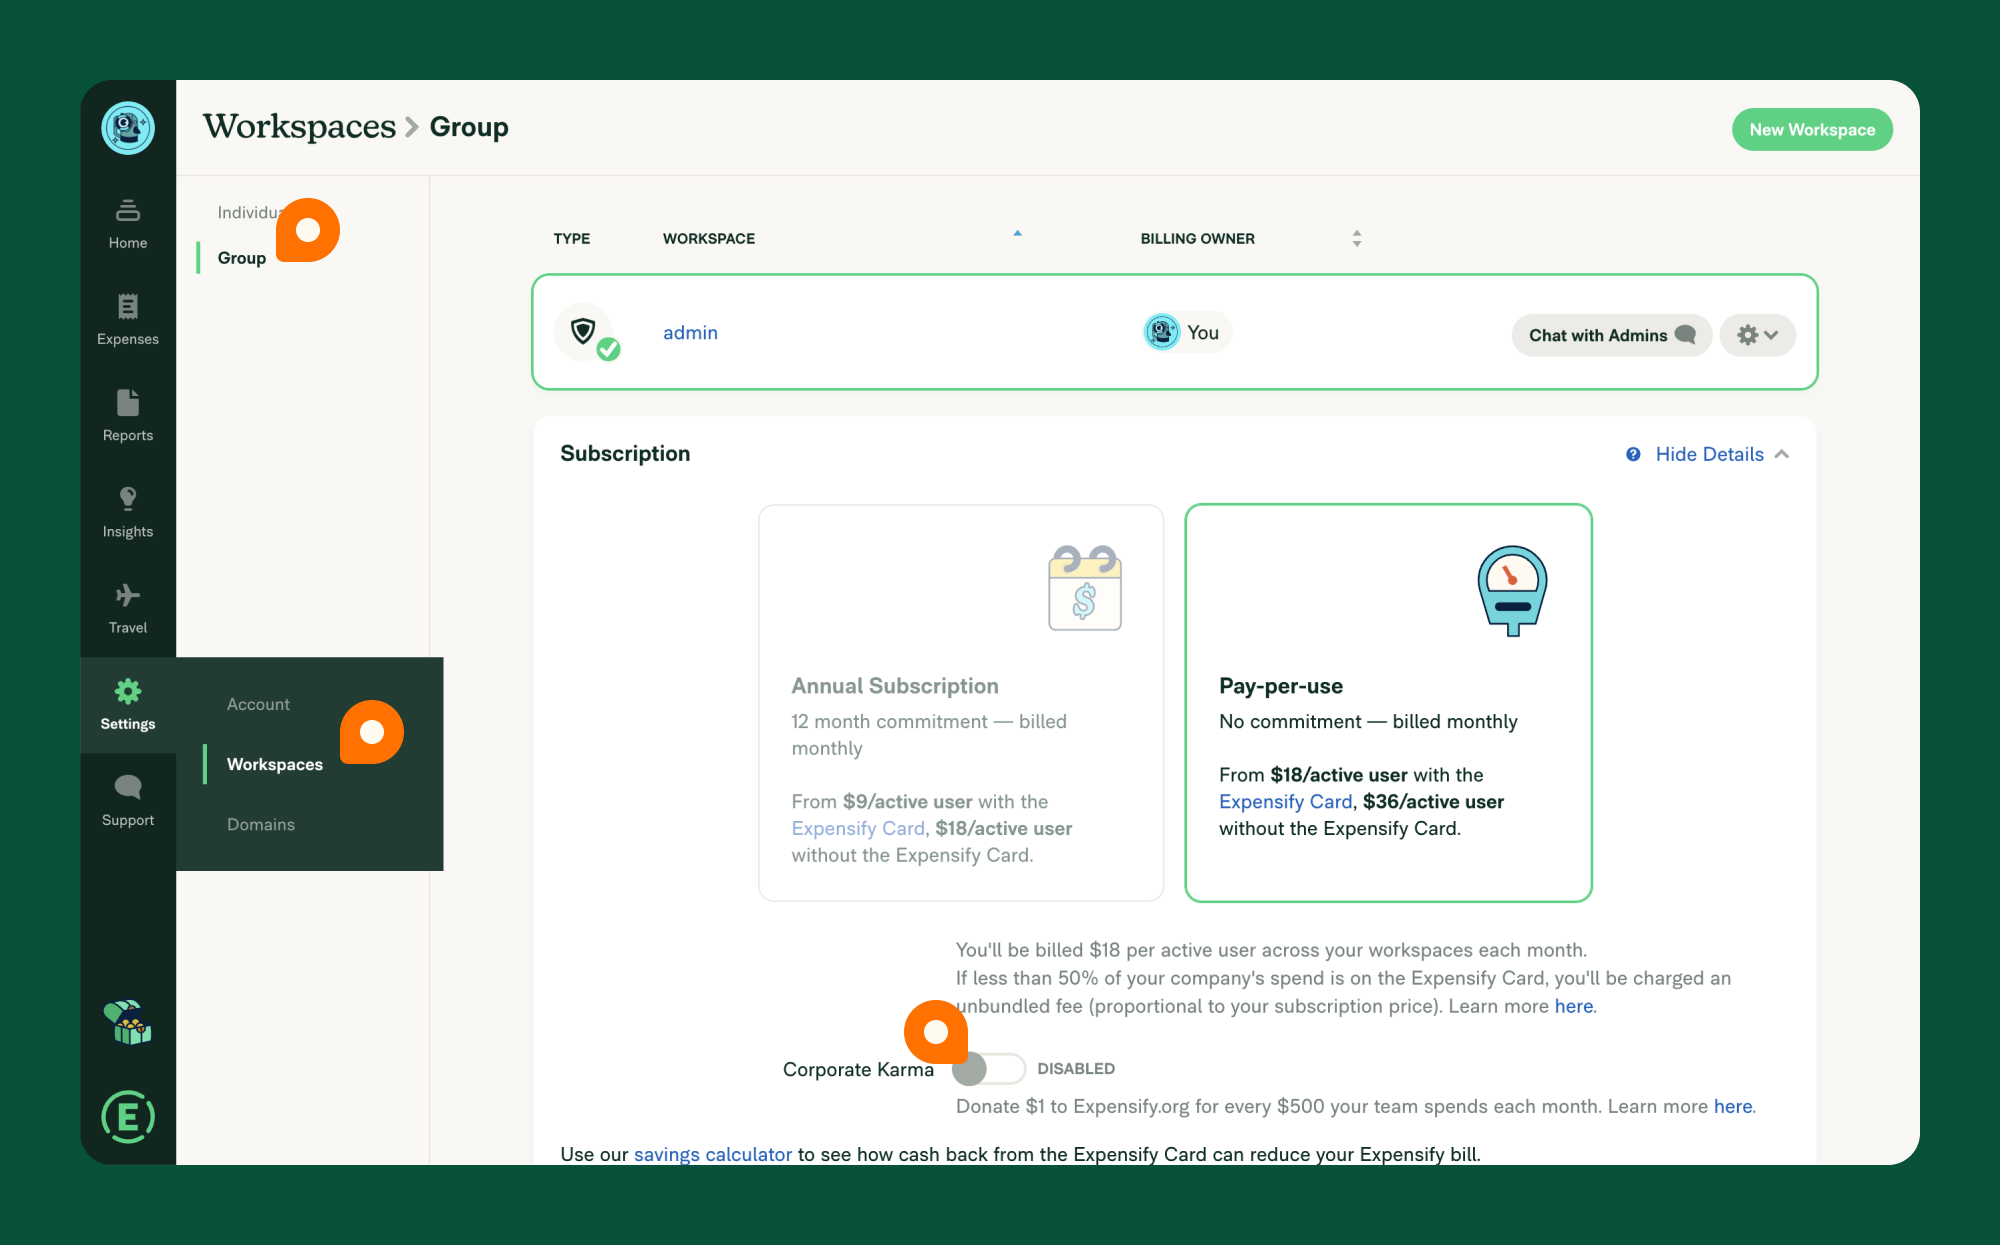
![Settings > Workspaces > Group > enable Corporate Karma in subscription settings](https://help.expensify.com/assets/images/ExpensifyHelp_OldDot_Karma_Group.png){:width="100%"}

Original file line number Diff line number Diff line change
Expand Up @@ -6,7 +6,7 @@ keywords: [Expensify Classic, create workspace, new workspace, getting started]

Creating a workspace in Expensify Classic is the first step to organizing your expenses and managing your finances efficiently. This guide walks you through setting up your workspace so you can seamlessly track receipts, submit reports, and stay on top of your spending.

All Expensify accounts include an Individual Workspace, which allows you to track personal expenses. If you want to connect your personal expenses to an accounting or travel integration, you can create a Group Workspace — even if you are the only member.
You can create a workspace to track personal expenses and connect to accounting or travel integrations — even if you are the only member.

---

Expand All @@ -29,24 +29,9 @@ Your personal assistant, **Concierge**, is available on your Expensify Home page

# 3. Create a Workspace

## Individual vs. Group Workspaces
- **Individual Workspace**: A private space for managing your personal expenses.
- **Group Workspace**: Designed for teams, even if you’re the only member. Group workspaces include features like expense approval flows and integrations with accounting, HR, and travel tools.

## Set Up Your Individual Workspace
1. Go to **Settings** > **Workspaces**.
2. Click the **Individual** tab on the left.
3. Click the workspace name to set up your Individual Workspace.
4. Go to Plan on the workspace menu to select the workspace type that fits your needs.
5. Configure your workspace details (e.g., workspace name, categories, tags, etc).

Note: The Individual Workspace is an underlying component of Expensify Classic. It cannot be deleted, and you can't add additional Individual Workspaces. Only additional Group Workspaces can be added manually (see below). Individual workspaces don't connect directly to accounting software or have the ability to add users.

## Create a Group Workspace
1. Go to **Settings** > **Workspaces**.
2. Click the **Group** tab on the left.
3. Click **New Workspace**.
4. Set up the workspace details (e.g., name, expense rules, categories).
2. Click **New Workspace**.
3. Set up the workspace details (e.g., name, expense rules, categories).

---

Expand Down Expand Up @@ -127,13 +112,13 @@ When logging in, use the Magic Code from your email and the 6-digit code from yo

# FAQ

## Is the Individual workspace free?
## Can I use Expensify for free?

Yes, individuals can use Expensify for free to track expenses.
Yes, you can use Expensify for free to track expenses.

## Can I create a Group workspace to use just for myself?
## Can I create a workspace to use just for myself?

Yes, group workspaces include key features such as more robust approval rules, direct connections to accounting integrations, and access to Expensify Travel. These are helpful features for automating expense tracking, even if you are the only member of the workspace.
Yes, a workspace includes features such as approval rules, direct connections to accounting integrations, and access to Expensify Travel -- even if you are the only member.

See pricing details [here](https://help.expensify.com/articles/new-expensify/billing-and-subscriptions/Plan-types-and-pricing).

Original file line number Diff line number Diff line change
Expand Up @@ -4,7 +4,7 @@ description: Customize and manage expense settings at the workspace level, inclu
keywords: [Expensify Classic, expenses, violations, reimbursable, billable, mileage, eReceipts, taxes, Concierge Receipt Audit, expense rules]
---

Expensify offers multiple ways to customize how expenses are created and managed at the workspace level. Whether you’re using an individual workspace or managing expenses in a group workspace, you can configure various settings to suit your needs.
Expensify offers multiple ways to customize how expenses are created and managed at the workspace level. You can configure various settings to suit your needs.

You can manage expense rules and distance rates at the workspace level. The following expense-level settings are customizable:

Expand Down
Original file line number Diff line number Diff line change
Expand Up @@ -4,7 +4,7 @@ description: Using more than one Expensify workspace
keywords: [Expensify Classic, default workspace]
---

If you have multiple workspaces—whether an individual workspace and a group workspace or multiple group workspaces—you’ll want to:
If you have multiple workspaces, you’ll want to:
- Set a default workspace. (*Note: Some domains automatically set your default workspace, and in these cases, you cannot change it.*)
- Select your workspace before creating an expense or report to ensure it’s posted to the correct workspace.

Expand Down
65 changes: 65 additions & 0 deletions docs/articles/new-expensify/settings/Personal-Karma.md
Original file line number Diff line number Diff line change
@@ -0,0 +1,65 @@
---
title: Personal Karma
description: Learn how Personal Karma works, how donation amounts are calculated, and how to enable or disable automatic donations to Expensify.org.
keywords: [New Expensify, personal karma, donations, expensify.org, save the world, Expensify.org donation, automatic donation, billing card charge]
---

# Personal Karma

Personal Karma lets you automatically donate a small percentage of your monthly added expenses to [Expensify.org](https://www.expensify.org/about).

For every $500 in expenses you add, $1 is donated to a related Expensify.org fund. Donations are calculated monthly and charged to the billing card on file. You’ll receive a donation receipt by email after each charge.

---

## How to enable or disable Personal Karma

1. In the navigation tabs (on the left on Web, at the bottom on Mobile), choose **Account**.
2. Select **Save the World**
3. Toggle **Personal Karma** to enable or disable it.

---

## How Personal Karma calculates your donation amount

Your donation is based on the total amount of expenses added during the month.

This includes:
- Reported expenses
- Unreported expenses
- Invoice expenses

For every $500 in total expenses, $1 is donated. For example:

- $500 in expenses = $1 donation
- $2,500 in expenses = $5 donation

The total donation amount is calculated at the end of each month.

---

## How Expensify charges you for Personal Karma donations

At the end of each month, Expensify calculates your total donation amount and charges your billing card on file. A donation receipt is sent to your email.

To change the card where Personal Karma is charged, [update your Expensify billing card](https://help.expensify.com/articles/new-expensify/billing-and-subscriptions/Add-a-payment-card-and-view-your-subscription#how-to-update-your-expensify-billing-card).

---

# FAQ

## Does Personal Karma include unreported expenses?

Yes. All expenses on the Expenses page — reported and unreported — are included in the monthly total used to calculate your donation.

## Where does my donation go?

Donations are directed to one of Expensify.org's five funds — Climate Justice, Food Security, Housing Equity, Reentry Services, or Youth Advocacy — based on the Merchant Category Code of each expense.

## Can I choose which Expensify.org fund receives my donation?

No. The fund is automatically selected based on the Merchant Category Code (MCC) of each expense.

## How can I learn more about Expensify.org's fund categories?

To learn more about Expensify.org funding categories, visit [expensify.org/funds](https://www.expensify.org/funds).
Loading