FeedBack is the simplest and easiest way to create customs for Guitar Hero.
FeedBack is a custom chart editing tool which was designed to simplify the process of making custom note charts for the Guitar Hero games, and possibly other games in the future.
Its interface is designed to be simple and easy+fast to use, but I understand it can be a little confusing to first time users. I will continue to improve the interface over time with users feedback and experiences.
FeedBack should run on any reasonably modern PC running WindowsXP, THE LATEST DirectX-9 and recent drivers for your video card installed. I have never tested in Vista, so I can't comment on compatibility. If you are experiencing problems, and you have followed the software pre-requisite checklist, please post your bug in the FeedBack support thread.
Windows 2000 is not currently supported, but I would like to get it working under that OS. If any programmers are running Windows 2000 and would like to help, please PM me and let me know.
I would also like to support FeedBack running under linux and OSX (which is mostly working), but I will need assistance from any programmers running these OS's to help test it is working.
Download the latest version of FeedBack here: Downloads
Simply extract the .zip, repeat, extract the .zip and run FeedBack.exe, there is no installation required.
When you start the application you will see the help screen, this displays your current key-map configuration (which can be edited in the Config.ini file if it is inappropriate for you for whatever reason).
[Screenshot coming]
Press [Esc] to exit the help screen, and you will see the main editor window.
[Screenshot coming]
This is where you edit your chart, syncing to music, placing notes, etc. More about editing charts later.
So if you have gotten this far and the software is running correctly you will want to get started.
Place your music file in the 'Songs' folder that sits alongside FeedBack.exe. FeedBack currently supports .mp3 and .ogg files.
Start FeedBack, press [Esc] to exit the help menu, and [Esc] again to enter the main menu.
From the main menu, select 'New Chart'.
It should now display a list of all the music files it found in the 'Songs' folder.
Select the music file for the song you just converted, and press [Enter].
It should load the song and return you to the main editor window.
To test that the song loaded properly, press [Space] to begin playback and you should hear your music playing.
If you want to edit the details about your chart, like weather the second co-op player is bass or rhythm, you can can enter the Main Menu again, and choose 'Chart Settings'.
Here you can edit the song name, choose the second player type, etc.
Once you're done with that, return to the main editor screen.
Now press 'S' to save your chart (even though it is empty).
It will play a 'save' noise, and it will create a .chart file in the 'Songs' folder next to your music file.
This is the note chart that you can share with people on the internet, you do not need to share the audio file with anyone.
Next time you restart the program, you can choose 'Load Chart' from the Menu Menu to load the chart you just created.
Now that you have setup your chart file, you can begin to create your note chart.. You will need to begin by syncing the chart to the music.
To get the music to play, press the space bar. You should hear the music play and the chart begin to flow towards you. Now, to change volume settings, Press V and the mixer will appear. To stop music playback, press the space bar again. The fretboard will stop at the fret closest to the step you have indicated. To start playback from the beginning of the song, hold SHIFT and press the space bar. To go back to where playback started, while playback is going, hold SHIFT and press the space bar.
FeedBack is equipped with three key features to help you sync your chart perfectly to your song. The first feature is the metronome, which can be enabled by pressing the 'M" key. Now when you press the space bar, the music and the metronome play. Note the different sounds of the metronome. Beat 1 has a distinctively higher pitched sound than the other beats. This is important, and will help you sync your chart easier.
The next feature is the clap feature. This feature can be enabled by pressing the "N" key. Simply put, this feature plays a 'clap' noise every time a note passes through the fretboard. When you hear the 'clap', that is when the note will be expected to be strummed when playing it in the game, so you want to make sure this lines up as exact as possible.
The last and newest feature to help chart synchronization is the Anchors. Read up on TurkeyMan's description of how to use them in the original FeedBack thread. (http://www.scorehero.com/forum/viewtopic.php?t=7466)
The first thing you need to do is set the offset of your chart. Basically, this is how far into the fretboard you need to go before the first note is played. There are two ways two do this, one is recommended, and one is more complex, and only for experienced chart makers.
The recommended way for setting the offset is to use the internal calculation in FeedBack. The offset is controlled by the "[" and "]" key. To make this as easy as possible, place one note on the first fret, and enable the clapping feature. Then press the "]" key to increase how much the offset is. You will see the offset number increase in the top left hand corner. Now this is a matter of guessing and checking, where you play the music and try to line up the clapping noise that you're hearing to the first note of the song.
The offset is vital to chart synchronization, so you have to be sure to get it as exact as possible. To do so, here are the values that the offset can be changed to:
"]" = Adds 1 to the value of the offset.
"[" = Decreases the value of the offset by 1.
SHIFT & "]" = Adds .1 to the value of the offset.
SHIFT & "[" = Decreases the value of the offset by .1.
CTRL & "]" = Adds .01 to the value of the offset.
CTRL & "[" = Decreases the value of the offset by .01.
SHIFT & CTRL & "]" = Adds .001 to the value of the offset.
SHIFT & CTRL & "[" = Decreases the value of the offset by .001.
The complex way, or the "Zero Offset" way, for setting the offset is to create your own offset without using the internal feature of FeedBack. This is NOT recommended unless you know what you're doing. This method will give you a more accurate looking chart that is visually appealing. To do this, you won't set an offset with FeedBack, leave it at zero. (I'll explain how to do this later if TM believes it should be included. Since this in an Idiot Proof Guide, I don't know if TM wants me to explain this.)
(To see why this is better for game play, Read This.)
Now we will line up the time signature to the song. Hopefully you have a basis of musical knowledge to know what time signature your song has. Input that into FeedBack using the "<" and ">" keys. The default time signature is 4/4. NOTE: Guitar Hero will only support x/4 time signatures. Once that is set you will adjust the BPM (Beats Per Minute) to the song. This is another guess and check method, where you enable the metronome ("M"), press the spacebar, and listen to see if the metronome is lined up with the song. If the metronome ticks are faster than the song, decrease the BPM. If the ticks are slower than the song, increase the BPM.
The BPM is also vital to chart synchronization, so you have to be sure to get it as exact as possible. To do so, here are the values that the BPM can be changed to:
"+" = Adds 1 to the value of the BPM.
"-" = Decreases the value of the BPM by 1.
SHIFT & "+" = Adds .1 to the value of the BPM.
SHIFT & "-" = Decreases the value of the BPM by .1.
CTRL & "+" = Adds .01 to the value of the BPM.
CTRL & "-" = Decreases the value of the BPM by .01.
SHIFT & CTRL & "+" = Adds .001 to the value of the BPM.
SHIFT & CTRL & "-" = Decreases the value of the BPM by .001.
Describe the Anchor System and how to use it in here along with screenshots. (Haven't used it yet, don't feel like writing this)
This can be helpful when creating your note chart. To place a Section Name, Press the "R" key, and type in your section name. Make sure to use the "_" symbol as a space, and not the actual space bar. Placing section names will help you skip from section to section as your write your note chart. To skip between Sections (when you use Section Names), Press CTRL & the Up arrow key to move to the next section, or CTRL & the Down arrow key to move to the previous section.
Notes are placed directly on the fret board using the keyboard. There are other means to place notes, as in hooking up a guitar hero controller, but I haven't tried it, nor am I going to write about it. To place notes on the fretboard using the keyboard, the keys 1,2,3,4 and 5 correspond to each coloured note. Use the keys above the QWERTY in your keyboard, not the number pad. In sequential order, they are:
"1" Key = Green Note
"2" Key = Red Note
"3" Key = Yellow Note
"4" Key = Blue Note
"5" Key = Orange Note
The space between one note and the next is called the step. To change the step, use the Left and Right arrow keys. Valid steps for FeedBack are 1/1, 1/2, 1/3, 1/4, 1/6, 1/8, 1/12, 1/16, 1/24, 1/32, 1/48.
To change between difficulties and instruments (Guitar, Rhythm/Bass), Press the F1 - F12 keys. They are the separate note track charts for the following:
F1 - Easy Single
F2 - Easy Double Guitar (Co-Op Lead)
F3 - Easy Double Bass (Co-Op Rhythm or Bass**)
F4 - Medium Single
F5 - Medium Double Guitar (Co-Op Lead)
F6 - Medium Double Bass (Co-Op Rhythm or Bass**)
F7 - Hard Single
F8 - Hard Double Guitar (Co-Op Lead)
F9 - Hard Double Bass (Co-Op Rhythm or Bass**)
F10*-Expert Single Guitar
F11 - Expert Double Guitar (Co-Op Lead)
F12 - Expert Double Bass (Co-Op Rhythm or Bass**)
- Default. This loads when FeedBack starts.
** Depending on the chart settings which can be found in the options menu.
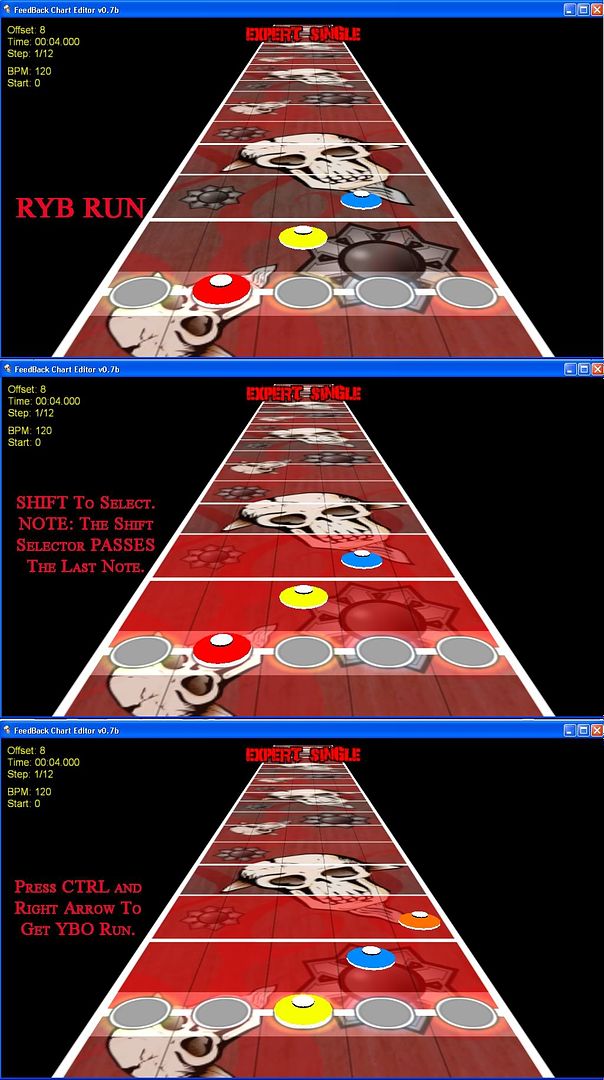
FeedBack is also equipped with a 'Shift' feature. That is, FeedBack can take notes, and shift them up and down with respect to their colours while maintaining their rhythmic position. To do this, hold SHIFT and select the notes you want to push. Now, hold CTRL and press the Left or Right arrow key. This will push the notes Up or Down. For Example: If you have a RYB run, and you select these three notes and push CTRL and Right, they will become YBO. Take the RYB run, select it and push CTRL and Left, and they will become GRY.
You can NOT place notes while the music is playing.
A fast and easy way to skip between parts of your note chart is to use the Jump feature of FeedBack. To use it, press CTRL & G, and input where you want to go. You can jump to section names by typing in the name of the section you want to go to, you can jump to offset numbers by entering the number you want to go to, or you can jump by seconds or in milliseconds. Just be sure to label "s" or "ms" when using the seconds of milliseconds jump.
So now you have your finished chart. It is synchronized to the song, and contains all of the notes to the song in a note chart form. Now, to spice things up a bit. (BAM!)
To place SP in your note chart, scroll to where you would like the star power to begin. Press and hold the 8 key, and now press the up arrow. You will see a blue bar appear on the left of the fretboard. That is where the SP will be activated. NOTE: There has been some confusion on what notes will get SP, and which won't. In order for a note to get star power, the blue bar MUST surpass the note. Then it will get star power. If the blue bar is even with the note, that note will not get star power.

These sections are the parts of the song each player will play in Multiplayer on the Face-Off mode. The chart creator can designate which section(s) Player One plays, which section(s) Player Two plays, and which section(s) they both play. Player One is the 6 key, Player Two is the 7 key. To designate that Player One plays a section, start at the beginning of the section, press and hold the 6 key, and push the Up arrow key. You will see a red bar appear along the right hand side of the fretboard. That is telling you what Player One will play. To designate that Player Two plays a section, press and hold the 7 key, and push the Up arrow key. You will see a yellow bar appear along the right hand side of the fretboard. That is telling you what Player Two will play. To designate that both players play that section, press and hold both the 6 and 7 keys, and push the Up arrow key. You can also do one player at a time and still get both player to play one section, for instance if you designate that Player One plays a section, you can go back over that section with Player Two's yellow bar and FeedBack will show you that now both players will be playing that section. NOTE: Pay attention to where the bars stop and end. The note will be played by the player who's coloured bar PASSES that note.

Events are text triggers that tell them game to do something. To place an event string, press the "E" key. To place a track event, press the "W" key. (Don't feel like writing this either.)
FeedBack can also Copy and Paste like no other! To copy, hold SHIFT and select the notes you want to copy. NOTE: SHIFT will only apply the notes that the selection bar (it's red) passes. That is, if the last note you want to select is even with the selection bar, it is not selected, and therefore will not be copied. Then press CTRL & C. The selection is now copied. To paste, move the fret board to the position you want the first note to be copied to. Press CTRL & V. The selection is now pasted. You can copy and paste between difficulties and instruments.
If you have trouble adding BPM changes or any other key trouble, open the Config.ini file under the FeedBack folder and change the controls to what ever you like, for example: IncreaseBPM = Delay, "~All+Equals" (doesnt work) IncreaseBPM = Delay, "~All+9" (works good) [the program wouldn't respond to my equals, so i changed it.. no effect to the program at all, just a control change on mine.] (Thanks metalhead453)
- You can NOT add notes while the music is playing.
- You can NOT add a negative start offset. You need to add silence to the start of your song using audacity.
- NO, there is no program that can do this for you, FeedBack can not chart the notes for you, don't think that's what this programs intention is.
- If your computer is a piece, we don't want to hear about it. You had better have the most recent drivers for your video card, have a decent video card, and not have a computer from the sixties to run FeedBack.
- The track graphics change when you start and restart the program. If you don't like one, close FeedBack and restart it.
- FeedBack can't undo using CTRL & Z. Get used to it.
- Is FeedBack Windows Vista compatible? Many people have reported FeedBack working fine, if not better under Windows Vista.
- If your computer BSODs while running FeedBack, chances are your computer sucks.
- If you get the "Error parsing line 7" message, open your chart in notepad and delete the "MusicStream = "XXXXXXXXX.mp3/ogg".
- HOs and POs are NOT controlled by the tab. Read the Custom Song FAQ to know how they work.
- Copy and Paste will take only the notes, not the star power and multiplayer designations with it.
Additional reading material containing additional tips and tricks for making better charts.
Boots's Guide to Properly Syncing Songs with FeedBack (with pics) http://www.scorehero.com/forum/viewtopic.php?t=18750
Gokussj5okazu's Guide to Advanced Feedback Editing http://zelphaforever.beatme101.com/PersonalFiles/Guitar%20Hero%202/Gokussj5okazus%20Guide%20to%20Advanced%20Feedback%20Editing.html