- 1. Archive The repository
- 2. Bundle the Repository
- 3. Ignore a File
- 4. Stash Uncommitted Changes
- 5. Hook into Git's internals
- 6. View Diffs Between commits
- 7. Reset and checkout files
- 8. Aliases and Other Configurations
- 9. Conclusion
- 10. Quick Reference
- 11. How to create a global gitignore file
- 12. How to create a pull request from your local branch
- 13. How to fetch a branch from another team member and merge
- 14. Remove .DS_Store files recursively
This module presents a broad survey of useful Git utilities. We will take a step back from the theoretical aspects of Git and focus on common tasks like preparing a project for release and backing up a repository. While working through this module, your goal shouldn't be to understand why they were created and when they might come in handy.
First, let's export our repository into a ZIP archive. Run the following command in your local copy of my git repository, in this case RysGitTutorialRepository.
Sun Jul 05 ~/iOS/RysGitTutorialRepository
$ git archive master --format=zip --output=../website-Jul-05-2020.zip
Or, for Unix users that would prefer a tarball:
Sun Jul 05 ~/iOS/RysGitTutorialRepository
$ git archive master --format=tar --output=../website-Jul-05-2020.tar
This takes the current master branch and places all of its files into a ZIP archive (or tarball), ommitting the .git directory. Removing the .git directory removes all version control information, and you are left with a single snapshot of your project.
You can send the resulting archive to a client for review, even if they don't have Git installed on their machine. This is also an easy way to create Git-independent backups of important revisions, which is always a good idea.
Similar to the git archive command, git bundle turns a repository into a single file. However, in this case, the file retains the versioning information of the entire project. Try running the following command.
Mon Jul 06 ~/iOS/RysGitTutorialRepository
$ git bundle create ../repo.bundle master
Enumerating objects: 94, done.
Counting objects: 100% (94/94), done.
Compressing objects: 100% (91/91), done.
Total 94 (delta 44), reused 0 (delta 0)
It's like we just pushed our master branch to a remote, except it's contained in a file instead of a remote repository. We can even clone it using the same git clone command.
Mon Jul 06 ~/iOS/RysGitTutorialRepository
$ cd ..
Mon Jul 06 ~/iOS
$ git clone repo.bundle repo-bundle-copy -b master
Cloning into 'repo-bundle-copy'...
Receiving objects: 100% (94/94), 11.16 KiB | 2.23 MiB/s, done.
Resolving deltas: 100% (44/44), done.
$ ls repo*
repo.bundle
repo-bundle-copy:
about index.html news-3.html rainbow.html yellow.html
blue.html news-1.html orange.html red.html
green.html news-2.html pink.html style.cssMon Jul 06 ~/iOS/repo-bundle-copy
$ git logThe log output should show you the entire history of our master branch, and repo.bundle is also the origin remote for the new repository. This is the exact behavior we encountered when cloning a "normal" Git repository.
Bundles are a great way to backup entire Git repositoies (not just an isolated snapshot like git archive).
They also let you share changes without a network connection.
For example, if you didn't want to configure the SSH accounts for a private Git Server, you could bundle up the repository, put it on a jump drive, and walk it over to your co-worker's computer. Of course, this could become a bit tiresome for active projects.
We will not be needing the repo.bundle file and repo-copy folder, so go ahead and delete them now.
Remember that Git does not automatically track files because we don't want to record generarted files llike C binaris or compiled Phyton modules. But, seeing these files under the "Untracked files" list in git status can get confusing for large projects, so Git lets us ignore content using a special text file called .gitignore. Each file or directory stored in .gitignore will be invisible to Git.
Let's see how this works by creating a file called notes.txt to store some personal (private) comments about the project. Add some text to it and save it, then run the following.
Wed Jul 08 ~/iOS/RysGitTutorialRepository
$ vim notes.txt
Wed Jul 08 ~/iOS/RysGitTutorialRepository
$ git status
On branch master
Untracked files:
  (use "git add <file>..." to include in what will be committed)
	notes.txt

nothing added to commit but untracked files present (use "git add" to track)
Wed Jul 08 ~/iOS/RysGitTutorialRepository
As expected, this will show you notes.txt in the "Untracked files" section. Next, create a fie called .gitignore in the repository directory and add the following text to it. Windows users can create a file that starts with a period by executing the touch .gitignore command in Git bash (you should also make sure hidden files are visible in your file browser).
Wed Jul 08 ~/iOS/RysGitTutorialRepository
$ touch .gitignore
Run another git status and you will see that the notes file no longer appears under "Untracked files", but .gitignore does. This is a common file for Git-based projects, so let's add it to the repository.
Wed Jul 08 ~/iOS/RysGitTutorialRepository
$ git status
On branch master
Untracked files:
  (use "git add <file>..." to include in what will be committed)
	.gitignore

nothing added to commit but untracked files present (use "git add" to track)
Wed Jul 08 ~/iOS/RysGitTutorialRepository
$ git add .
Wed Jul 08 ~/iOS/RysGitTutorialRepository
$ git commit -m "Add .gitignore file"
[master da3867e] Add .gitignore file
1 file changed, 1 insertion(+)
create mode 100644 .gitignore
Wed Jul 08 ~/iOS/RysGitTutorialRepository
$ git status
On branch master
nothing to commit, working tree cleanYou can also specify entire directories in .gitignore or use the * wildcard to ignore files with a particular extension. For example, the following is a typical .gitignore file for a simple C project. It tells Git to overlook all ., .out, and .exe files in the repository
*.o
*.out
*.exeNext, we will take a brief look at stashing, which conveniently "Staches" away uncommitted changes. Open up style.css and change the h1 element to:
h1 {
 font-size: 32px;
 “font-family: "Times New Roman", serif;
}
Now let's say we had to make an emergency fix to our project. We don't want to commit an unfinished feature, and we also don't want to lose our current CSS addition. The solution is to temporarily remove these changes with the git stash command.
Thu Jul 09 ~/iOS/RysGitTutorialRepository
$ vim style.css
Thu Jul 09 ~/iOS/RysGitTutorialRepository
$ git status
On branch master
Changes not staged for commit:
(use "git add <file>..." to update what will be committed)
(use "git restore <file>..." to discard changes in working directory)
modified: style.css
no changes added to commit (use "git add" and/or "git commit -a")Thu Jul 09 ~/iOS/RysGitTutorialRepository
$ git stash
Saved working directory and index state WIP on master: da3867e Add .gitignore fileThu Jul 09 ~/iOS/RysGitTutorialRepository
$ git status
On branch master
nothing to commit, working tree cleanBefore the stash, style.css was listed as "Change by not updated". The git stash command hid these changes, giving us a clean working directory. We are now able to switch to a new hotfix branch to make our important updates - without having to commit a meaningless snapshot just to save our current state.
Let's pretend we have completed our emergency update and we are ready to continue working on our CSS changes. We can retrieve our stashed content with the following command.
Thu Jul 09 ~/iOS/RysGitTutorialRepository
$ git stash apply
On branch master
Changes not staged for commit:
  (use "git add <file>..." to update what will be committed)
  (use "git restore <file>..." to discard changes in working directory)
	modified:   style.css

no changes added to commit (use "git add" and/or "git commit -a")
The style.css file now looks the same as it did before the stash, and we can continue development as if we were never interrupted. Whereas patches represent a committed snapshot, a stash represents a set of uncommitted changes. It takes the uncommitted modifications, stores them internally, ten does a git reset --hard to give us a clean working directory. This also means that stashes can be applied to any branch, not just the one from which it was created.
In addition to temporarily storing uncommitted changes, this makes stashing a simple way to transfer modifications between branches. So, for example, if you ever found yourself developing on the wrong branch, you could stash all your changes, checkout the correct branch, then run a git stash apply.
Let's undo these CSS updates before moving on.
Thu Jul 09 ~/iOS/RysGitTutorialRepository
$ git reset --hard
HEAD is now at da3867e Add .gitignore fileArguably, Git's most useful configuration options are its hooks. A hook is a script that Git executes every time a particular event occurs in a repository. In this section, we will take a hands-on look at Git hooks by automatically publishing our website every time someone pushes to the central-repo.git repository.
Fri Jul 10 ~/iOS
$ cd central-repo.git/
Fri Jul 10 ~/iOS/central-repo.git
$ ls
description HEAD        config      info        refs        hooks       objects
Fri Jul 10 ~/iOS/central-repo.git
$ cd hooks/
Fri Jul 10 ~/iOS/central-repo.git/hooks
$ ls
commit-msg.sample         fsmonitor-watchman.sample pre-merge-commit.sample
pre-rebase.sample         pre-receive.sample        pre-applypatch.sample
pre-commit.sample         prepare-commit-msg.sample pre-push.sample
applypatch-msg.sample     post-update.sample        update.sample
In the centra-repo.git directory, open the hooks directory and rename the file post-update.sample to post-update. After removing the .sample extension, this script will be executed whenever any branch gets pushed to central-repo.git. Replace the default contents of post-update with the following.
Fri Jul 10 ~/iOS/central-repo.git/hooks
$ mv post-update.sample post-update#!/bin/sh
echo "Publishing master branch!" >&2
# remove the old `my-website` directory (if necessary)
rm -rf ../my-website
# create a new `RysGitTutorialMyWebsitem` directory
mkdir ../RysGitTutorialMyWebsite
#Archive the `master` branch
git archive master --format=tar --output=../RysGitTutorialMyWebsite.tar
#Uncompress the archive into the `RysGitTutorialMyWebsite` directory
tar -xf ../RysGitTutorialMyWebsite.tar -C ..RysGitTutorialMyWebsiteWhile shell scripts are outside the scope of this tutorial, the majority of commands in the above code listing should be familiar to you. In short, this new post-update script creates an archive of the master branch, then exports it into a directory called RysGitTutorialMyWebsite repository.
We can see the script in action by pushing a branch to the central-repo.git repository.
Fri Jul 10 ~/iOS/RysGitTutorialRepository
$ git push ../central-repo.git master
Enumerating objects: 15, done.
Counting objects: 100% (15/15), done.
Delta compression using up to 4 threads
Compressing objects: 100% (12/12), done.
Writing objects: 100% (13/13), 1.43 KiB | 366.00 KiB/s, done.
Total 13 (delta 7), reused 0 (delta 0)
remote: Publishing master branch!
To ../central-repo.git
   450182a..da3867e  master -> master
.
.
central-repo.git
RysGitTutorialMyWebsite.tar
RysGitTutorialMyWebsite
Fri Jul 10 ~/iOS after the central repository receives the new master branch, our post-update script is executed. You should see the Publishing master branch! message echoed from the script, along with RysGitTutorialMyWebsite folder in the same directory as RysGitTutorialRepository. You can open index.html in a web browser to verify that it contains all the files from our master branch, and you can also see the intermediate.tar archive produces by the hook.
This is a simple unoptimized example, but Git hooks are infinitely versatile. Each of the .sample scripts in the hooks directory represents different event that you can listen for, an each of them can do anything from automatically creating and publishing releases to enforcing a commit policy, making sure a project compiles, and of course, publishing websites (that means no more cluncy FTP uploads). Hooks are even configured on a per-repository basis, which means you can run different scripts in your local repository than your central repository.
Up until now, we have been using git log --stat to view the changes introduced by new commits. However, this does not show us which lines have been change in any given file. For this level of detail, we need the git diff command. Let's take a look at the updates from the "Add a pink block of color" commit
This will output the diff between the "Add a pink block of color" commit (HEAD~1) and the one before it (HEAD~2):
Mon Jul 13 ~/iOS/RysGitTutorialRepository
$ git diff HEAD~2..HEAD~1
diff --git a/pink.html b/pink.html
index c349233..431492b 100644
--- a/pink.html
+++ b/pink.html
@@ -4,10 +4,17 @@
   <title>The Pink Page</title>
   <link rel="stylesheet" href="style.css" />
   <meta charset="utf-8" />
+  <style>
+  div {
+    width: 300px;
+    height: 50px;
+  }
+  </style>
 </head>
 <body>
   <h1 style="color: #F0F">The Pink Page</h1>
   <p>Only <span style="color: #F0F">real men</span> wear pink!</p>
+  <div style="background-color: #F0F"></div>
   <p><a href="index.html">Return to home page</a></p>
 </body>
 </html>
This diff looks nearly identical to the patches we created in the previous module, and it shows exactly what was added to get from HEAD~2 to HEAD~1. The git diff command is incredibly useful for pinpointing contributions from other developers. For example, we could have used the following to view the differences between John's pink-page branch and our master before merging it into the project in Distributed Workflows.
diff --git a/.gitignore b/.gitignore
deleted file mode 100644
index 99ed0d4..0000000
--- a/.gitignore
+++ /dev/null
@@ -1 +0,0 @@
-notes.txt
diff --git a/pink.html b/pink.html
index 431492b..47ea234 100644
--- a/pink.html
+++ b/pink.html
@@ -4,17 +4,12 @@
   <title>The Pink Page</title>
   <link rel="stylesheet" href="style.css" />
   <meta charset="utf-8" />
-  <style>
-  div {
-    width: 300px;
-    height: 50px;
-  }
-  </style>
 </head>
 <body>
   <h1 style="color: #F0F">The Pink Page</h1>
-  <p>Only <span style="color: #F0F">real men</span> wear pink!</p>
-  <div style="background-color: #F0F"></div>
+  <p>Pink is <span style="color: #F0F">girly,
+  flirty and fun</span>!</p>
+
   <p><a href="index.html">Return to home page</a></p>
 </body>
 </html>
This flexible command can also generate a detailed view of our uncommitted changes. Open up blue.html, make any kind of change, and save the file. Then run git diff without any arguments:
Mon Jul 13 ~/iOS/RysGitTutorialRepository
$ vim blue.html
Mon Jul 13 ~/iOS/RysGitTutorialRepository
$ git diff
diff --git a/blue.html b/blue.html
index 370563f..14728e6 100644
--- a/blue.html
+++ b/blue.html
@@ -10,3 +10,5 @@
   <p>Blue is the color of the sky.</p>
 </body>
 </html>
+<!-- You will not be able to see this text. -->
+
And, just in case we forgot what was added to the staging area, we can use the --cached flag to generate a diff between the staged snapshot and the most recent commit:
Mon Jul 13 ~/iOS/RysGitTutorialRepository
$ git add blue.html
Mon Jul 13 ~/iOS/RysGitTutorialRepository
$ git diff --cached
diff --git a/blue.html b/blue.html
index 370563f..14728e6 100644
--- a/blue.html
+++ b/blue.html
@@ -10,3 +10,5 @@
   <p>Blue is the color of the sky.</p>
 </body>
 </html>
+<!-- You will not be able to see this text. -->
+
A plain old git diff will not output anything after the blue.html is added to the staging area, but the changes are now visible through the --cached flag. These are the three main configurations of the git diff command.
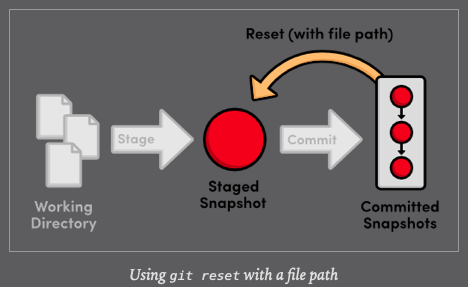
We have used git reset and git checkout many times throughout this tutorial; however, we have only seen them work with branches/commits. You can also reset and checkout individual files, which slightly alters the behavior of both commands.
The git reset we are accustomed to moves the current branch to a new commit and optionally updates the working directory to match. But when we pass a file path, git reset updates the staging area to match the given commit instead of the working directory, and it does not move the current branch pointer. This means we can remove blue.html from the staged snapshot with the following command.
Mon Jul 13 ~/iOS/RysGitTutorialRepository
$ git reset HEAD blue.html
Unstaged changes after reset:
M	blue.html
Mon Jul 13 ~/iOS/RysGitTutorialRepository
$ git status
On branch master
Changes not staged for commit:
(use "git add <file>..." to update what will be committed)
(use "git restore <file>..." to discard changes in working directory)
modified: blue.html
no changes added to commit (use "git add" and/or "git commit -a")This makes the blue.html in the staging area match the version stored in HEAD, but it leaves the working directory and current branch alone. The result is a stagging area that matches the most recent commit and a working directory that contains the modified blue.html file. In other words, this type of git reset can be used to unstage a file.
Let's take this one step further with git checkout. The git checkout we have been using updates the working directory and switches branches. If we add a file path to git checkout, it narrows its focus to only the specified file and does not update the branch pointer. This means that we can "check out" the most recent version of blue.html with the following command.
Mon Jul 13 ~/iOS/RysGitTutorialRepository
$ git checkout HEAD blue.html
Updated 1 path from c5ba33c
$ git status
On branch master
nothing to commit, working tree cleanOur blue.html file now looks exactly like the version stored in HEAD, and we thus have a clean working directory. Passing a file path to git checkout reverts that file to the specified commit.

To summarize the file-path behavior of git reset and git checkout, both take a committed snapshot as an reference point and make a file in the staging area or the working directory match that reference, respectively.
Typing git checkout every time you wanted to see a new branch over the last ten modules has been a bit verbose. Fortunately, Git lets you create aliases, which are shortcuts to other commands. Let's create a few aliases for our most common commands:
Tue Jul 14 ~/iOS/RysGitTutorialRepository
$ git config --global alias.check checkout
Tue Jul 14 ~/iOS/RysGitTutorialRepository
$ git config --global alias.ci commit
Tue Jul 14 ~/iOS/RysGitTutorialRepository
$ git config --global alias.br branch
Now, we can use git check instead git checkout, etc.
Tue Jul 14 ~/iOS/RysGitTutorialRepository
$ git check -b test
Switched to a new branch 'test'
Git stores these aliases in a global config file, similar to the local config file we looked at in Mary's repository (.git/config). By default, global configurations reside in ~/.gitconfig, where the ~ character represents your home directory. This file should resemble the following.
Tue Jul 14 ~/iOS/RysGitTutorialRepository
$ cat ~/.gitconfig
[filter "lfs"]
	clean = git-lfs clean -- %f
	smudge = git-lfs smudge -- %f
	process = git-lfs filter-process
	required = true
[user]
	name = c4arl0s
	email = c.santiago.cruz@gmail.com
[color]
	status = auto
	branch = auto
	diff = auto
	interactive = auto
[core]
	excludesfile = /Users/carlossantiagocruz/.gitignore_global
[alias]
	check = checkout
	ci = commit
	br = branch
Of course, your settings should reflect the name and email you entered in The Basics. As you can see, all of our new aliases are also stored in .gitconfig. Let's add a few more useful configurations by modifying this file directly. Append the following to .gitconfig
[color]
  status = always
[core]
  editor = gvim
This makes sure Git colorized the output of git status and that it uses the gVim text editor for creating commit messages. To use different editor, simply change gvim to the command that opens your editor. For example, Emacs users would use emacs, and Notepad users would use notepad.exe.
Git includes a long list of configuration options, all of which can be found in the official manual. Note that storing your global configuration n a plaintext file makes it incredibly easy to transfer your settings to a new Git installation: just copy ~/.gitconfig onto your new machine.
In this module, we learned how to export snapshots, backup repositories, ignore files, stash temporary changes, hook into Git's internals, generate diffs, reset individual files, and create shorter aliases for common commands. While it is impossible to cover all of Git's supporting features in hands-on guide such as this, I hope that you now have a clearer picture of Git's numerous capabilities.
With all of these convenient features, it is easy to get so caught up in designing the perfect workflow that you lose sight of Git's underlying purpose. As you add new commands to your repertoire, remember that Git should always make it easier to develop a software project - never harder. If you ever find that Git is causing more harm than good, don't be scared to drop some of the advance features and go back to the basics.
The final module will go a long way towards helping you realize the full potential of Git's version control model. We will explore Git's internal database by manually inspecting and creating snapshots. Equipped with this low-level knowledge, you will be more that ready to venture out into the reality of Git-base project management.
$ git archive branchName --format=zip --output=fileNameExport a single snapshot to a ZIP archive called fileName
git bundle create fileNam branchNameExport an entire branch, complete with history, to the specified fileName
git clone repo.bundle repoDirectory -b branchNameRe-create a project from a bundle repository and checkout branchName
git stashTemporarily stash change to create a clean working directory
git stash applyRe-apply stashed changes to the working directory
git diff commitID..anotherCommitIDView the difference between two commits
git diffView the difference between the working directory and the stagging area.
git reset HEAD fileNameUnstage a file, but don't alter the working directory or move the current branch
git checkout commitID fileNameRevert and individual file to match the specified commit without switching branches
git config --global alias.aliasName gitCommandCreate a shortcut for a command and store it in the global configuration file
<<<<<<< Updated upstream
$ echo .DS_Store >> ~/.gitignore_globalthen:
git config --global core.excludesfile ~/.gitignore_globalNow each commit you will not be able to add any .DS_Store file.
If you already add a .DS_Store file in your repo, you have to delete it manually.
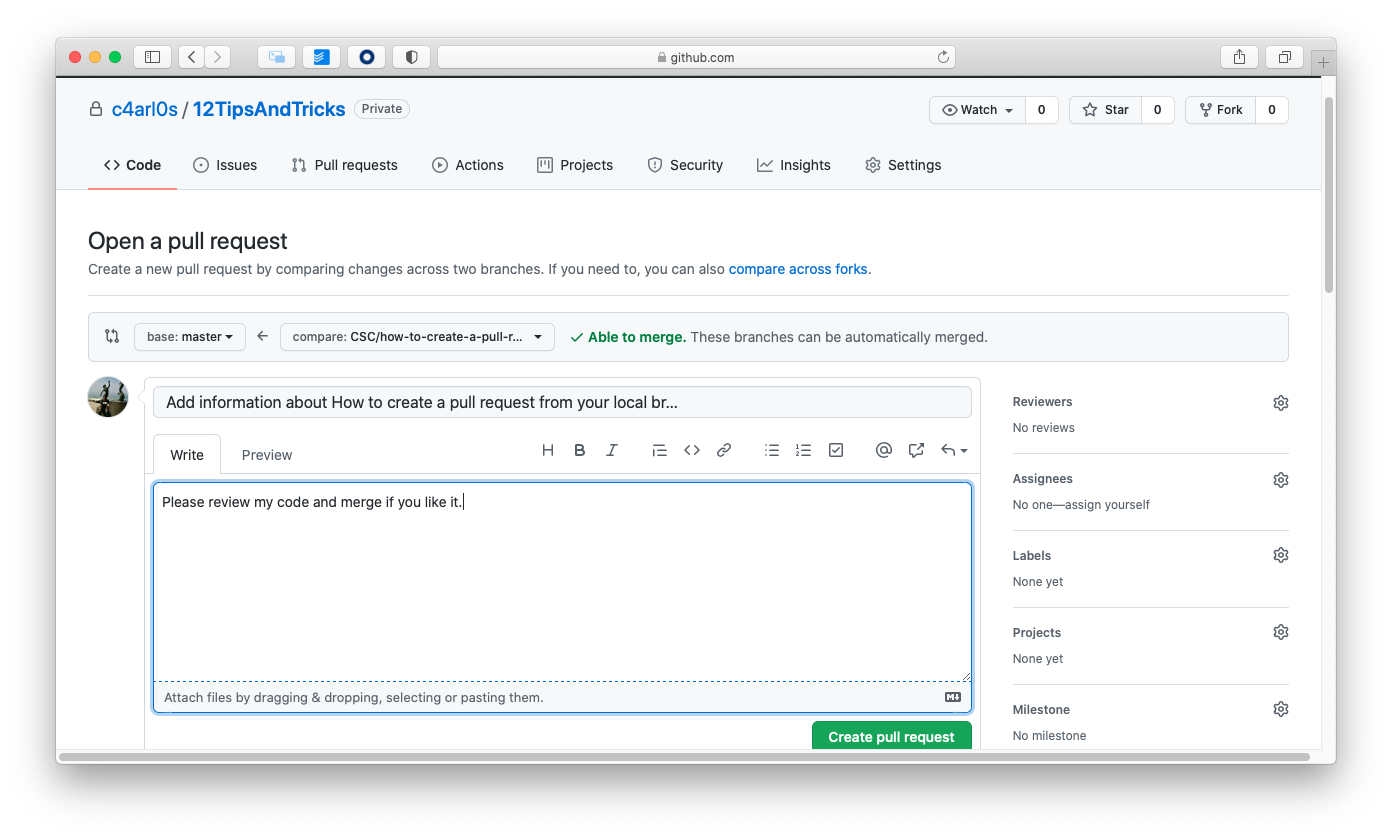
You can create a pull request on your own project just pushing your branch
Console output:
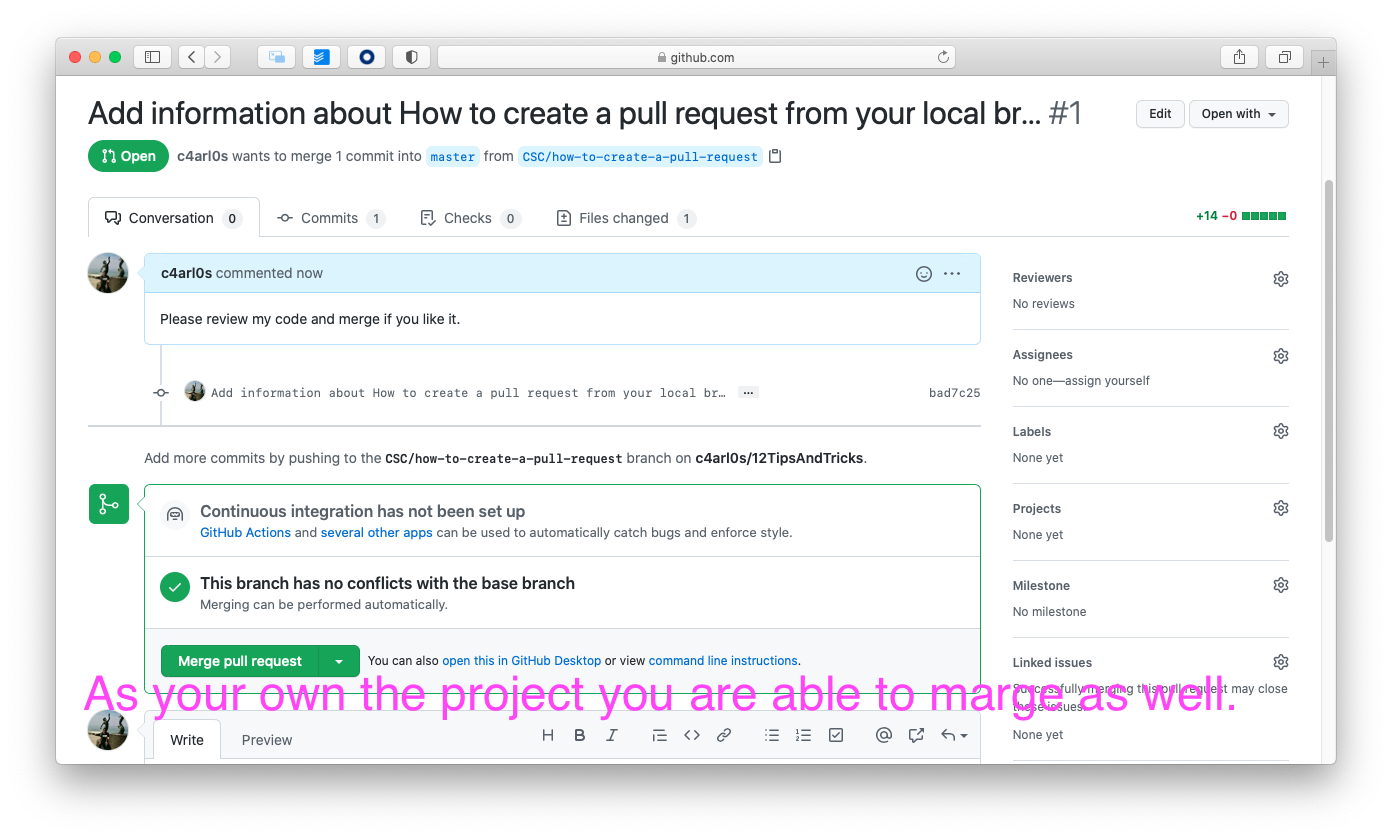
$ git push origin <nameOfTheBranch>Then on Github will appear the message that you can generate a pull request, follow the instructions and ask for the pull request, someone in the project then can merge your branch on main or develop branch.


Once you did push (your buddy) a branch to the repository, you can fetch the branch to your macbook with these commands:
- Step 1: From your project repository, bring in the changes and test.
$ git fetch origin
$ git checkout -b CSC/13-how-to-fetch-a-branch-and-merge-Only-Test origin/CSC/13-how-to-fetch-a-branch-and-merge
In this case I had to create another branch with different name in order to test the branch that it is on
origin(because I have not buddy :-( )
-
Step 2: Run a test, verify if everything is ok.
-
Step 3: Merge the changes and update on GitHub.
$ git checkout master
$ git merge --no-ff CSC/13-how-to-fetch-a-branch-and-merge- Step 4: Push the current branch (master) to origin.
$ git push origin masterIf you already created these .DS_Store files, use this command.
find . -name .DS_Store -print0 | xargs -0 git rm -f --ignore-unmatchConsole output example:
rm 'Projects/.DS_Store'
rm 'Projects/1ButtonsProjectCommonInputControls/.DS_Store'
rm 'Projects/2SwitchesProjectCommonInputControls/.DS_Store'
rm 'Projects/3SlidersProjectCommonInputControls/.DS_Store'
rm 'Projects/4TextFieldsProjectCommonInputControls/.DS_Store'
rm 'Projects/5ActionsAndOutletsProjectCommonInputControls/.DS_Store'
rm 'Projects/6GestureRecognizersProjectCommonInputControls/.DS_Store'
rm 'Projects/7ProgrammaticActionsProjectCommonInputControls/.DS_Store'
rm 'Projects/LabStep1CreateYourViewInInterfaceBuilderTwoButtons/.DS_Store'
rm 'Projects/LabStep2CreateOutletsAndActionsTwoButtons/.DS_Store'
rm 'Projects/LabStep3AddCodeForYourActionsTwoButtons/.DS_Store'