- 1. Create a Landmark Model
- 2. Create the Row View
- 3. Customize the Row Preview
- 4. Create the List of Landmarks
- 5. Make the List Dynamic
- 6. Set Up Navigation Between List and Detail
- 7. Pass Data into Child Views
- 8. Generate Previews Dynamically
In the first tutorial, you hard-coded information into all of your custom views. Here, you’ll create a model to store data that you can pass into your views.
Use the completed project from the previous tutorial and the resources available from this tutorial’s project files to get started.
Drag landmarkData.json in the downloaded files Resources folder into your project’s navigation pane; in the dialog that appears, select “Copy items if needed” and the Landmarks target, and then click Finish.
You’ll use this sample data throughout the remainder of this tutorial, and for all that follow.
Choose File > New > File to create a new Swift file in your project, and name it Landmark.swift.
Define a Landmark structure with a few properties matching names of some of the keys in the landmarkData.json data file.
Adding Codable conformance makes it easier to move data between the structure and a data file. You’ll rely on the Decodable component of the Codable protocol later in this section to read data from file.
import Foundation
struct Landmark: Hashable, Codable {
var id: Int
var name: String
var park: String
var state: String
var description: String
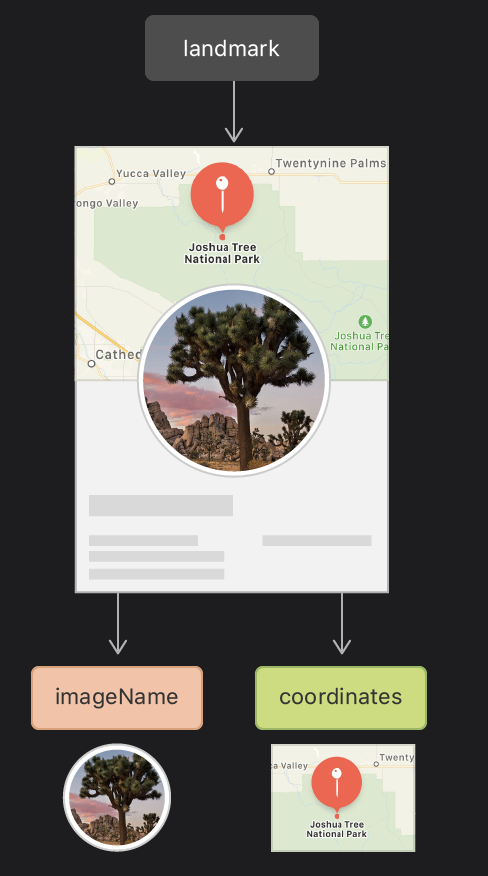
}In the next few steps you’ll model the image associated with each landmark.
Drag the JPG files from the project files’ Resources folder into your project’s asset catalog. Xcode creates a new image set for each image.
The new images join the one for Turtle Rock that you added in the previous tutorial.
Add an imageName property to read the name of the image from the data, and a computed image property that loads an image from the asset catalog.
import Foundation
import SwiftUI

struct Landmark: Hashable, Codable {
    var id: Int
    var name: String
    var park: String
    var state: String
    var description: String

    private var imageName: String
    var image: Image {
        Image(imageName)
    }
}Add a coordinates property to the structure using a nested Coordinates type that reflects the storage in the JSON data structure.
import Foundation
import SwiftUI

struct Landmark: Hashable, Codable {
    var id: Int
    var name: String
    var park: String
    var state: String
    var description: String

    private var imageName: String
    var image: Image {
        Image(imageName)
    }

    private var coordinates: Coordinates

    struct Coordinates: Hashable, Codable {
        var latitude: Double
        var longitude: Double
    }
}
You mark this property as private because you’ll use it only to create a public computed property in the next step.
Compute a locationCoordinate property that’s useful for interacting with the MapKit framework.
import Foundation
import SwiftUI
import CoreLocation

struct Landmark: Hashable, Codable {
    var id: Int
    var name: String
    var park: String
    var state: String
    var description: String

    private var imageName: String
    var image: Image {
        Image(imageName)
    }

    private var coordinates: Coordinates

    struct Coordinates: Hashable, Codable {
        var latitude: Double
        var longitude: Double
    }

    var locationCoordinate: CLLocationCoordinate2D {
        CLLocationCoordinate2D(latitude: coordinates.latitude, longitude: coordinates.longitude)
    }
}Create a new Swift file in your project and name it ModelData.swift.
Create a load(_:) method that fetches JSON data with a given name from the app’s main bundle.
The load method relies on the return type’s conformance to the Decodable protocol, which is one component of the Codable protocol.
import Foundation

func load<T: Decodable>(_ filename: String) -> T {
    let data: Data

    guard let file = Bundle.main.url(forResource: filename, withExtension: nil)
    else {
        fatalError("Couldn't find \(filename) in main bundle.")
    }

    do {
        data = try Data(contentsOf: file)
    } catch {
        fatalError("Couldn't load \(filename) from main bundle:\n\(error)")
    }

    do {
        let decoder = JSONDecoder()
        return try decoder.decode(T.self, from: data)
    } catch {
        fatalError("Couldn't parse \(filename) as \(T.self):\n\(error)")
    }
}
The load method relies on the return type’s conformance to the Decodable protocol, which is one component of the Codable protocol.
Create an array of landmarks that you initialize from landmarkData.json.
import Foundation

var landmarks: [Landmark] = load("landmarkData.json")

func load<T: Decodable>(_ filename: String) -> T {
    let data: Data

    guard let file = Bundle.main.url(forResource: filename, withExtension: nil)
    else {
        fatalError("Couldn't find \(filename) in main bundle.")
    }

    do {
        data = try Data(contentsOf: file)
    } catch {
        fatalError("Couldn't load \(filename) from main bundle:\n\(error)")
    }

    do {
        let decoder = JSONDecoder()
        return try decoder.decode(T.self, from: data)
    } catch {
        fatalError("Couldn't parse \(filename) as \(T.self):\n\(error)")
    }
}
Before moving on, group related files together to make it easier to manage your growing project.
Put ContentView.swift, CircleImage.swift, and MapView.swift into a Views group, landmarkData.json in a Resources group, and Landmark.swift and ModelData.swift into a Model group.
Tip: You can create groups of existing items by selecting the items to add to the group, and then choosing
File > New > Groupfrom Selection in the Xcode menu.
The first view you’ll build in this tutorial is a row for displaying details about each landmark. This row view stores information in a property for the landmark it displays, so that one view can display any landmark. Later, you’ll combine multiple rows into a list of landmarks.
Create a new SwiftUI view in the Views group named LandmarkRow.swift.
If the preview isn’t visible already, show the canvas by choosing Editor > Canvas, and then click Resume.
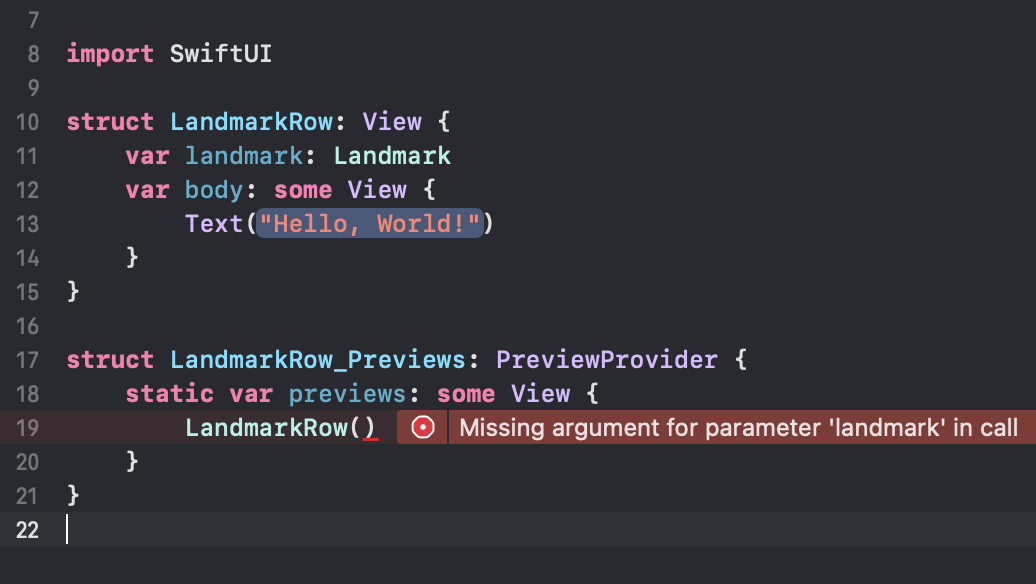
Add landmark as a stored property of LandmarkRow.
When you add the
landmarkproperty, the preview stops working, because theLandmarkRowtype needs alandmarkinstance during initialization.
struct LandmarkRow: View {
    var landmark: Landmark
    var body: some View {
        Text(/*@START_MENU_TOKEN@*/"Hello, World!"/*@END_MENU_TOKEN@*/)
    }
}

struct LandmarkRow_Previews: PreviewProvider {
    static var previews: some View {
        LandmarkRow()
    }
}
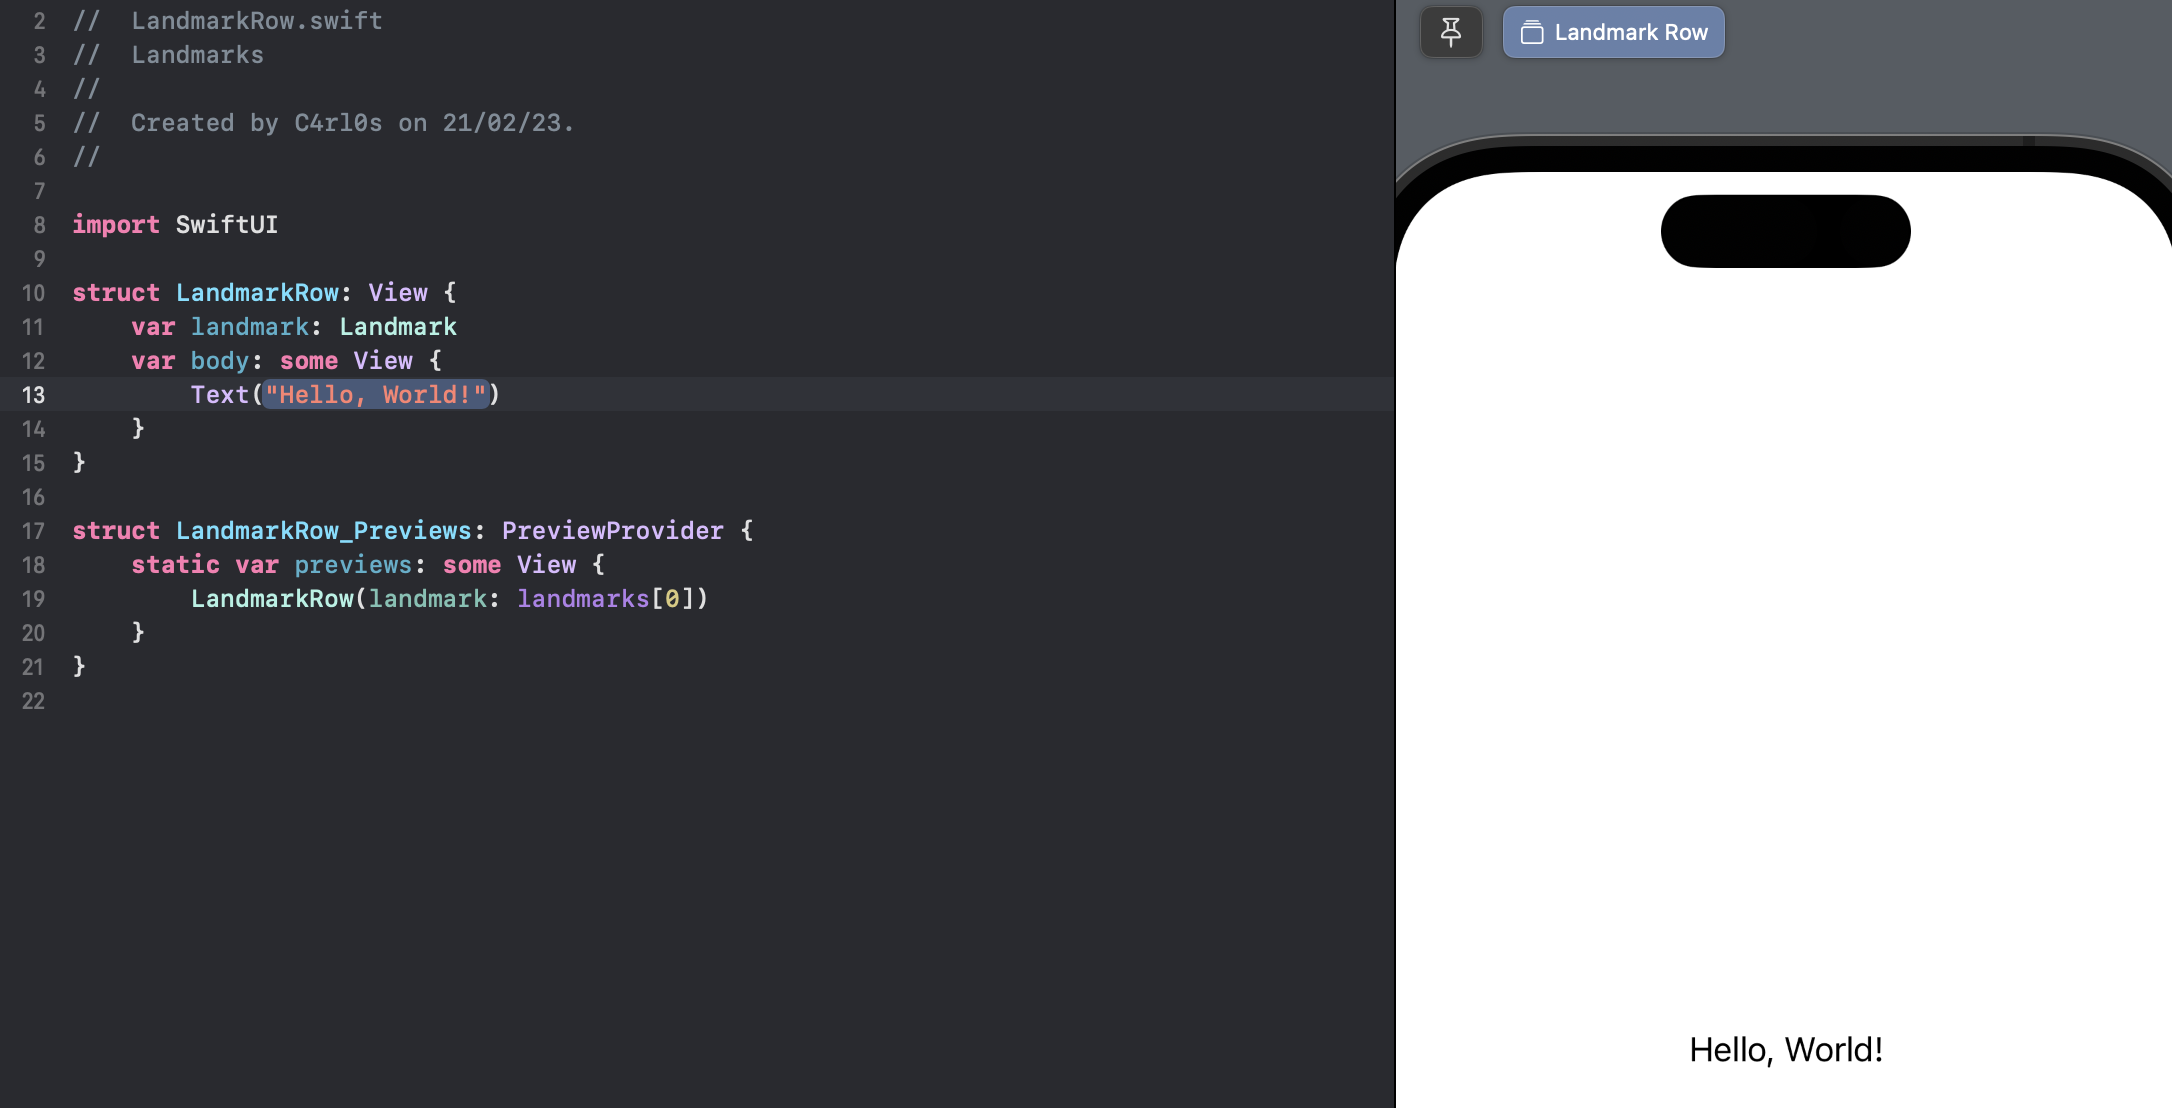
To fix the preview, you’ll need to modify the preview provider.
In the previews static property of LandmarkRow_Previews, add the landmark parameter to the LandmarkRow initializer, specifying the first element of the landmarks array.
import SwiftUI

struct LandmarkRow: View {
    var landmark: Landmark
    var body: some View {
        Text(/*@START_MENU_TOKEN@*/"Hello, World!"/*@END_MENU_TOKEN@*/)
    }
}

struct LandmarkRow_Previews: PreviewProvider {
    static var previews: some View {
        LandmarkRow(landmark: landmarks[0])
    }
}
With that fixed, you can build the layout for the row.
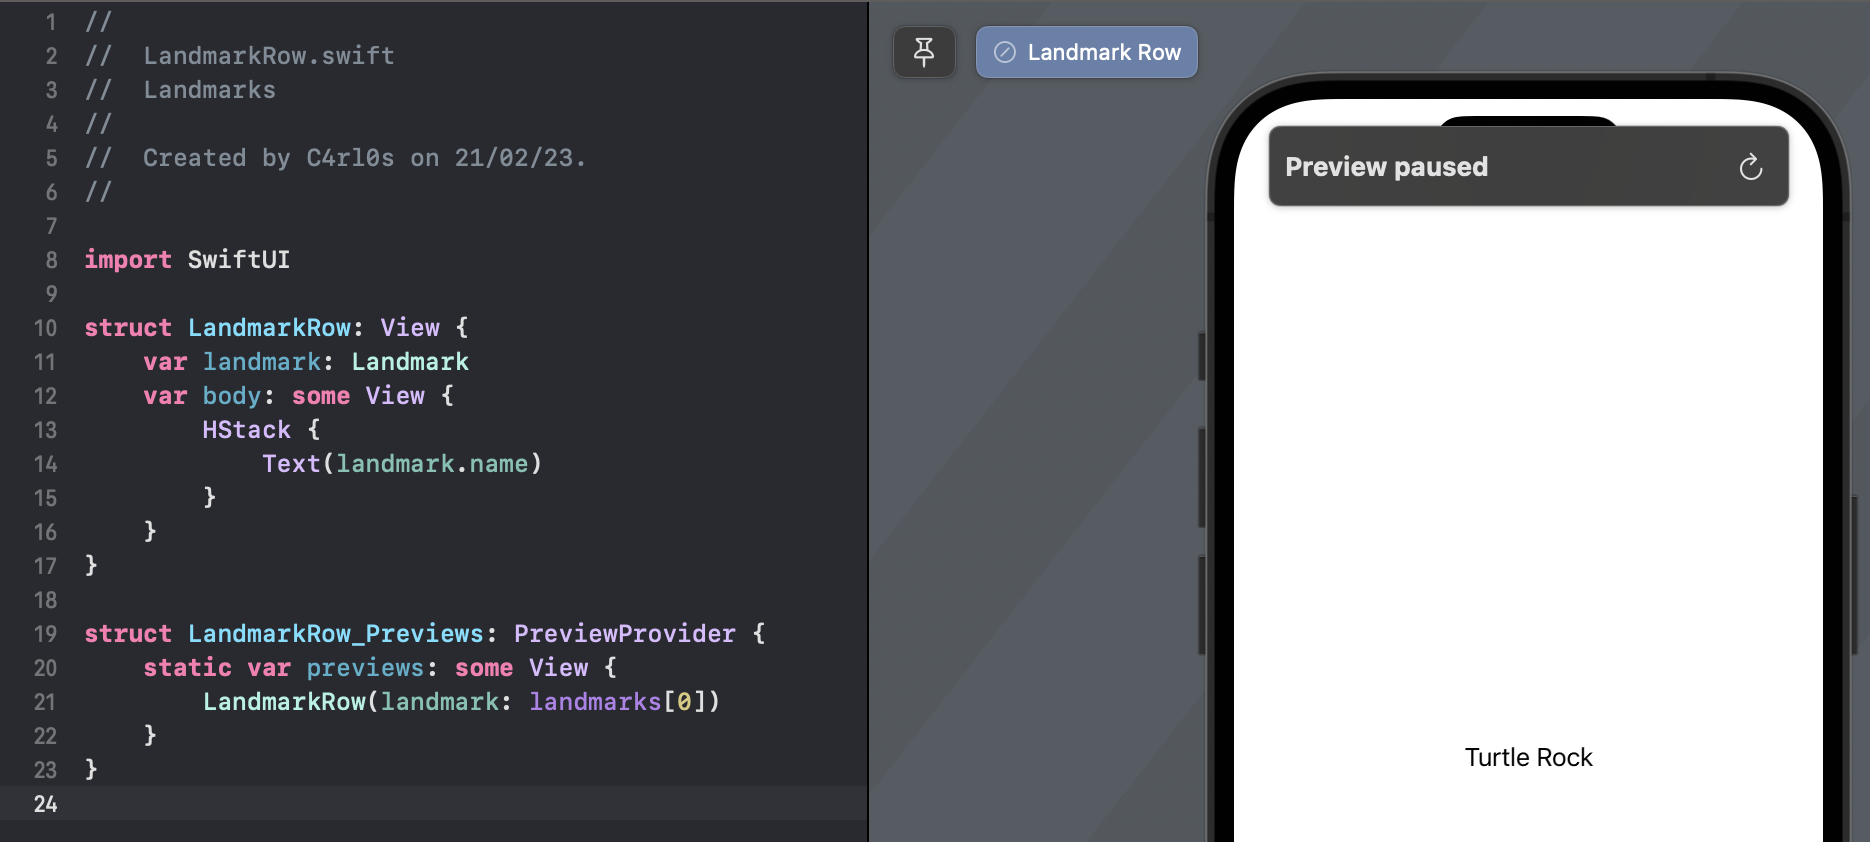
Embed the existing text view in an HStack.
import SwiftUI

struct LandmarkRow: View {
    var landmark: Landmark
    var body: some View {
        HStack {
            Text("Hello, World!")
        }
    }
}

struct LandmarkRow_Previews: PreviewProvider {
    static var previews: some View {
        LandmarkRow(landmark: landmarks[0])
    }
}Modify the text view to use the landmark property’s name.
import SwiftUI

struct LandmarkRow: View {
    var landmark: Landmark
    var body: some View {
        HStack {
            Text(landmark.name)
        }
    }
}

struct LandmarkRow_Previews: PreviewProvider {
    static var previews: some View {
        LandmarkRow(landmark: landmarks[0])
    }
}
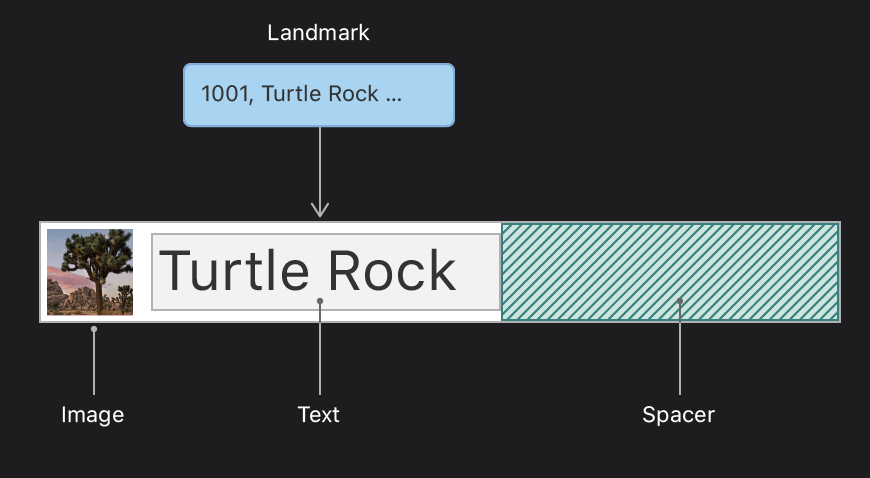
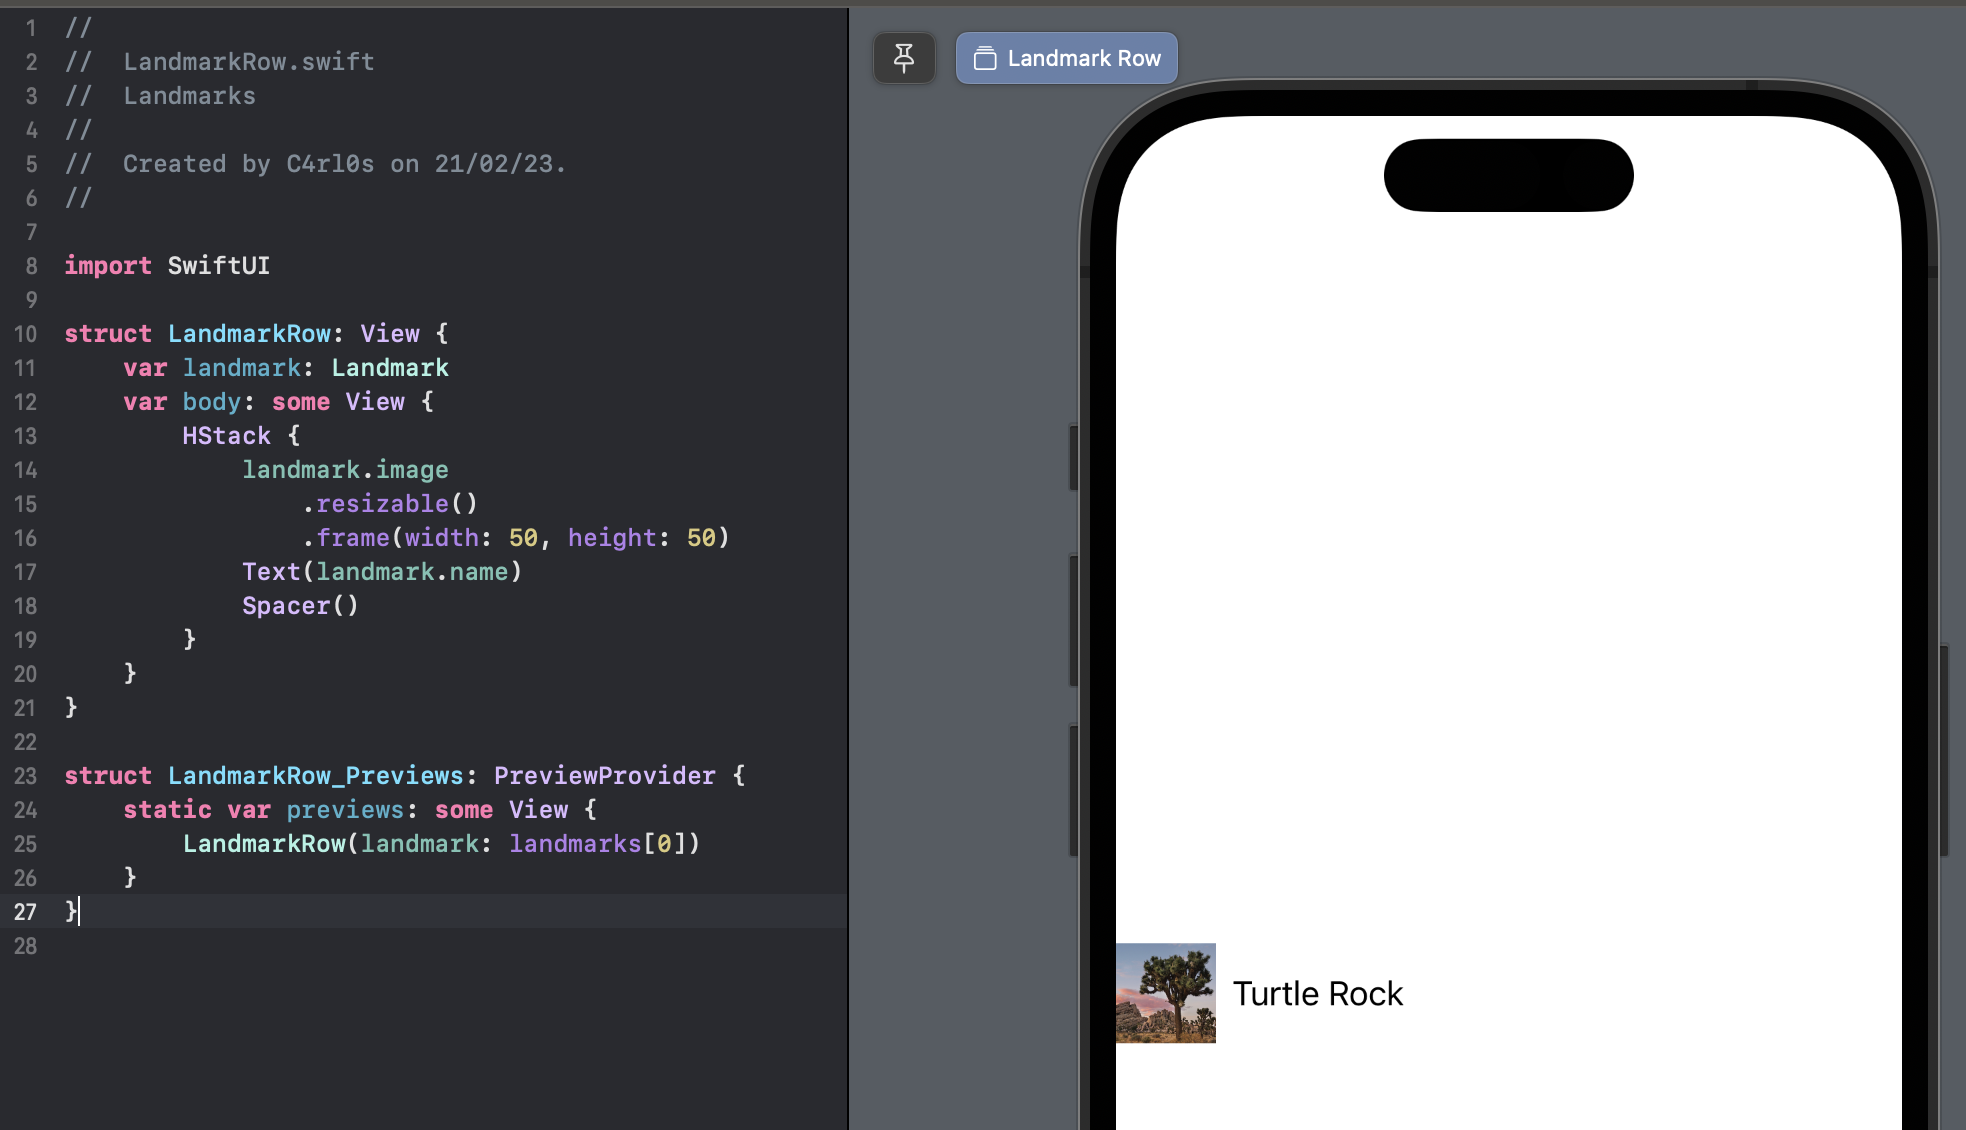
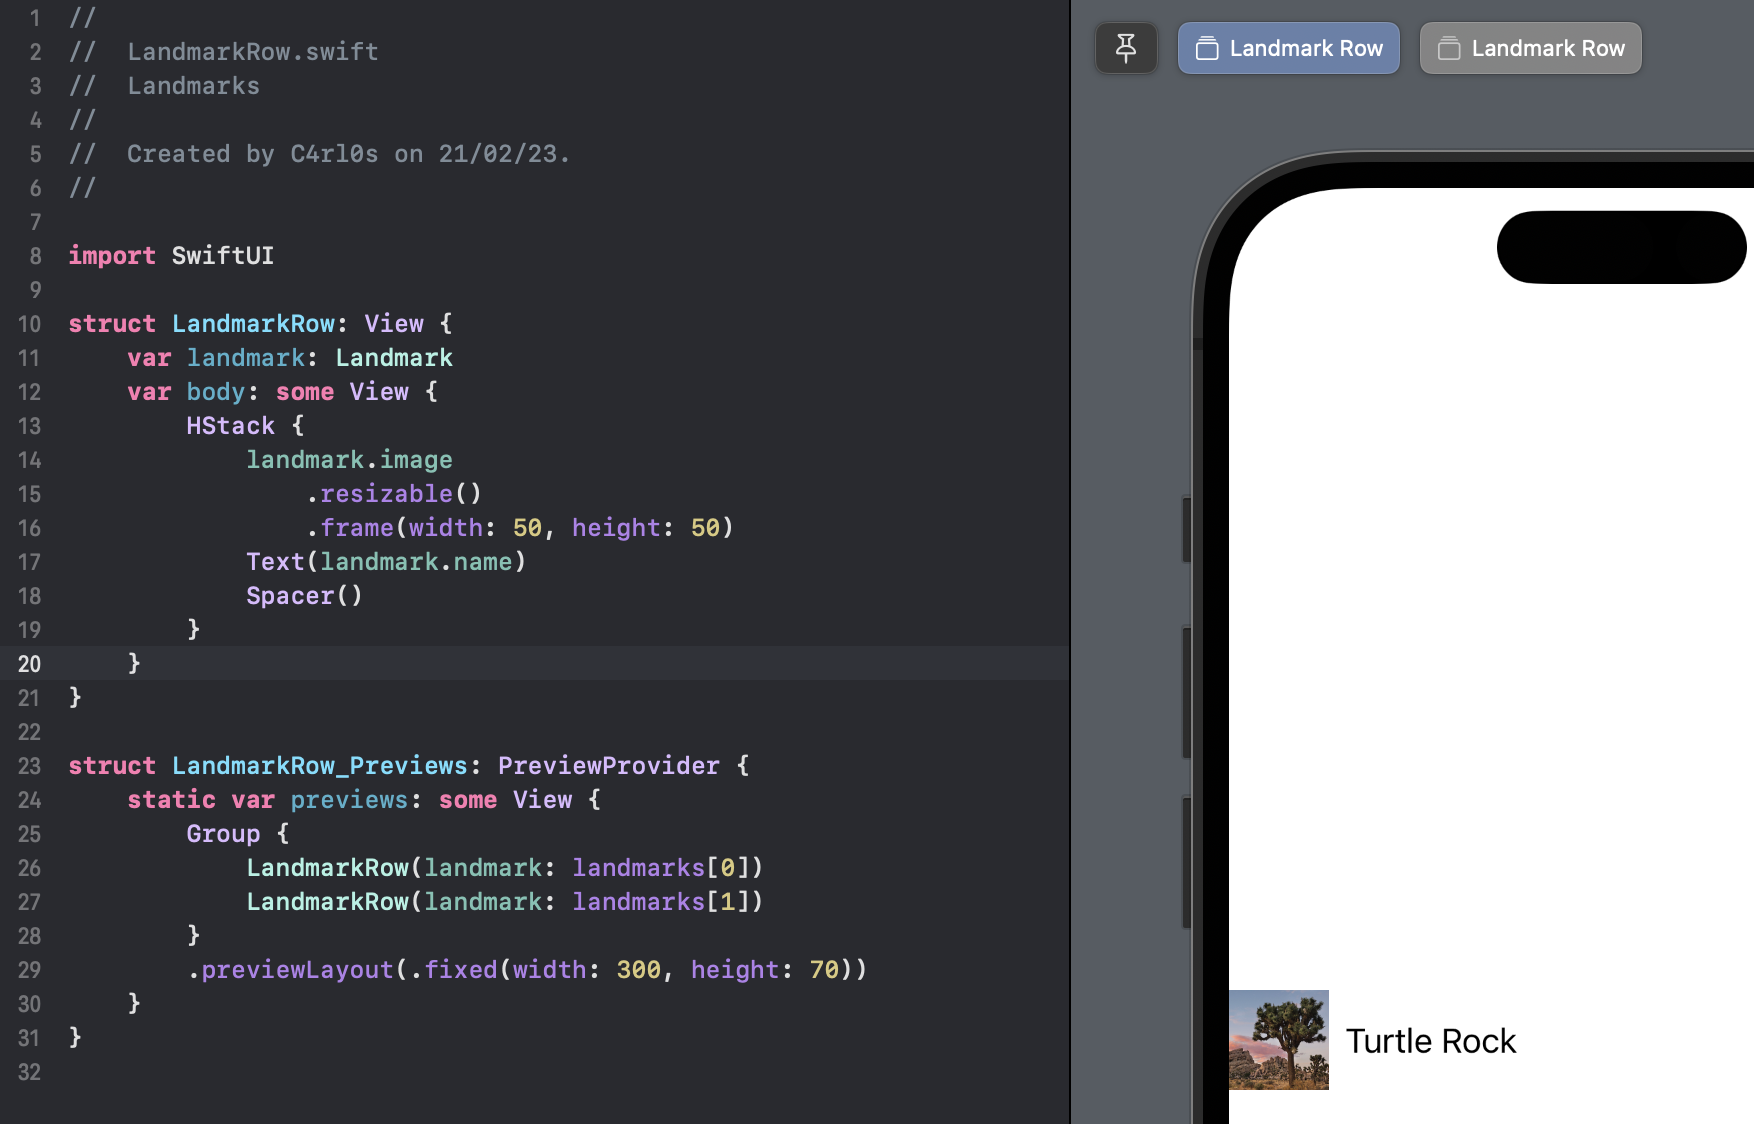
Complete the row by adding an image before the text view, and a spacer after it.
import SwiftUI

struct LandmarkRow: View {
    var landmark: Landmark
    var body: some View {
        HStack {
            landmark.image
                .resizable()
                .frame(width: 50, height: 50)
            Text(landmark.name)
            Spacer()
        }
    }
}

struct LandmarkRow_Previews: PreviewProvider {
    static var previews: some View {
        LandmarkRow(landmark: landmarks[0])
    }
}
Xcode’s canvas automatically recognizes and displays any type in the current editor that conforms to the PreviewProvider protocol. A preview provider returns one or more views, with options to configure the size and device.
You can customize the returned content from a preview provider to render exactly the previews that are most helpful to you.
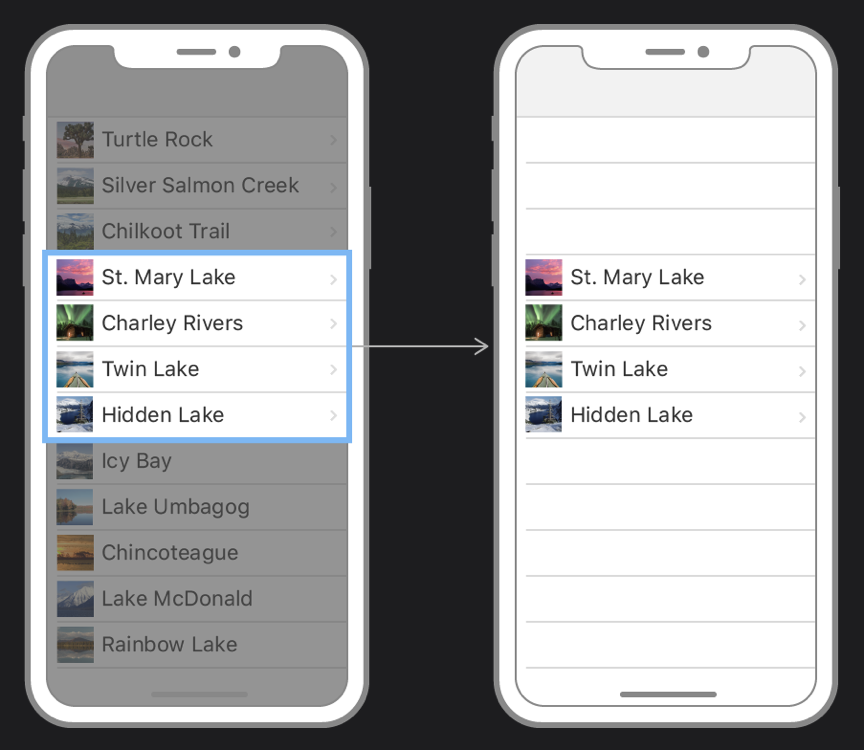
In LandmarkRow_Previews, update the landmark parameter to be the second element in the landmarks array.
import SwiftUI

struct LandmarkRow: View {
    var landmark: Landmark
    var body: some View {
        HStack {
            landmark.image
                .resizable()
                .frame(width: 50, height: 50)
            Text(landmark.name)
            Spacer()
        }
    }
}

struct LandmarkRow_Previews: PreviewProvider {
    static var previews: some View {
        LandmarkRow(landmark: landmarks[1])
    }
}
The preview immediately changes to show the second sample landmark instead of the first.
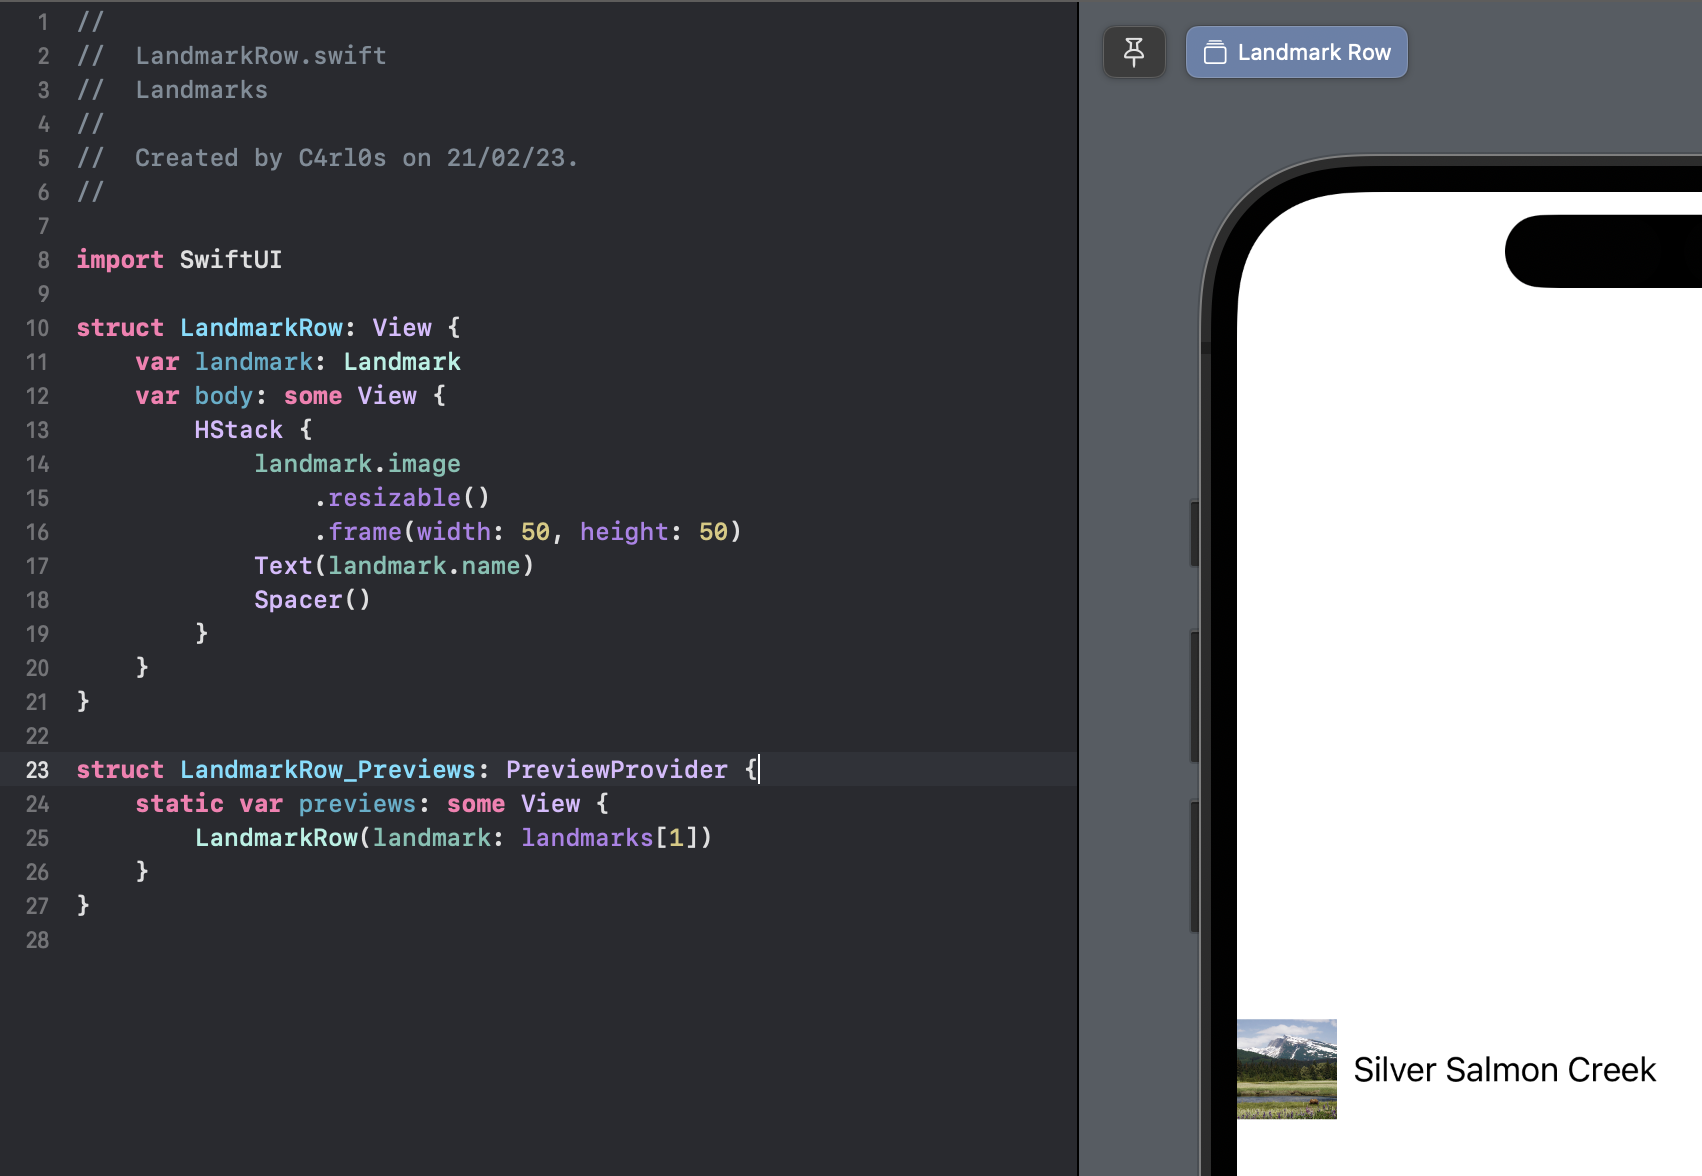
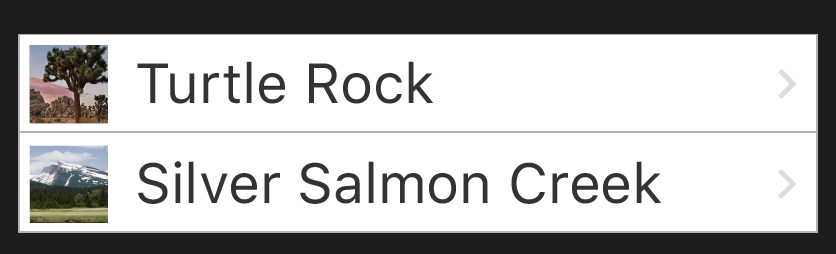
Use the previewLayout(_:) modifier to set a size that approximates a row in a list.
import SwiftUI
struct LandmarkRow: View {
var landmark: Landmark
var body: some View {
HStack {
landmark.image
.resizable()
.frame(width: 50, height: 50)
Text(landmark.name)
Spacer()
}
}
}
struct LandmarkRow_Previews: PreviewProvider {
static var previews: some View {
LandmarkRow(landmark: landmarks[1])
.previewLayout(.fixed(width: 300, height: 70))
}
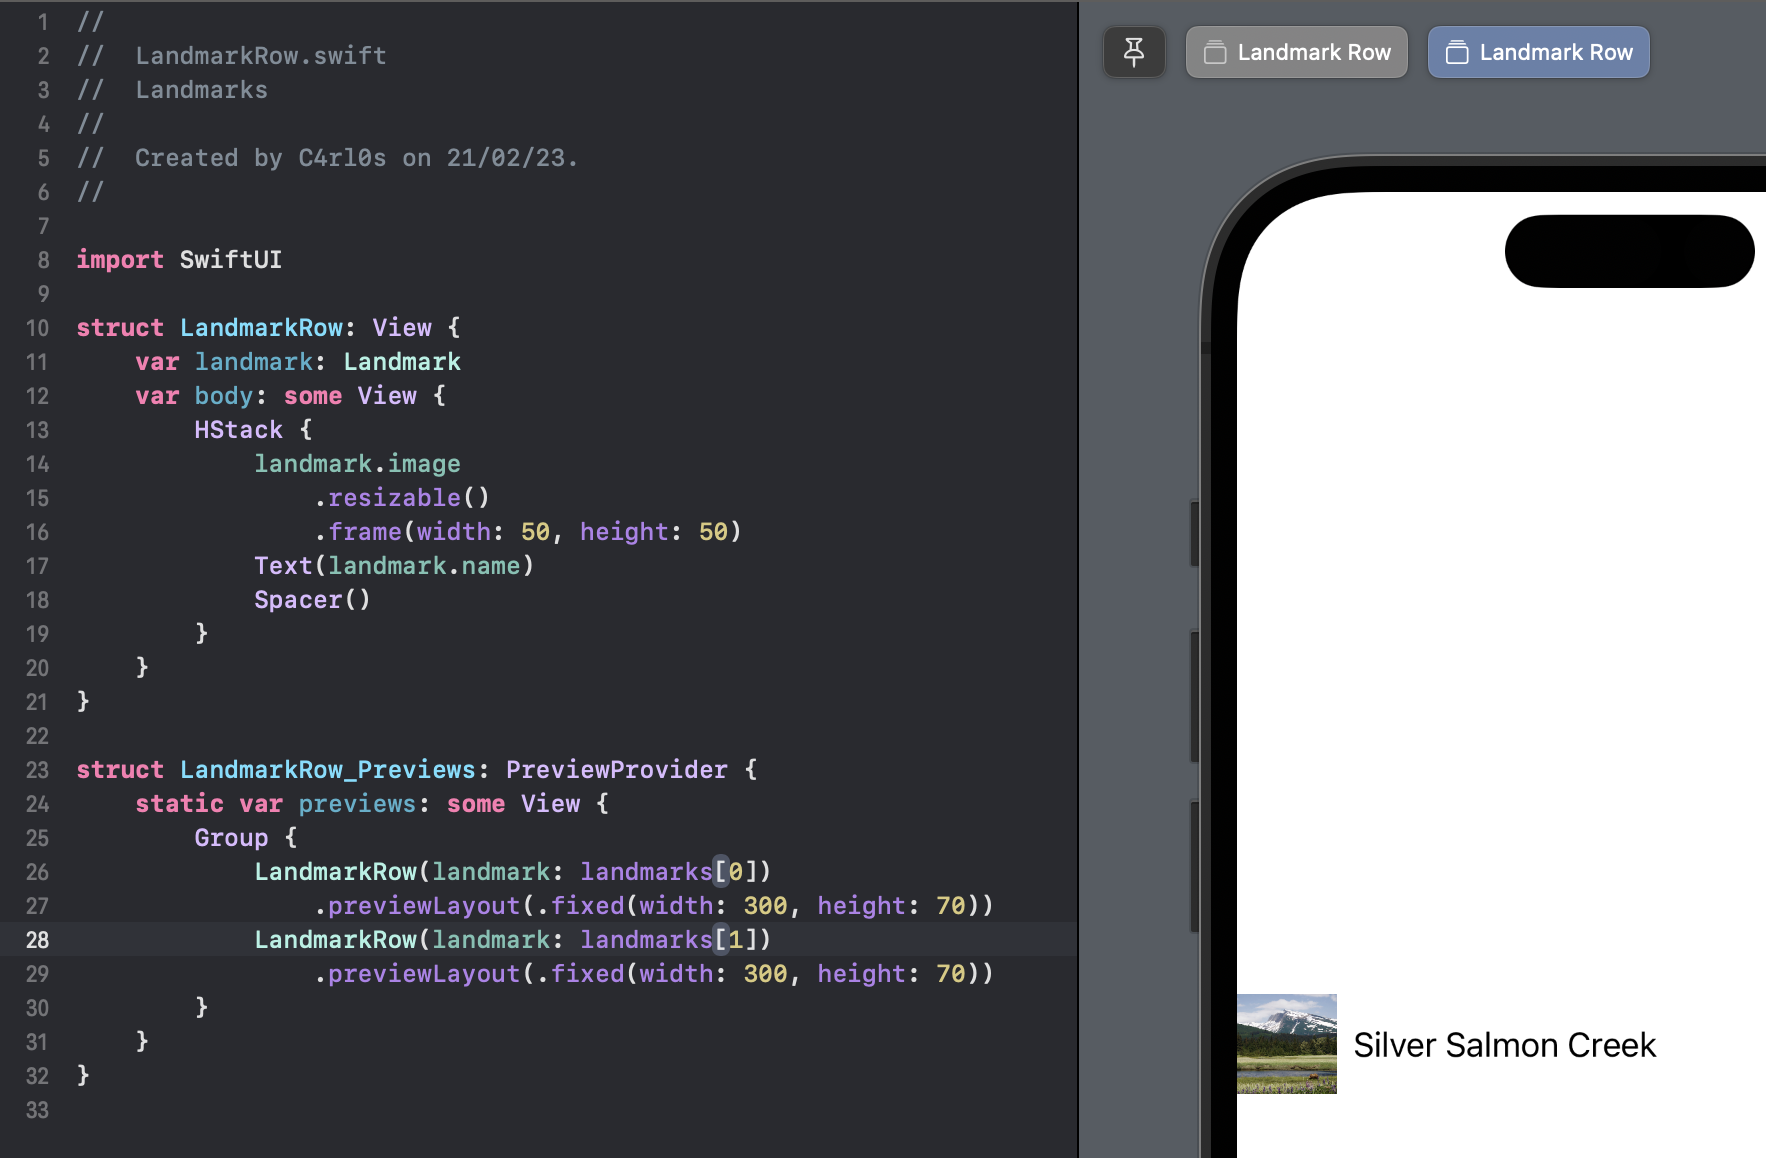
}You can use a Group to return multiple previews from a preview provider.

Wrap the returned row in a Group, and add the first row back again.
import SwiftUI

struct LandmarkRow: View {
    var landmark: Landmark
    var body: some View {
        HStack {
            landmark.image
                .resizable()
                .frame(width: 50, height: 50)
            Text(landmark.name)
            Spacer()
        }
    }
}

struct LandmarkRow_Previews: PreviewProvider {
    static var previews: some View {
        Group {
            LandmarkRow(landmark: landmarks[0])
                .previewLayout(.fixed(width: 300, height: 70))
            LandmarkRow(landmark: landmarks[1])
                .previewLayout(.fixed(width: 300, height: 70))
        }
    }
}
Group is a container for grouping view content. Xcode renders the group’s child views as separate previews in the canvas.
To simplify the code, move the previewLayout(_:) call to the outside of the group’s child declarations.
import SwiftUI

struct LandmarkRow: View {
    var landmark: Landmark
    var body: some View {
        HStack {
            landmark.image
                .resizable()
                .frame(width: 50, height: 50)
            Text(landmark.name)
            Spacer()
        }
    }
}

struct LandmarkRow_Previews: PreviewProvider {
    static var previews: some View {
        Group {
            LandmarkRow(landmark: landmarks[0])
            LandmarkRow(landmark: landmarks[1])
        }
        .previewLayout(.fixed(width: 300, height: 70))
    }
}
A view’s children inherit the view’s contextual settings, such as preview configurations.
The code you write in a preview provider only changes what Xcode displays in the canvas.
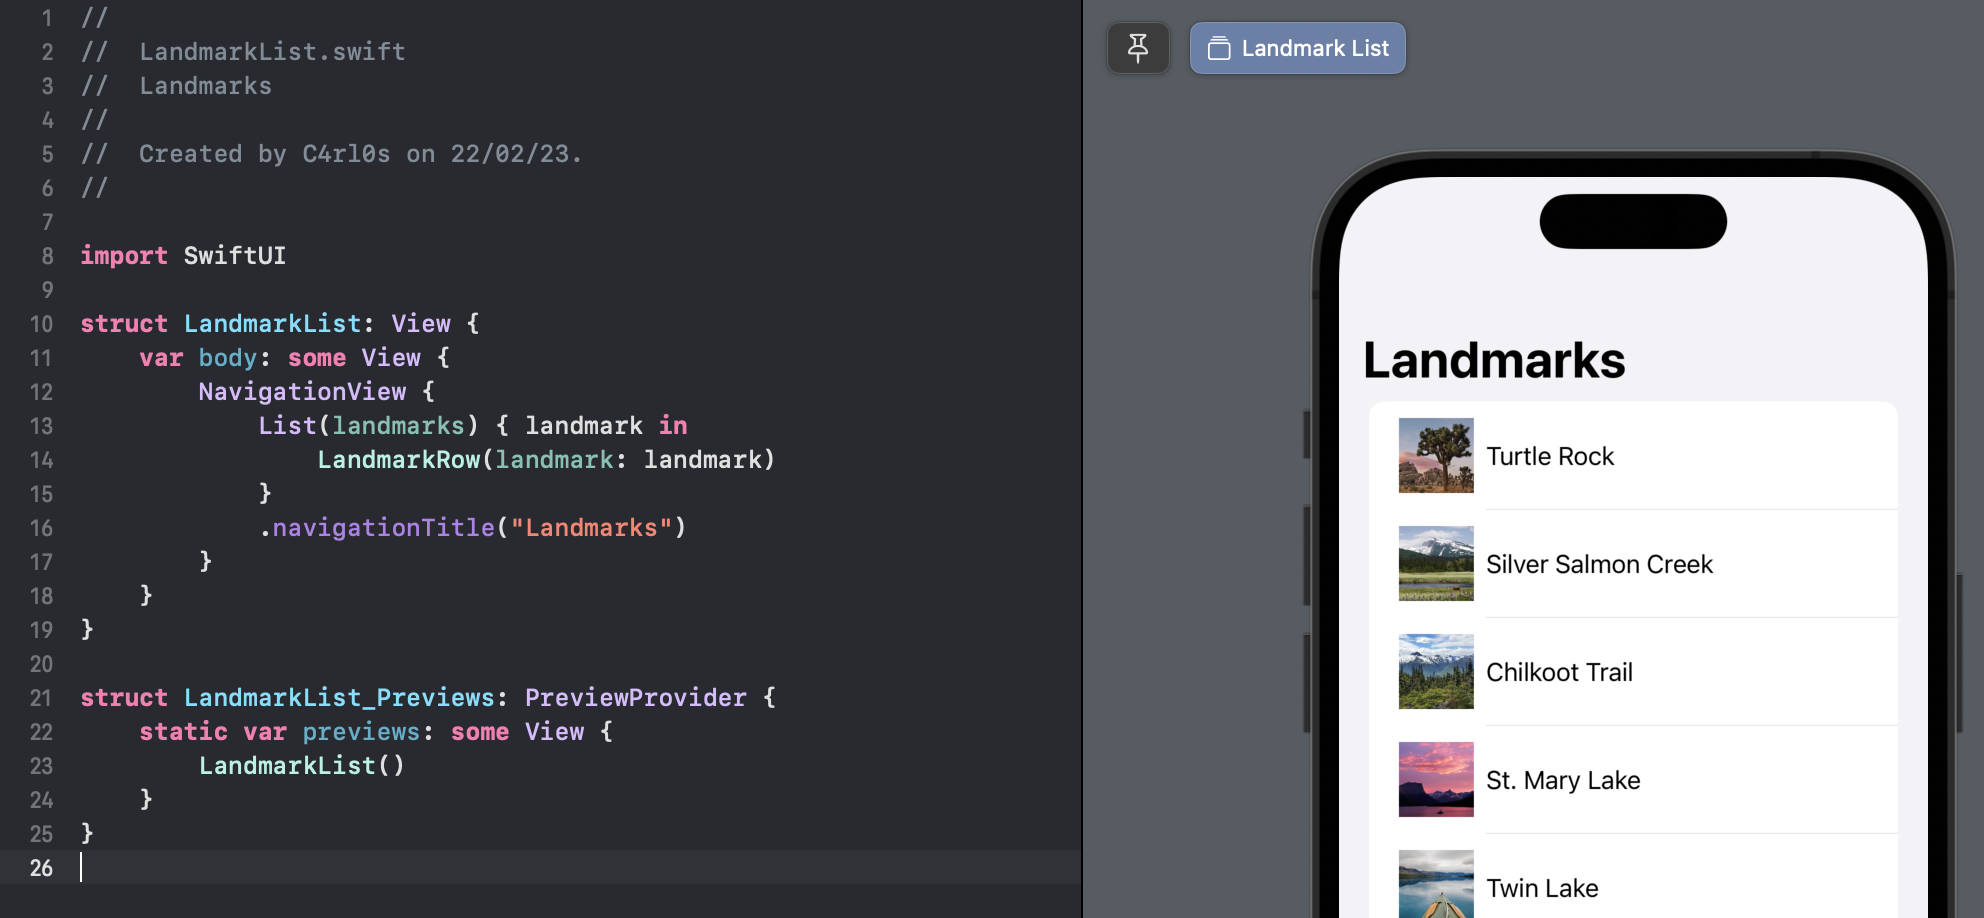
When you use SwiftUI’s List type, you can display a platform-specific list of views. The elements of the list can be static, like the child views of the stacks you’ve created so far, or dynamically generated. You can even mix static and dynamically generated views.
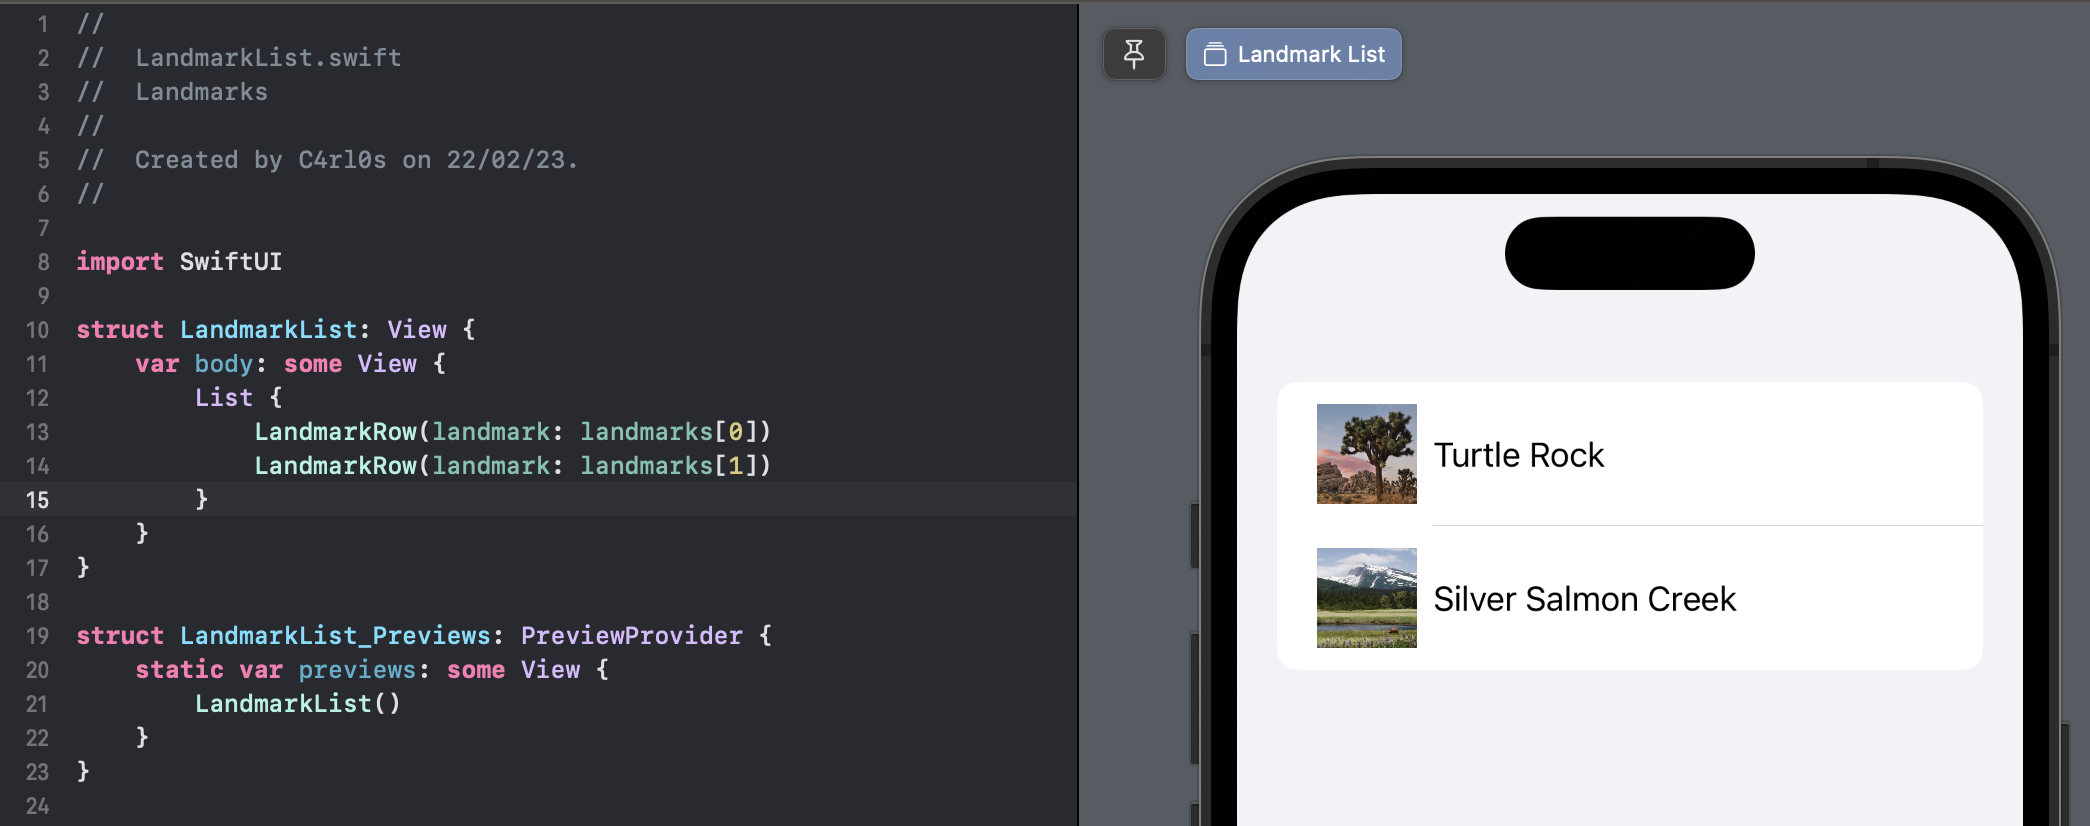
Create a new SwiftUI view in the Views group named LandmarkList.swift.
Replace the default Text view with a List, and provide LandmarkRow instances with the first two landmarks as the list’s children.
import SwiftUI

struct LandmarkList: View {
    var body: some View {
        List {
            LandmarkRow(landmark: landmarks[0])
            LandmarkRow(landmark: landmarks[1])
        }
    }
}

struct LandmarkList_Previews: PreviewProvider {
    static var previews: some View {
        LandmarkList()
    }
}
The preview shows the two landmarks rendered in a list style that’s appropriate for iOS.
Instead of specifying a list’s elements individually, you can generate rows directly from a collection.
You can create a list that displays the elements of a collection by passing your collection of data and a closure that provides a view for each element in the collection. The list transforms each element in the collection into a child view by using the supplied closure.
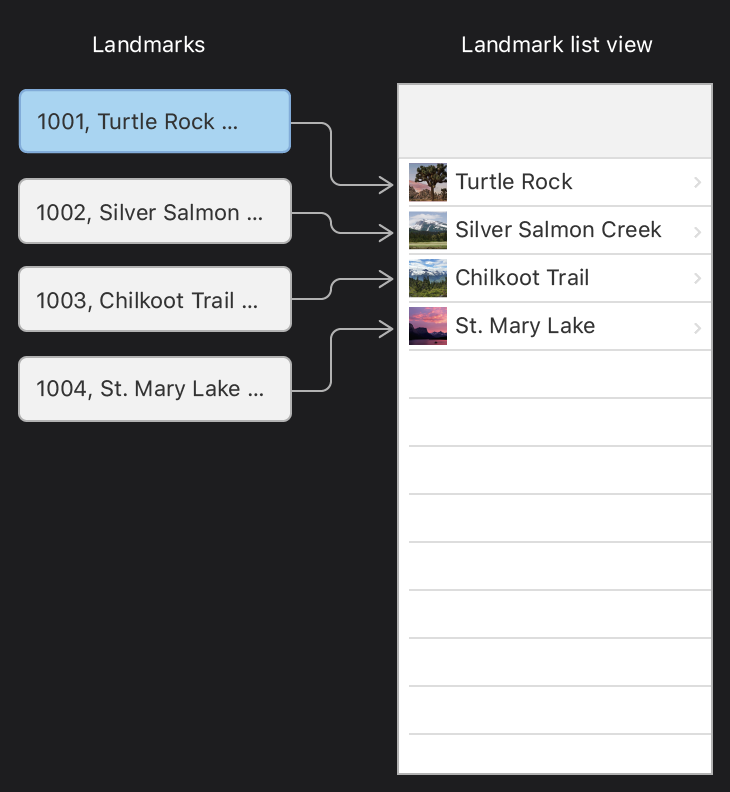
Remove the two static landmark rows, and instead pass the model data’s landmarks array to the List initializer.
import SwiftUI

struct LandmarkList: View {
    var body: some View {
        List(landmarks, id: \.id) { landmark in

        }
    }
}

struct LandmarkList_Previews: PreviewProvider {
    static var previews: some View {
        LandmarkList()
    }
}
Lists work with identifiable data. You can make your data identifiable in one of two ways:
- by passing along with your data a key path to a property that uniquely identifies each element,
- or by making your data type conform to the
Identifiableprotocol.
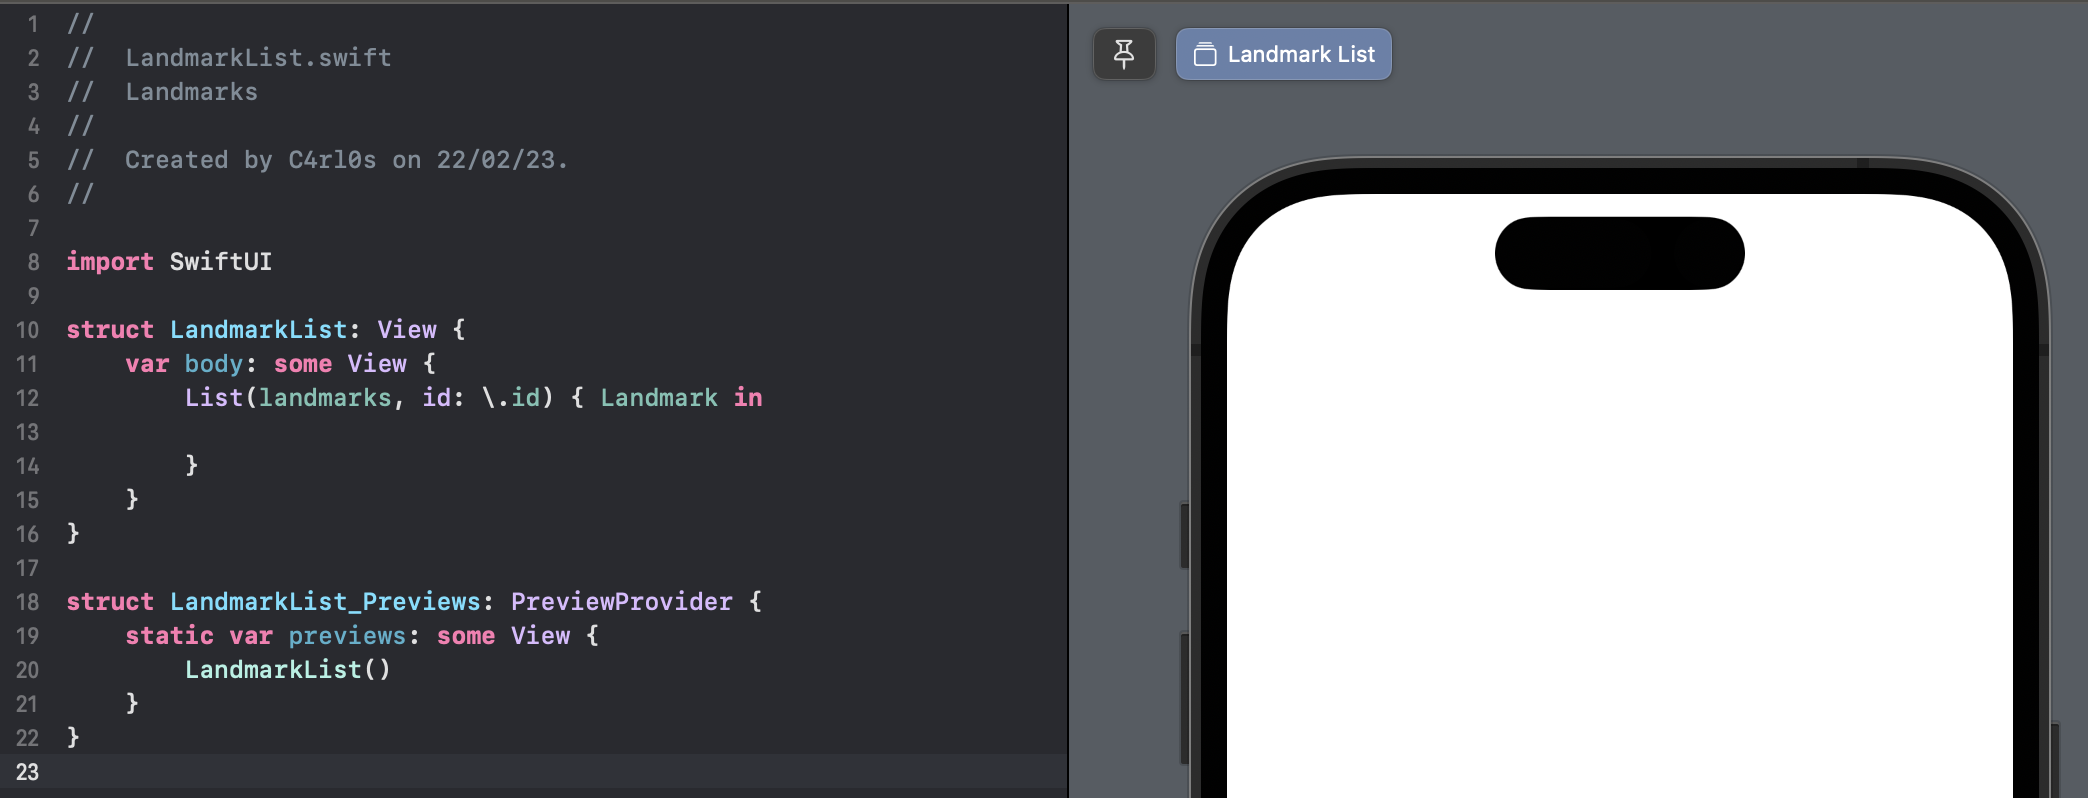
Complete the dynamically-generated list by returning a LandmarkRow from the closure.
import SwiftUI

struct LandmarkList: View {
    var body: some View {
        List(landmarks, id: \.id) { landmark in
            LandmarkRow(landmark: landmark)
        }
    }
}

struct LandmarkList_Previews: PreviewProvider {
    static var previews: some View {
        LandmarkList()
    }
}
This creates one LandmarkRow for each element in the landmarks array.
Next, you’ll simplify the List code by adding Identifiable conformance to the Landmark type.
Switch to Landmark.swift and declare conformance to the Identifiable protocol.
The Landmark data already has the id property required by Identifiable protocol; you only need to add a property to decode it when reading the data.
import Foundation
import SwiftUI
import CoreLocation

struct Landmark: Hashable, Codable, Identifiable {
    var id: Int
    var name: String
    var park: String
    var state: String
    var description: String

    private var imageName: String
    var image: Image {
        Image(imageName)
    }

    private var coordinates: Coordinates
    var locationCoordinate: CLLocationCoordinate2D {
        CLLocationCoordinate2D(
            latitude: coordinates.latitude,
            longitude: coordinates.longitude)
    }

    struct Coordinates: Hashable, Codable {
        var latitude: Double
        var longitude: Double
    }
}Switch back to LandmarkList.swift and remove the id parameter.
import SwiftUI

struct LandmarkList: View {
    var body: some View {
        List(landmarks) { landmark in
            LandmarkRow(landmark: landmark)
        }
    }
}

struct LandmarkList_Previews: PreviewProvider {
    static var previews: some View {
        LandmarkList()
    }
}
From now on, you’ll be able to use collections of Landmark elements directly.
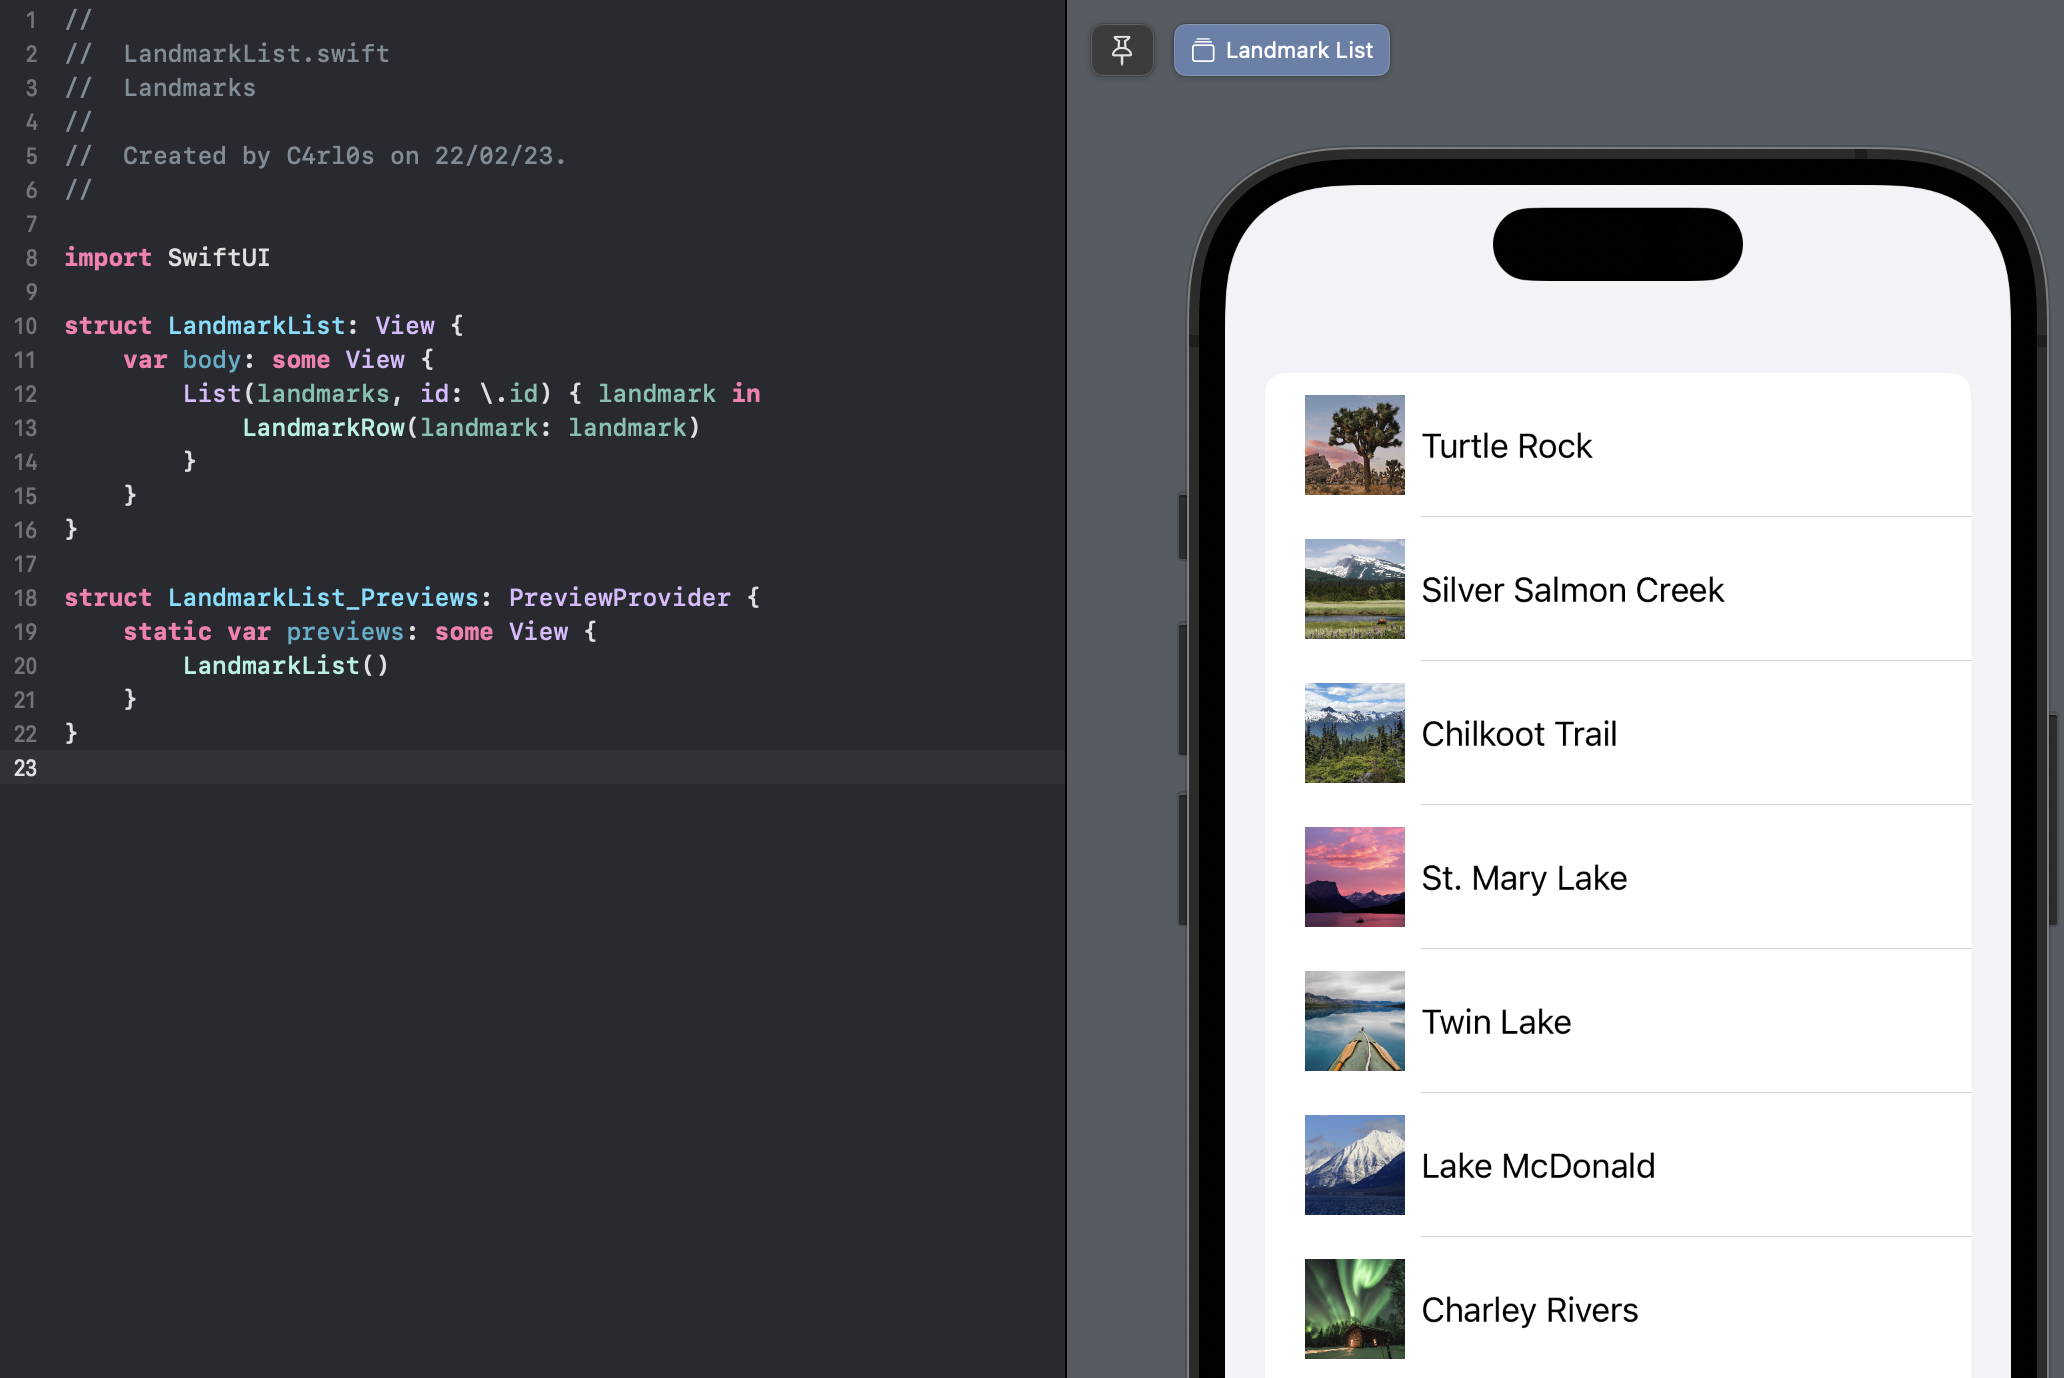
The list renders properly, but you can’t tap an individual landmark to see that landmark’s detail page yet.
You add navigation capabilities to a list by embedding it in a NavigationView, and then nesting each row in a NavigationLink to set up a transtition to a destination view.
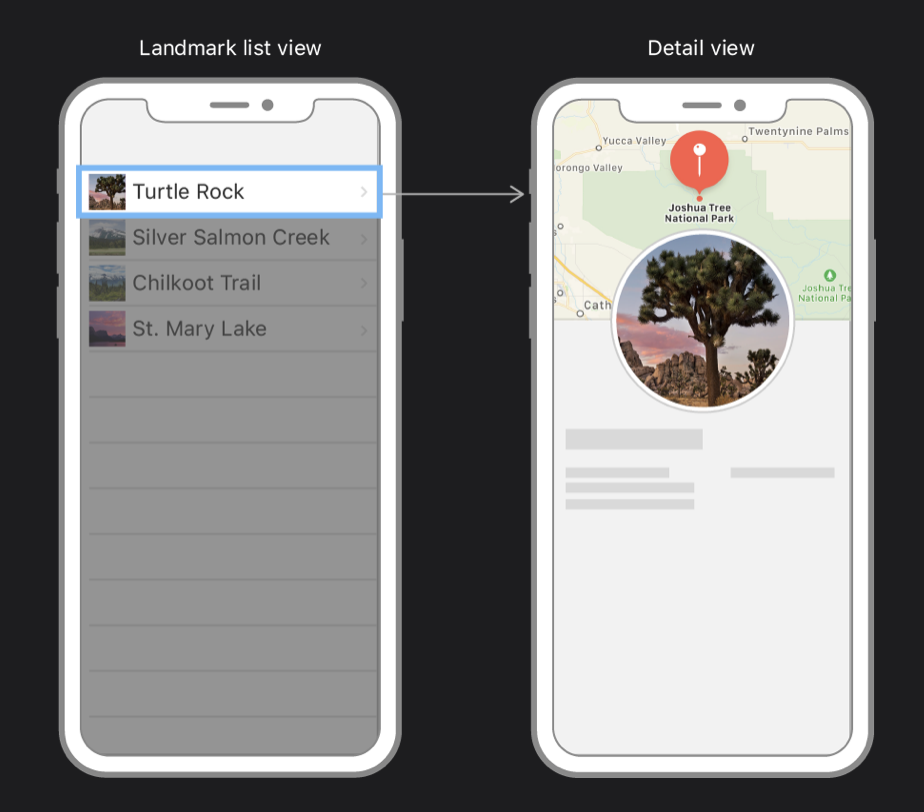
Prepare a detail view using the content you created in the previous tutorial and update the main content view to display the list view instead.
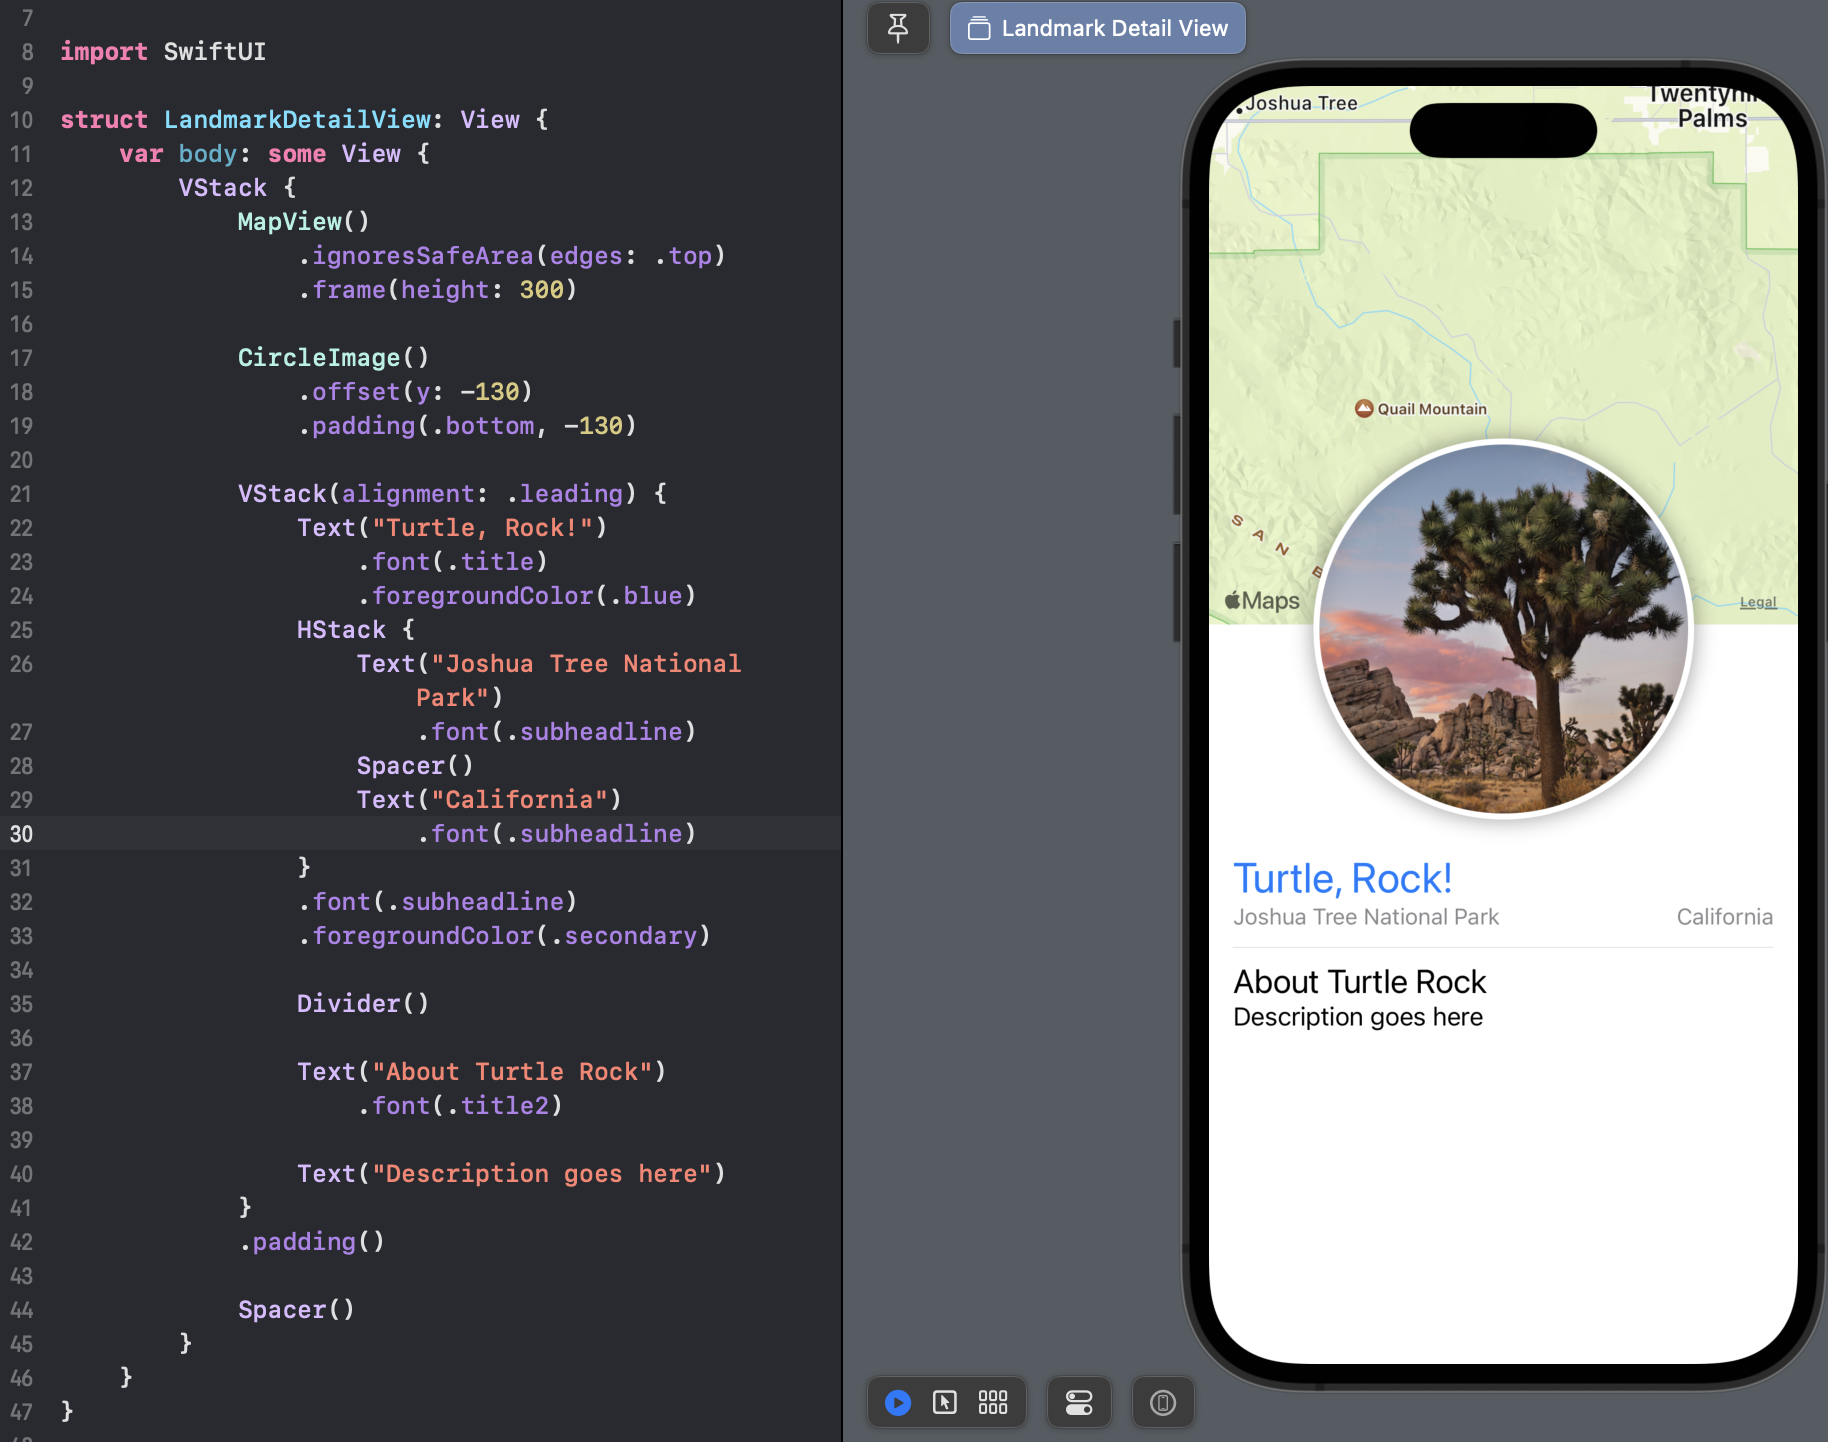
Create a new SwiftUI view named LandmarkDetailView.swift.
Copy the contents of the body property from ContentView into LandmarkDetail.
import SwiftUI

struct LandmarkDetailView: View {
    var body: some View {
        VStack {
            MapView()
                .ignoresSafeArea(edges: .top)
                .frame(height: 300)

            CircleImage()
                .offset(y: -130)
                .padding(.bottom, -130)

            VStack(alignment: .leading) {
                Text("Turtle, Rock!")
                    .font(.title)
                    .foregroundColor(.blue)
                HStack {
                    Text("Joshua Tree National Park")
                        .font(.subheadline)
                    Spacer()
                    Text("California")
                        .font(.subheadline)
                }
                .font(.subheadline)
                .foregroundColor(.secondary)

                Divider()

                Text("About Turtle Rock")
                    .font(.title2)

                Text("Description goes here")
            }
            .padding()

            Spacer()
        }
    }
}

struct LandmarkDetailView_Previews: PreviewProvider {
    static var previews: some View {
        LandmarkDetailView()
    }
}
Change ContentView to instead display LandmarkList
import SwiftUI

struct ContentView: View {
    var body: some View {
        LandmarkList()
    }
}

struct ContentView_Previews: PreviewProvider {
    static var previews: some View {
        ContentView()
    }
}
In the next few steps, you’ll add navigation among your list and detail views.
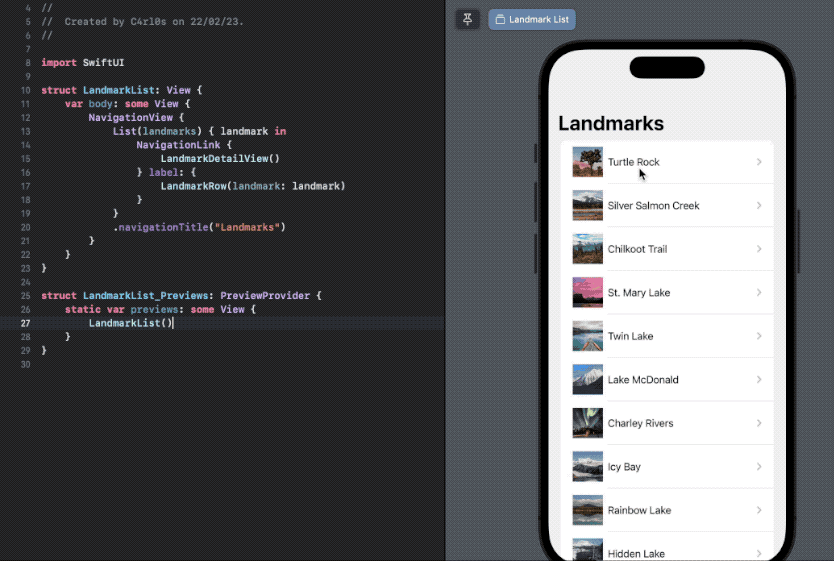
Embed the dynamically generated list of landmarks in a NavigationSplitView.
import SwiftUI

struct LandmarkList: View {
    var body: some View {
        NavigationSplitView {
            List(landmarks) { landmark in
                NavigationLink {
                    LandmarkDetailView()
                } label: {
                    LandmarkRow(landmark: landmark)
                }
            }
            .navigationTitle("Landmarks")
        } detail: {
            Text("Select a Landmark")
        }
    }
}

struct LandmarkList_Previews: PreviewProvider {
    static var previews: some View {
        LandmarkList()
    }
}Call the navigationTitle(_:) modifier method to set the title of the navigation bar when displaying the list.
import SwiftUI

struct LandmarkList: View {
    var body: some View {
        NavigationView {
            List(landmarks) { landmark in
                LandmarkRow(landmark: landmark)
            }
            .navigationTitle("Landmarks")
        }
    }
}

struct LandmarkList_Previews: PreviewProvider {
    static var previews: some View {
        LandmarkList()
    }
}
Inside the list’s closure, wrap the returned row in a NavigationLink, specifying the LandmarkDetailView view as the destination.
import SwiftUI

struct LandmarkList: View {
    var body: some View {
        NavigationView {
            List(landmarks) { landmark in
                NavigationLink {
                    LandmarkDetailView()
                } label: {
                    LandmarkRow(landmark: landmark)
                }
            }
            .navigationTitle("Landmarks")
        }
    }
}

struct LandmarkList_Previews: PreviewProvider {
    static var previews: some View {
        LandmarkList()
    }
}You can try out the navigation directly in the preview by switching to live mode. Click the Live Preview button and tap a landmark to visit the detail page.
The LandmarkDetail view still uses hard-coded details to show its landmark. Just like LandmarkRow, the LandmarkDetail type and the views it comprises need to use a landmark property as the source for their data.
Starting with the child views, you’ll convert CircleImage, MapView, and then LandmarkDetail to display data that’s passed in, rather than hard-coding each row.
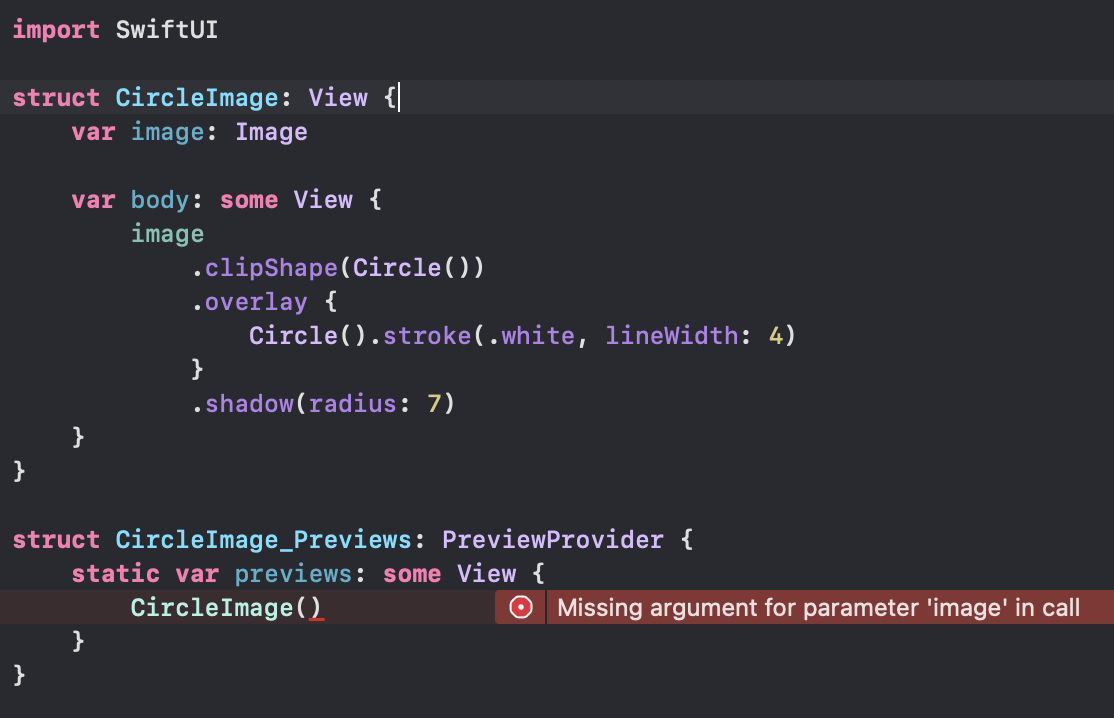
In CircleImage.swift, add a stored image property to CircleImage.
import SwiftUI

struct CircleImage: View {
    var image: Image

    var body: some View {
        image
            .clipShape(Circle())
            .overlay {
                Circle().stroke(.white, lineWidth: 4)
            }
            .shadow(radius: 7)
    }
}

struct CircleImage_Previews: PreviewProvider {
    static var previews: some View {
        CircleImage()
    }
}
This is a common pattern when building views using SwiftUI. Your custom views will often wrap and encapsulate a series of modifiers for a particular view.
Update the preview provider to pass the image of Turtle Rock.
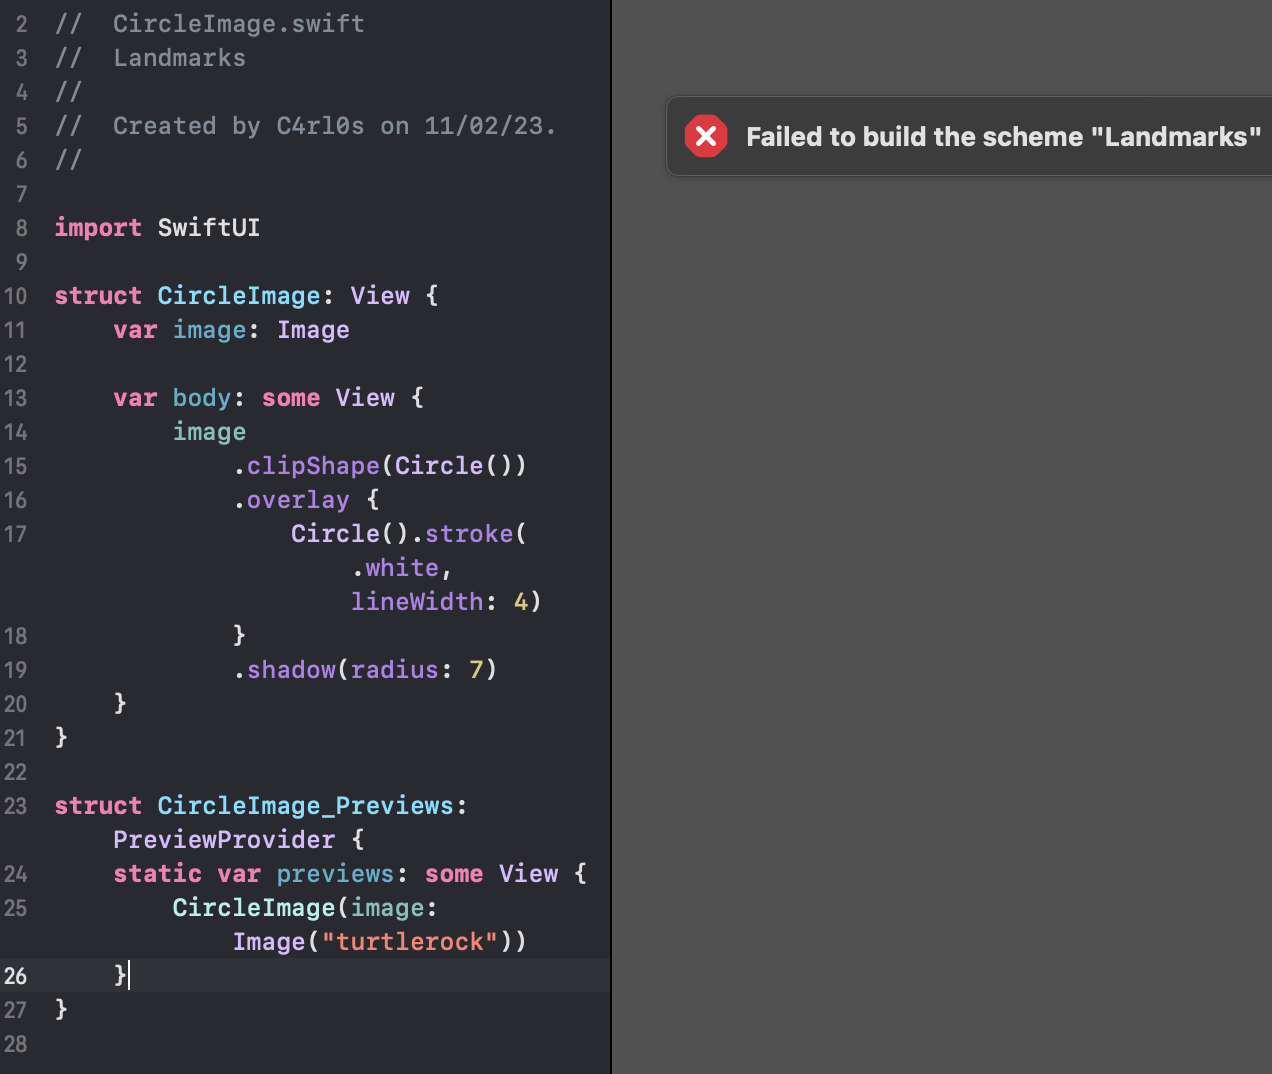
Even though you’ve fixed the preview logic, the preview fails to update because the build fails. The detail view, which instantiates a circle image, needs an input parameter as well.
import SwiftUI

struct CircleImage: View {
    var image: Image

    var body: some View {
        image
            .clipShape(Circle())
            .overlay {
                Circle().stroke(.white, lineWidth: 4)
            }
            .shadow(radius: 7)
    }
}

struct CircleImage_Previews: PreviewProvider {
    static var previews: some View {
        CircleImage(image: Image("turtlerock"))
    }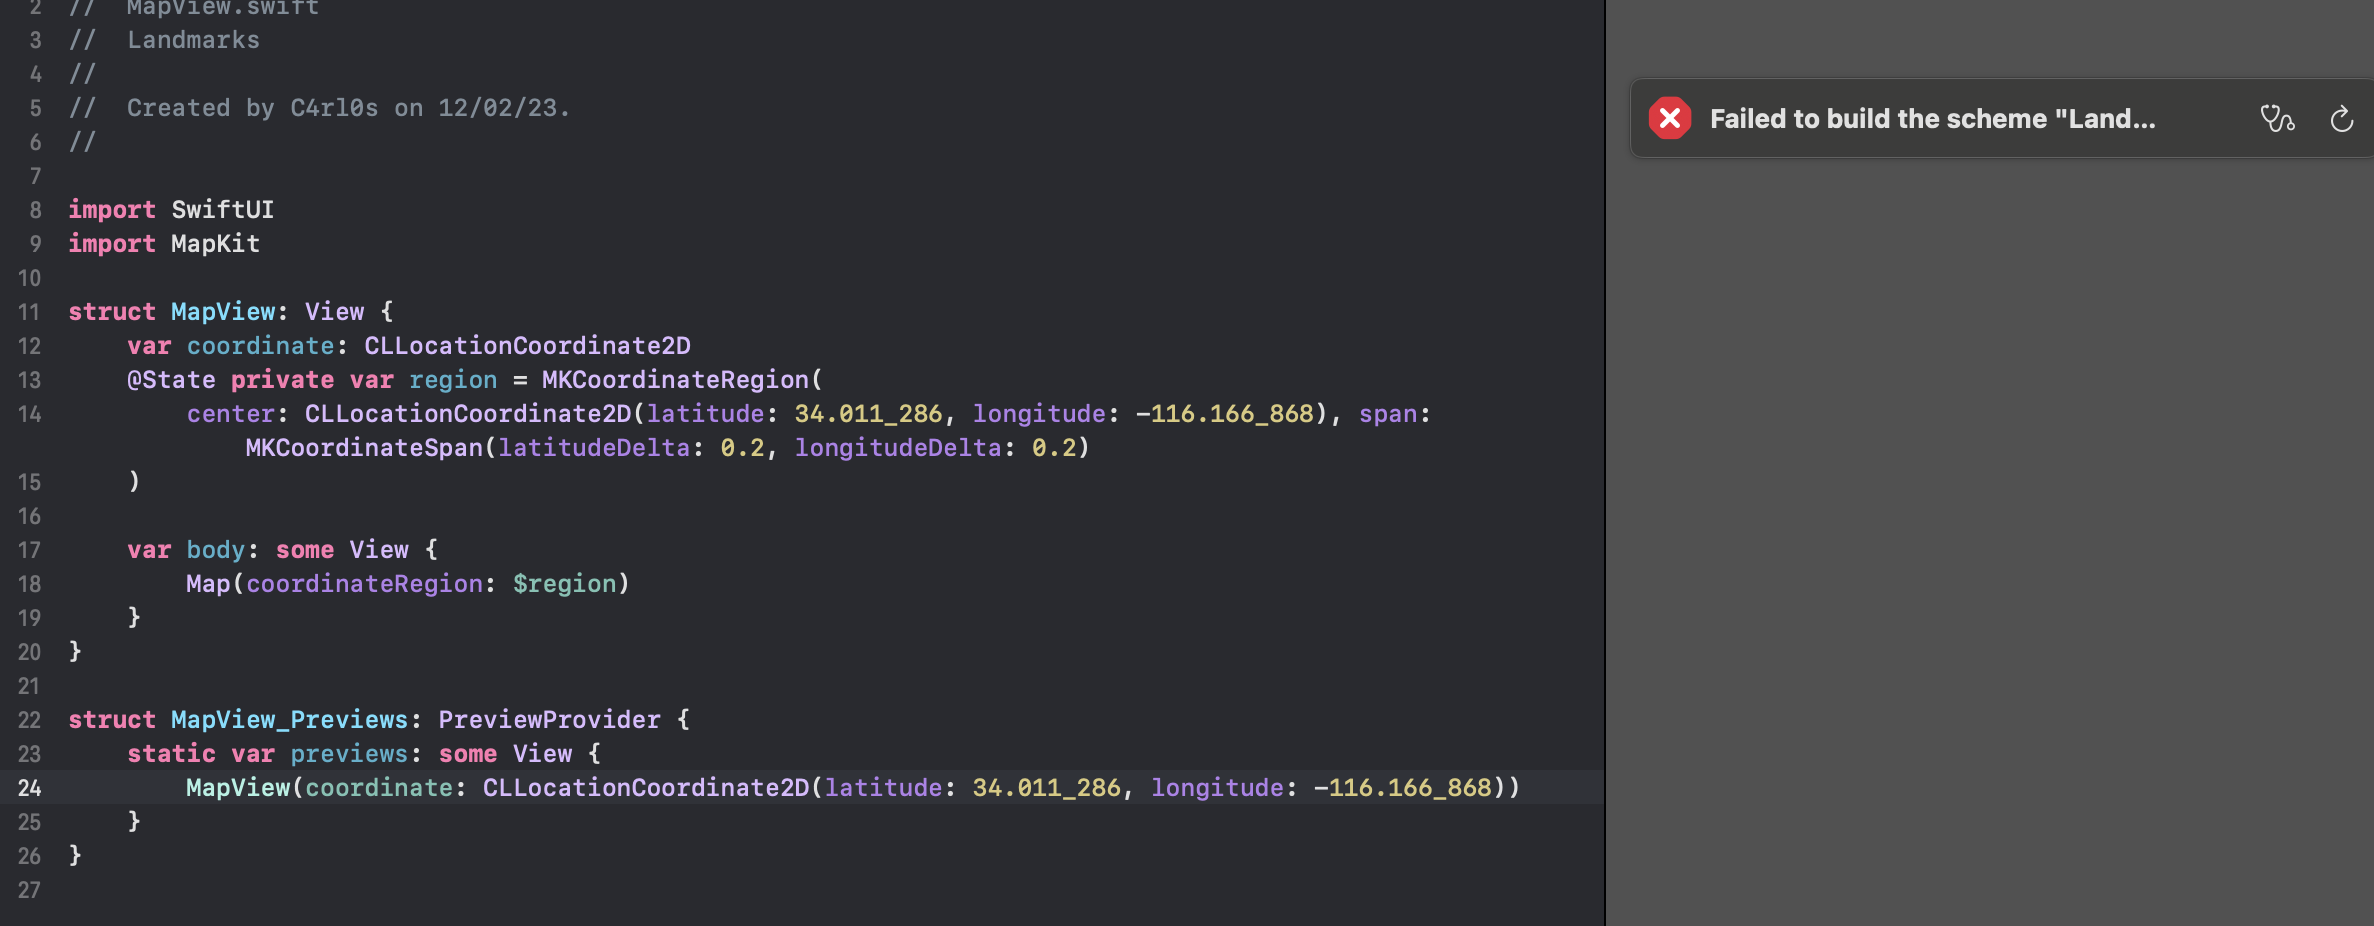
}In MapView.swift, add a coordinate property to MapView and update the preview provider to pass a fixed coordinate.
import SwiftUI
import MapKit

struct MapView: View {
    var coordinate: CLLocationCoordinate2D
    @State private var region = MKCoordinateRegion(
        center: CLLocationCoordinate2D(latitude: 34.011_286, longitude: -116.166_868), span: MKCoordinateSpan(latitudeDelta: 0.2, longitudeDelta: 0.2)
    )

    var body: some View {
        Map(coordinateRegion: $region)
    }
}

struct MapView_Previews: PreviewProvider {
    static var previews: some View {
        MapView(coordinate: CLLocationCoordinate2D(latitude: 34.011_286, longitude: -116.166_868))
    }
}
This change also affects the build because the detail view has a map view that needs the new parameter. You’ll fix the detail view soon.
Add a method that updates the region based on a coordinate value.
import SwiftUI
import MapKit

struct MapView: View {
    var coordinate: CLLocationCoordinate2D
    @State private var region = MKCoordinateRegion(
        center: CLLocationCoordinate2D(latitude: 34.011_286, longitude: -116.166_868), span: MKCoordinateSpan(latitudeDelta: 0.2, longitudeDelta: 0.2)
    )

    var body: some View {
        Map(coordinateRegion: $region)
    }

    private func setRegion(_ coordinate: CLLocationCoordinate2D) {
        region = MKCoordinateRegion(
            center: coordinate,
            span: MKCoordinateSpan(latitudeDelta: 0.2, longitudeDelta: 0.2)
        )
    }
}

struct MapView_Previews: PreviewProvider {
    static var previews: some View {
        MapView(coordinate: CLLocationCoordinate2D(latitude: 34.011_286, longitude: -116.166_868))
    }
}Add an onAppear view modifier to the map that triggers a calculation of the region based on the current coordinate.
import SwiftUI
import MapKit

struct MapView: View {
    var coordinate: CLLocationCoordinate2D
    @State private var region = MKCoordinateRegion(
        center: CLLocationCoordinate2D(latitude: 34.011_286, longitude: -116.166_868), span: MKCoordinateSpan(latitudeDelta: 0.2, longitudeDelta: 0.2)
    )

    var body: some View {
        Map(coordinateRegion: $region)
            .onAppear {
                setRegion(coordinate)
            }
    }

    private func setRegion(_ coordinate: CLLocationCoordinate2D) {
        region = MKCoordinateRegion(
            center: coordinate,
            span: MKCoordinateSpan(latitudeDelta: 0.2, longitudeDelta: 0.2)
        )
    }
}

struct MapView_Previews: PreviewProvider {
    static var previews: some View {
        MapView(coordinate: CLLocationCoordinate2D(latitude: 34.011_286, longitude: -116.166_868))
    }
}In LandmarkDetail.swift, add a Landmark property to the LandmarkDetail type.
import SwiftUI

struct LandmarkDetailView: View {
    var landmark: Landmark

    var body: some View {
        VStack {
            MapView()
                .ignoresSafeArea(edges: .top)
                .frame(height: 300)

            CircleImage()
                .offset(y: -130)
                .padding(.bottom, -130)

            VStack(alignment: .leading) {
                Text("Turtle, Rock!")
                    .font(.title)
                    .foregroundColor(.blue)
                HStack {
                    Text("Joshua Tree National Park")
                        .font(.subheadline)
                    Spacer()
                    Text("California")
                        .font(.subheadline)
                }
                .font(.subheadline)
                .foregroundColor(.secondary)

                Divider()

                Text("About Turtle Rock")
                    .font(.title2)

                Text("Description goes here")
            }
            .padding()

            Spacer()
        }
    }
}

struct LandmarkDetailView_Previews: PreviewProvider {
    static var previews: some View {
        LandmarkDetailView(landmark: landmarks[0])
    }
}In LandmarkList.swift, pass the current landmark to the destination LandmarkDetail.
import SwiftUI

struct LandmarkList: View {
    var body: some View {
        NavigationSplitView {
            List(landmarks) { landmark in
                NavigationLink {
                    LandmarkDetailView(landmark: landmark)
                } label: {
                    LandmarkRow(landmark: landmark)
                }
            }
            .navigationTitle("Landmarks")
        } detail: {
            Text("Select a Landmark")
        }
    }
}

struct LandmarkList_Previews: PreviewProvider {
    static var previews: some View {
        LandmarkList()
    }
}In the LandmarkDetailView file, pass the required data to your custom types.
import SwiftUI

struct LandmarkDetailView: View {
    var landmark: Landmark

    var body: some View {
        VStack {
            MapView(coordinate: landmark.locationCoordinate)
                .ignoresSafeArea(edges: .top)
                .frame(height: 300)

            CircleImage(image: landmark.image)
                .offset(y: -130)
                .padding(.bottom, -130)

            VStack(alignment: .leading) {
                Text(landmark.name)
                    .font(.title)
                    .foregroundColor(.blue)
                HStack {
                    Text(landmark.park)
                        .font(.subheadline)
                    Spacer()
                    Text(landmark.state)
                        .font(.subheadline)
                }
                .font(.subheadline)
                .foregroundColor(.secondary)

                Divider()

                Text("About \(landmark.name)")
                    .font(.title2)

                Text(landmark.description)
            }
            .padding()

            Spacer()
        }
    }
}

struct LandmarkDetailView_Previews: PreviewProvider {
    static var previews: some View {
        LandmarkDetailView(landmark: landmarks[0])
    }
}
Change the container from a VStack to a ScrollView so the user can scroll through the descriptive content, and delete the Spacer, which you no longer need.
import SwiftUI

struct LandmarkDetailView: View {
    var landmark: Landmark

    var body: some View {
        ScrollView {
            MapView(coordinate: landmark.locationCoordinate)
                .ignoresSafeArea(edges: .top)
                .frame(height: 300)

            CircleImage(image: landmark.image)
                .offset(y: -130)
                .padding(.bottom, -130)

            VStack(alignment: .leading) {
                Text(landmark.name)
                    .font(.title)
                    .foregroundColor(.blue)
                HStack {
                    Text(landmark.park)
                        .font(.subheadline)
                    Spacer()
                    Text(landmark.state)
                        .font(.subheadline)
                }
                .font(.subheadline)
                .foregroundColor(.secondary)

                Divider()

                Text("About \(landmark.name)")
                    .font(.title2)

                Text(landmark.description)
            }
            .padding()

            Spacer()
        }
    }
}

struct LandmarkDetailView_Previews: PreviewProvider {
    static var previews: some View {
        LandmarkDetailView(landmark: landmarks[0])
    }
}
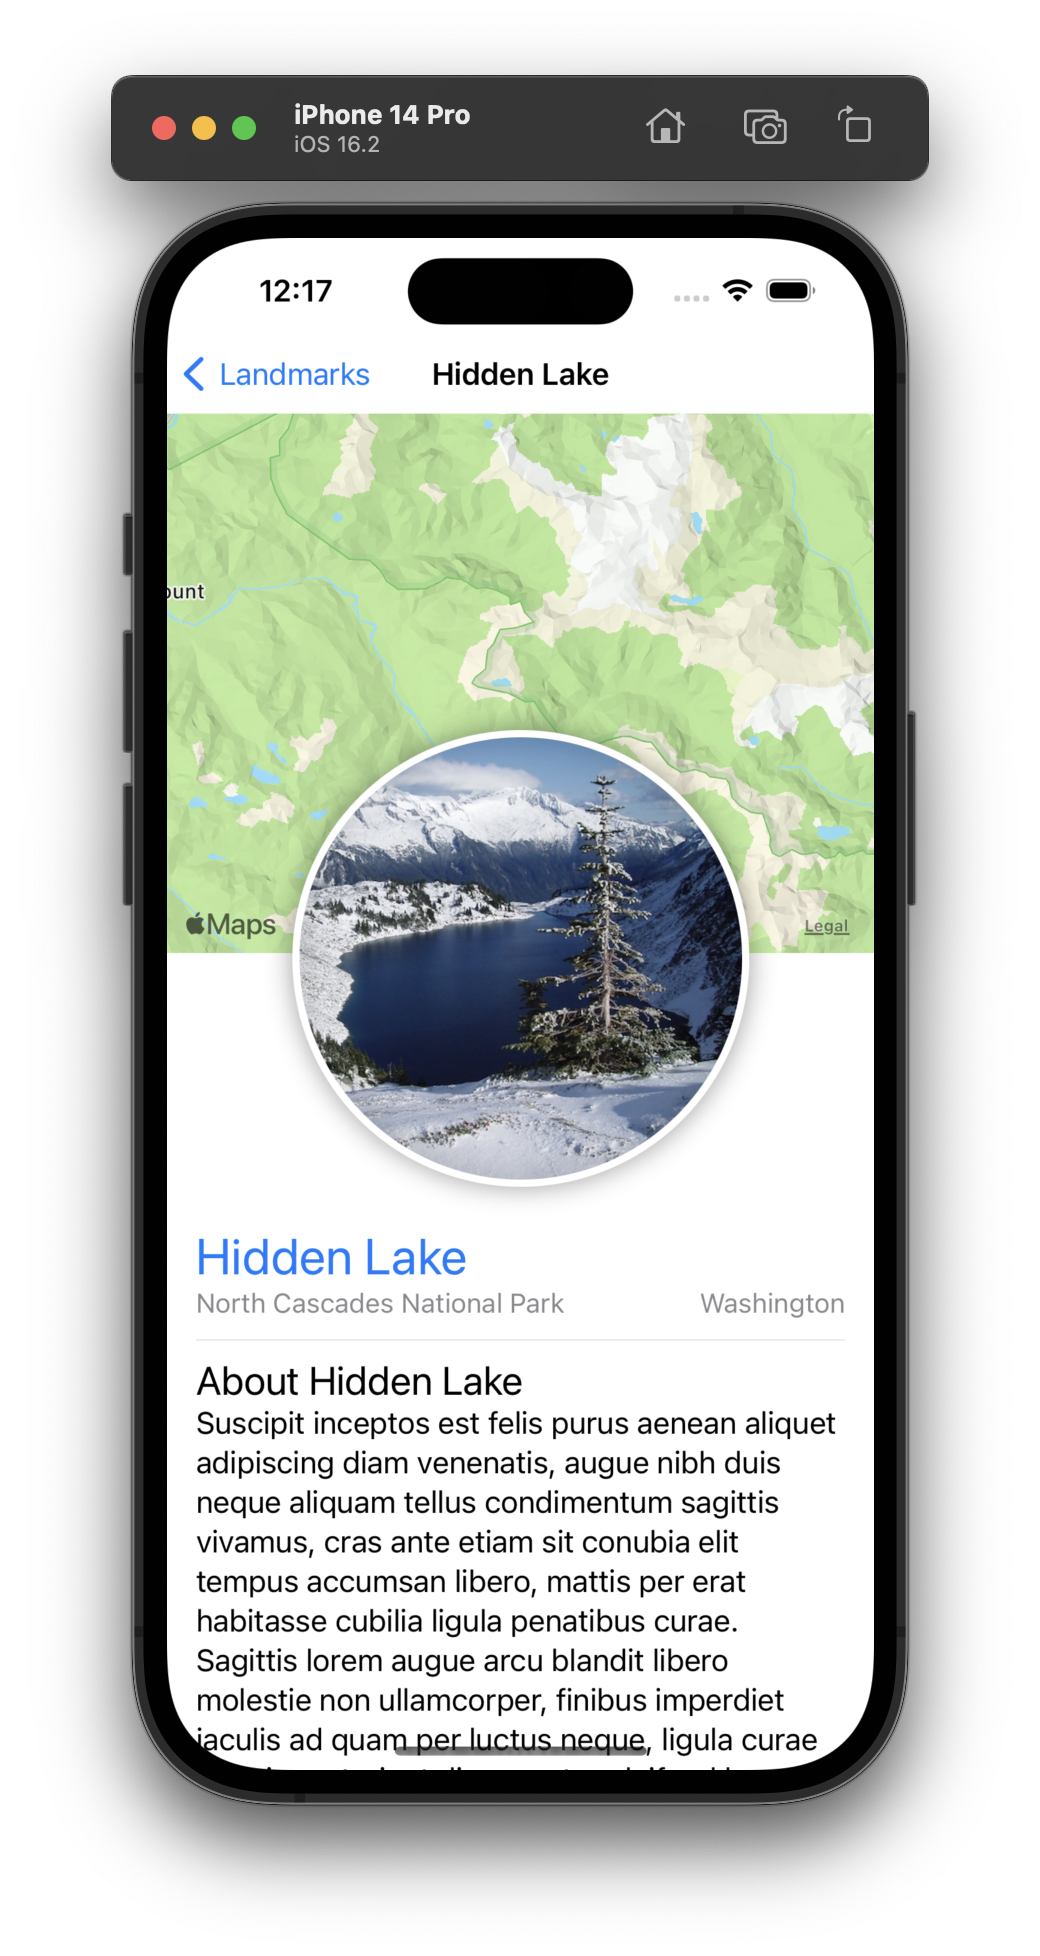
Finally, call the navigationTitle(_:) modifier to give the navigation bar a title when showing the detail view, and the navigationBarTitleDisplayMode(_:) modifier to make the title appear inline.
import SwiftUI

struct LandmarkDetailView: View {
    var landmark: Landmark

    var body: some View {
        ScrollView {
            MapView(coordinate: landmark.locationCoordinate)
                .ignoresSafeArea(edges: .top)
                .frame(height: 300)

            CircleImage(image: landmark.image)
                .offset(y: -130)
                .padding(.bottom, -130)

            VStack(alignment: .leading) {
                Text(landmark.name)
                    .font(.title)
                    .foregroundColor(.blue)
                HStack {
                    Text(landmark.park)
                        .font(.subheadline)
                    Spacer()
                    Text(landmark.state)
                        .font(.subheadline)
                }
                .font(.subheadline)
                .foregroundColor(.secondary)

                Divider()

                Text("About \(landmark.name)")
                    .font(.title2)

                Text(landmark.description)
            }
            .padding()
        }
        .navigationTitle(landmark.name)
        .navigationBarTitleDisplayMode(.inline)
    }

}

struct LandmarkDetailView_Previews: PreviewProvider {
    static var previews: some View {
        LandmarkDetailView(landmark: landmarks[0])
    }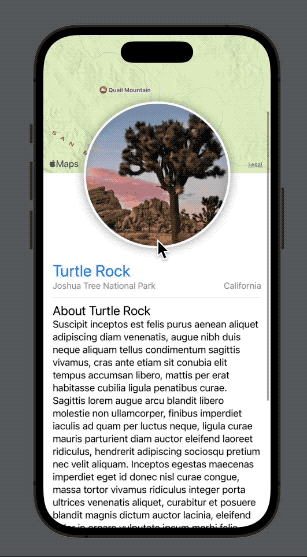
}Switch to the live preview to see the detail view show the correct landmarks when you navigate from the list.
Next, you’ll render previews of the list view for different device configurations.
By default, previews render at the size of the device in the active scheme. You can render for different devices by changing the target, or by overriding the device in the canvas. You can also explore other preview variations, like device orientation.

Change the device selector to make the preview display an iPad.
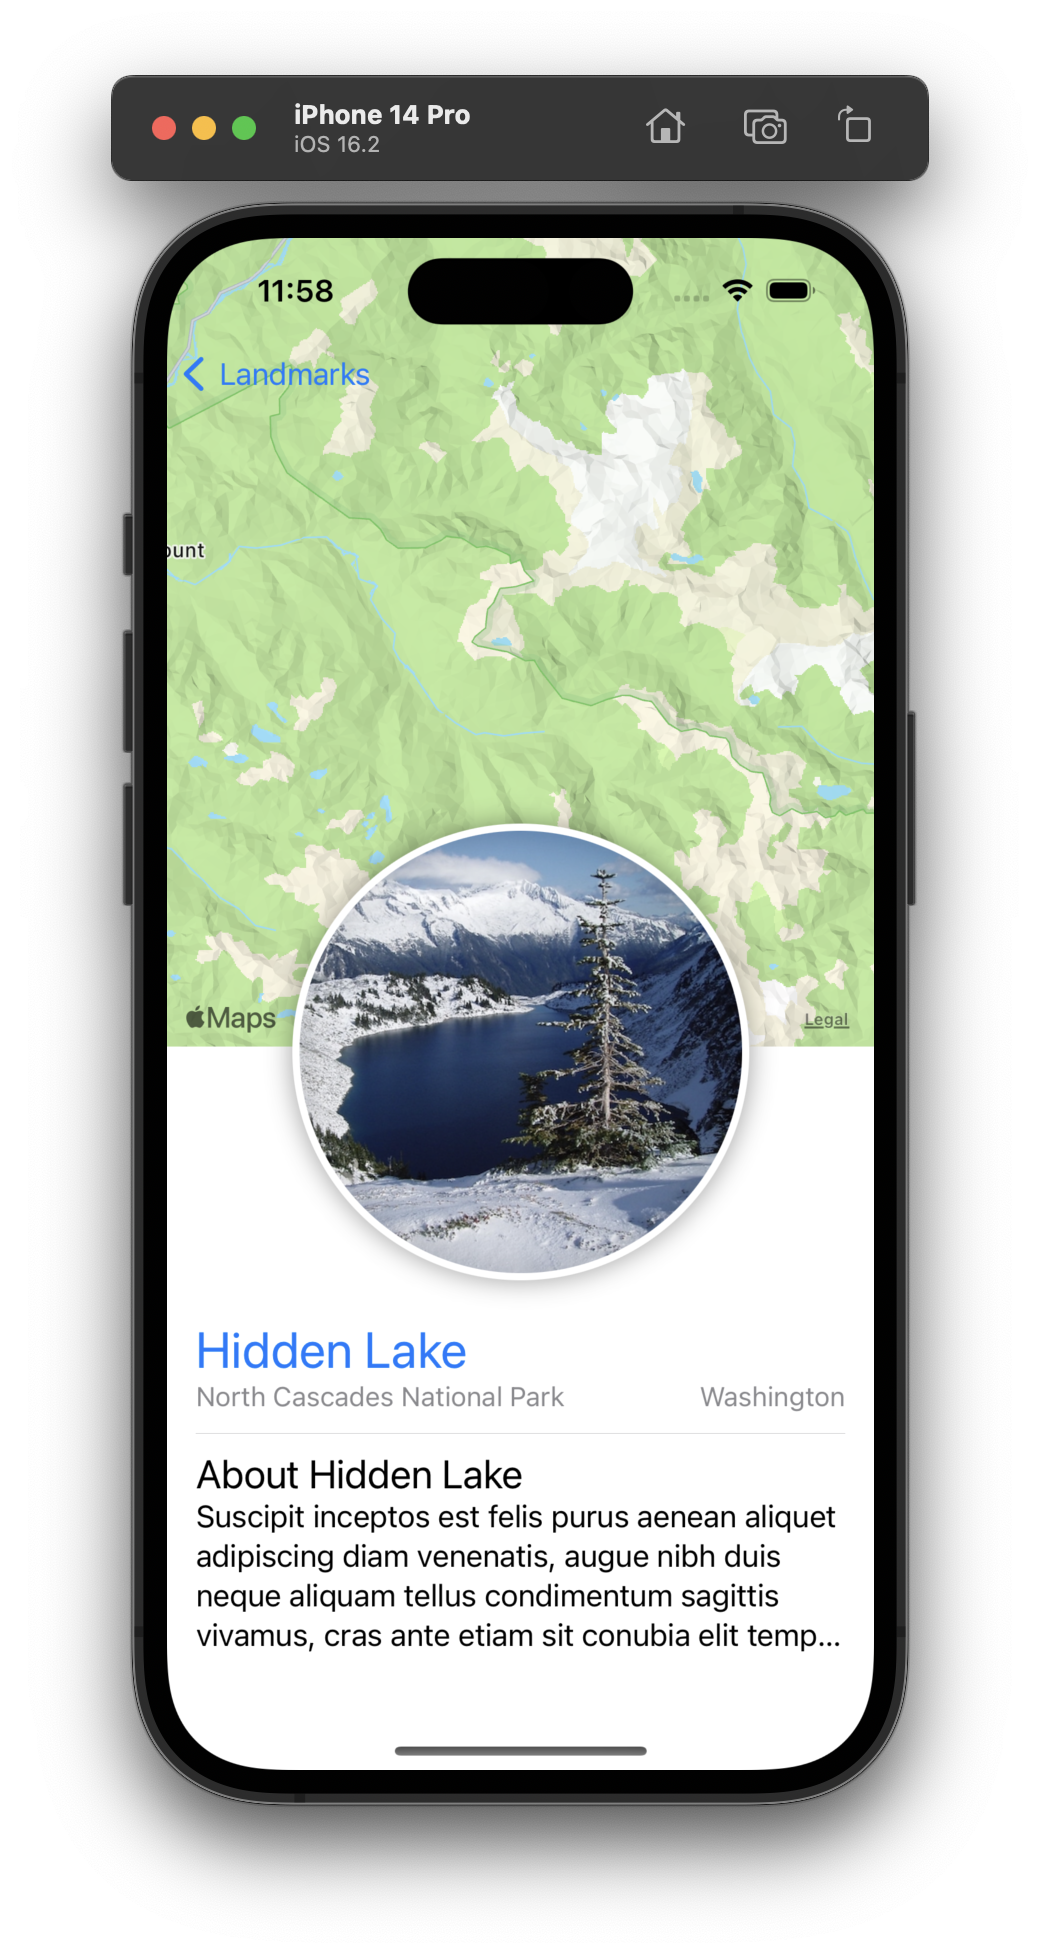
In portait orientation, the NavigationSplitView displays the detail pane by default, and provides a button in the toolbar to reveal the sidebar.

Tap the toolbar button to reveal the sidebar, and try navigating to one of the landmarks.
The detail view changes to the selected landmark under the sidebar. The sidebar remains visible until you tap somewhere in the detail view.

In the canvas, select the Device Settings and enable the Landscape Left orientation.
In landscape orientation, the NavigationSplitView displays the sidebar and detail panes side-by-side.

Experiment with different devices and configurations in the Device Settings to see how your views look under other conditions.