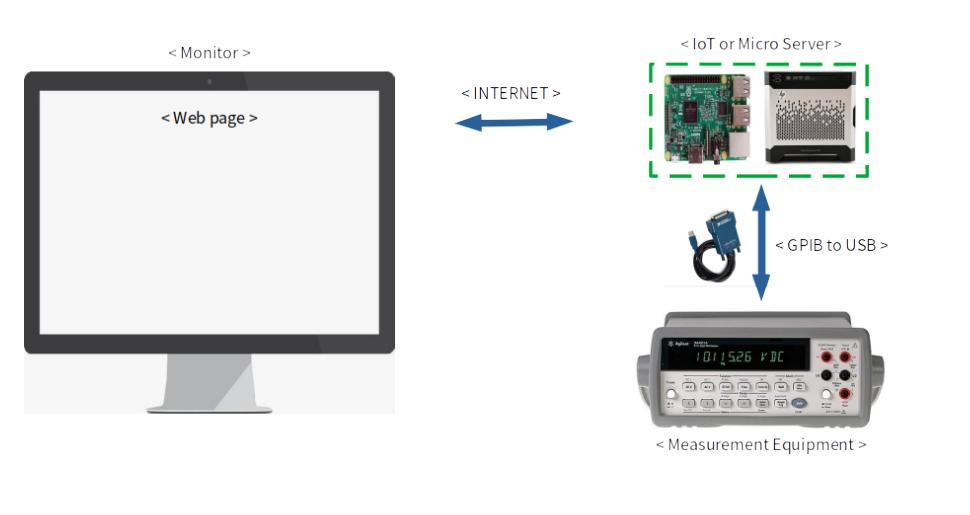
정밀측정장비를 원격으로 다루기 위한 node.js express 기반 REST API 서버입니다. GET, POST, PUT, DELETE 명령어를 서버로 보내면, 서버에서 측정장비로 부터 측정된 데이터를 가져와 json 형식의 파일로 클라이언트에게 보내줍니다.
-
node.js LTS 버전 설치하기. https://nodejs.org/ko/
-
git 설치하기. https://git-scm.com/
-
git 환경변수 등록하기. (https://cofs.tistory.com/421 참고 사이트)
-
본 프로젝트 로컬 PC에 클론하기.
터미널을 열고 (git 설치할 때 같이 딸려온 git bash 추천)
git clone https://github.com/fjvbn2003/express_rest_api_server_test -
해당 폴더에서 종속 라이브러리 설치
cd express_rest_api_server_testnpm install -
서버 실행
node ./app.js
- 실행 확인
아래 URL에 접속하여 테스트
http://localhost:2020
http://localhost:2020/meas/volt/AC
http://localhost:2020/meas/curr/AC
- VSCP(Visual Studio Codespace) 환경 : LINUX 환경
- 구형장비(34401A) 경우 GPIB 컨트롤러를 통해 장비 제어하며, 아래와 같은 킷헙의 자료를 참고 가능함. 참조 https://github.com/jue89/node-linux-gpib.git (김영주님 검색결과)
- 아래 코드는 구형장비를 측정하는 코드이며, 실제로 측정하기 위해 제공해야할 기준장비 코드는 제외됨.
-
Voltage DC (AC 경우 'MESA:VOLT:AC' 만 변경해주면 됨.)
const GPIB = require('linux-gpib'); // GPIB 인터페이스 Default 가 GPIB0 임. const gpib = GPIB(0); // dmm(Digital Multi Meter) 이며, PAD 값은 GPIB로 연결되었을때 장비 주소 이며, 장비 내에서 수정도 가능하며 코드에서도 수정가능함. let dmm = gpib.connect({pad : 13}); // 아래와 같이 'MEAS:VOLT:DC?' 쿼리를 날릴경우 현재 장비에서 측정되고 있는 전압값을 제공함. dmm.query('MEAS:VOLT:DC?').then((response) => { let data = []; return data; }).then((data) => { // 콘솔창에 data 변수에 저장된 값 출력 console.log(data); return dmm.disconnect(); }).catch((err) =>{ // 에러 날 경우 console 창에서 에러 메세지 제공 console.error(err.message); });- Current DC (AC 경우 'MESA:CURR:AC' 만 변경해주면 됨.)
const GPIB = require('linux-gpib'); // GPIB 인터페이스 Default 가 GPIB0 임. const gpib = GPIB(0); // dmm(Digital Multi Meter) 이며, PAD 값은 GPIB로 연결되었을때 장비 주소 이며, 장비 내에서 수정도 가능하며 코드에서도 수정가능함. let dmm = gpib.connect({pad : 13}); // 아래와 같이 'MEAS:CURR:DC?' 쿼리를 날릴경우 현재 장비에서 측정되고 있는 전압값을 제공함. dmm.query('MEAS:CURR:DC?').then((response) => { let data = []; return data; }).then((data) => { // 콘솔창에 data 변수에 저장된 값 출력 console.log(data); return dmm.disconnect(); }).catch((err) =>{ // 에러 날 경우 console 창에서 에러 메세지 제공 console.error(err.message); });- Resistance 저항측정(2Wire 와 4Wire 기능 있으며, 4Wire 경우 'MEAS:FRES? 임)
const GPIB = require('linux-gpib'); // GPIB 인터페이스 Default 가 GPIB0 임. const gpib = GPIB(0); // dmm(Digital Multi Meter) 이며, PAD 값은 GPIB로 연결되었을때 장비 주소 이며, 장비 내에서 수정도 가능하며 코드에서도 수정가능함. let dmm = gpib.connect({pad : 13}); // 아래와 같이 'MEAS:RES?' 쿼리를 날릴경우 현재 장비에서 측정되고 있는 전압값을 제공함. dmm.query('MEAS:RES?').then((response) => { let data = []; return data; }).then((data) => { // 콘솔창에 data 변수에 저장된 값 출력 console.log(data); return dmm.disconnect(); }).catch((err) =>{ // 에러 날 경우 console 창에서 에러 메세지 제공 console.error(err.message); });- Frequency 주파수 측정
 const GPIB = require('linux-gpib');

 // GPIB 인터페이스 Default 가 GPIB0 임.
 const gpib = GPIB(0);

 // dmm(Digital Multi Meter) 이며, PAD 값은 GPIB로 연결되었을때 장비 주소 이며, 장비 내에서 수정도 가능하며 코드에서도 수정가능함.
 let dmm = gpib.connect({pad : 13});

 // 아래와 같이 'MEAS:FREQ?' 쿼리를 날릴경우 현재 장비에서 측정되고 있는 전압값을 제공함.
 dmm.query('MEAS:FREQ?').then((response) => {
    let data = [];
    return data;
 }).then((data) => {
    // 콘솔창에 data 변수에 저장된 값 출력
    console.log(data);
    return dmm.disconnect();
 }).catch((err) =>{
    // 에러 날 경우 console 창에서 에러 메세지 제공
    console.error(err.message);
 });
-
voltage
전압 값을 가져오기
GET /meas/volt/AC
GET /meas/volt/DC
return 예시
{"volt":300} -
current
전류값을 가져오기
GET /meas/curr/AC
GET /meas/curr/DC
return 예시
{"curr":20} -
frequency
-
period : 이부분은 Frequency 측정이 잘된다면 같은 기능으로 미구현 낳을 것 같음.
-
configuration 설정값 지정하기
-
설정값을 설정하는 부분은 세부 설명이 필요하나, 요약컨대 장비가 정확한 측정을 위해선 장비 측정범위를 설정해줘야함. e.g. DC 100 V 전압을 측정하려면 100V 범위에서 측정해야함으로 보통 'CONF:VOLT:DC 100' 이런식으로
-
장단점으로는 위에 명시한 'MEAS:VOLT:DC?' 는 현재 장비에서 가지고 있는 값을 바로 보내주는 경우이고 'CONF:VOLT:DC 100' 경우는 write 만 명령한 거임. 'READ?' 해야한 현재 가지고 있는 값을 보내 준다.
-
왜냐하면 장비 자체 측정이 Delay가 생겨서 위와 같은 'MEAS:VOLT:DC?'가 하다보면 NULL 값이 인식 되는 경우가 있어서임.
-
허나 자체 장비 측정 시간에 대한 Delay 값을 준다면 문제 없음