a tool for creating minimal embed versions of windows (this is usually Windows with access to only one application without the ability to open any system menu or shell, but this is not the only scenario)
the easiest way to create a kiosk on Windows or use Windows on embedded device (single app mode)
program examples: https://github.com/igorkll/WinBox-Maker-programs
WARNING!!! if you read this text from GITHUB page please, download a release and read description there. on github this text is DEV winbox maker version (not released yet)
download "blobs" folder: https://drive.google.com/file/d/1xH0g-R7ckmCbhAJV-ED4NHXPXl_dOrfH/view?usp=sharing (it is only needed for self-build of the program)
takes on the task of modifying the windows image to remove excess and embed software there
the program is perfect for windows builds designed for ATM terminals and other devices that unauthorized people have access to and should not be allowed to leave the specified sandbox
the program needs to be run with administrator rights because it mounts images
the program is primarily aimed at creating Windows images for operation in kiosk mode, that is, the user will have access to only one of your programs that you add to the image and nothing more
however, the program can be used in other usage scenarios (for example, creating a TV set-top box or a Windows-based slot machine)
please note that the program requires the "dism" utility. usually it is built into Windows
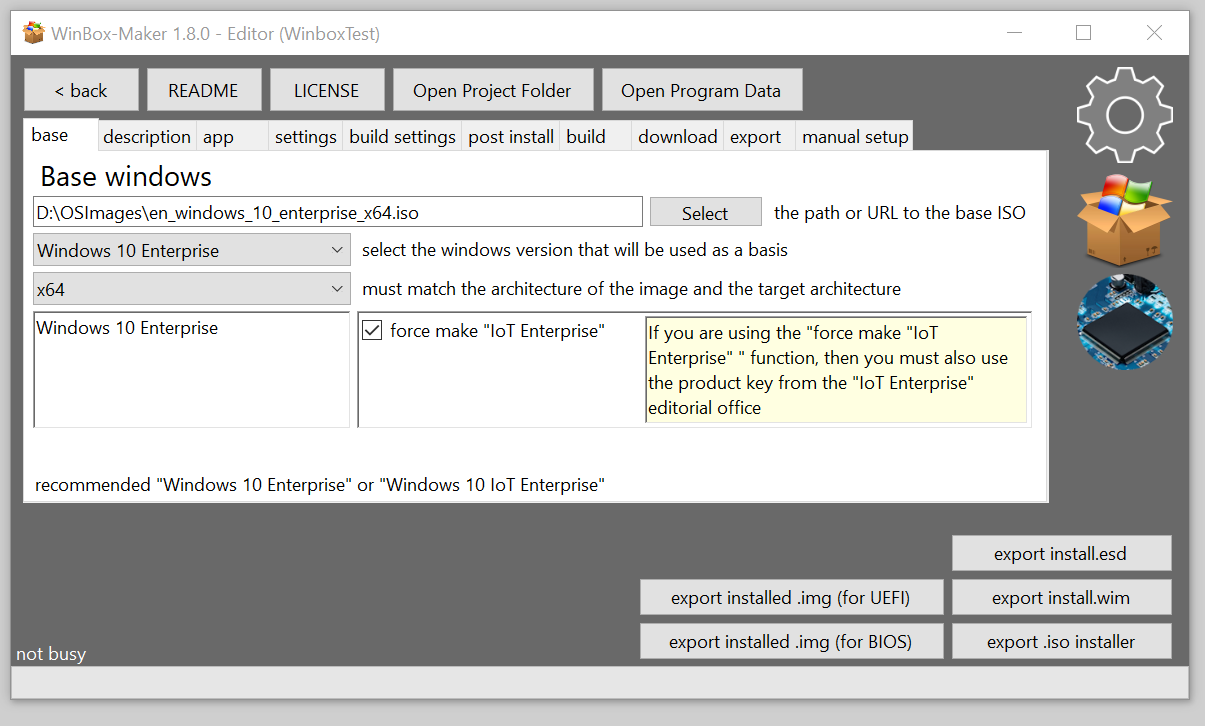
the program is recommended to be used with the original English image of "Windows 10 Enterprise" or "Windows 10 IoT Enterprise"
please note that winbox maker does not provide Windows images, it only provides a tool for reassembling Windows for use in kiosk mode
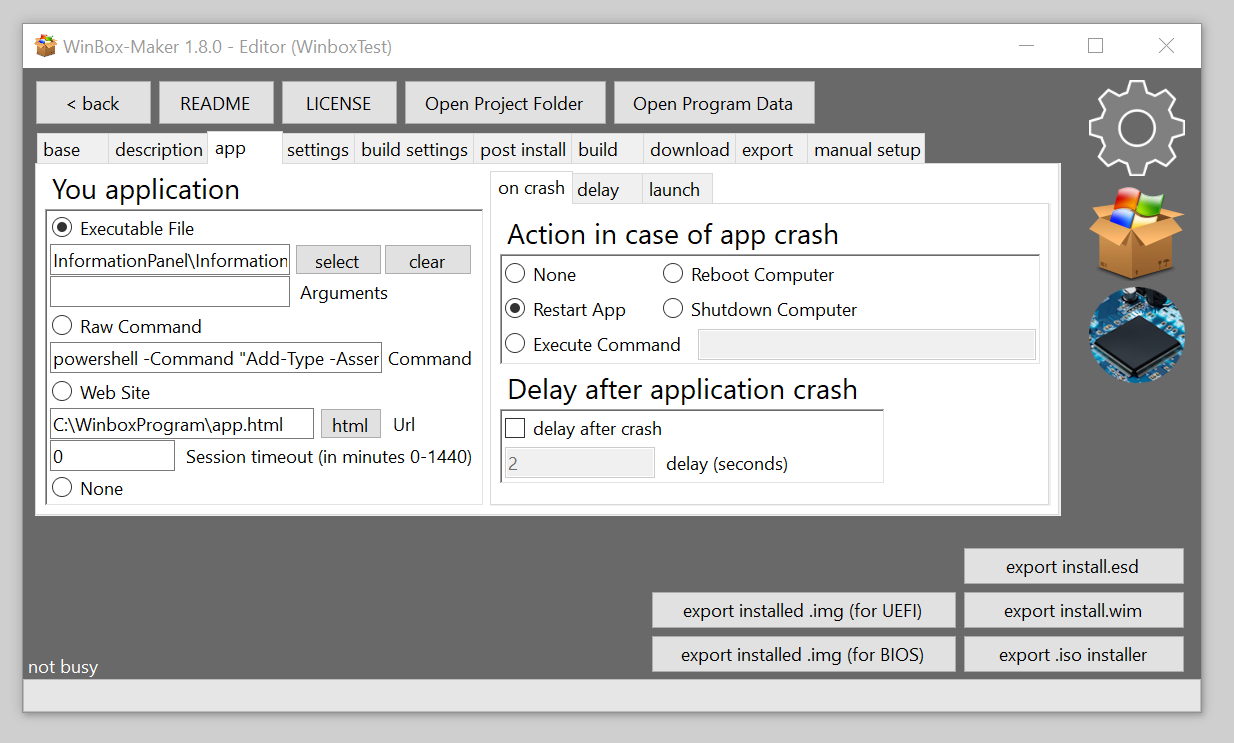
if the application fails, winbox will NOT crash on the Windows desktop. you will just have a black screen. This makes winbox maker safe to use in cases where passersby will have access to the device
during testing of winbox maker, there was not a single way to get into any system menu (if such behavior is not provided in the application) without using a boot disk or other modification of system files
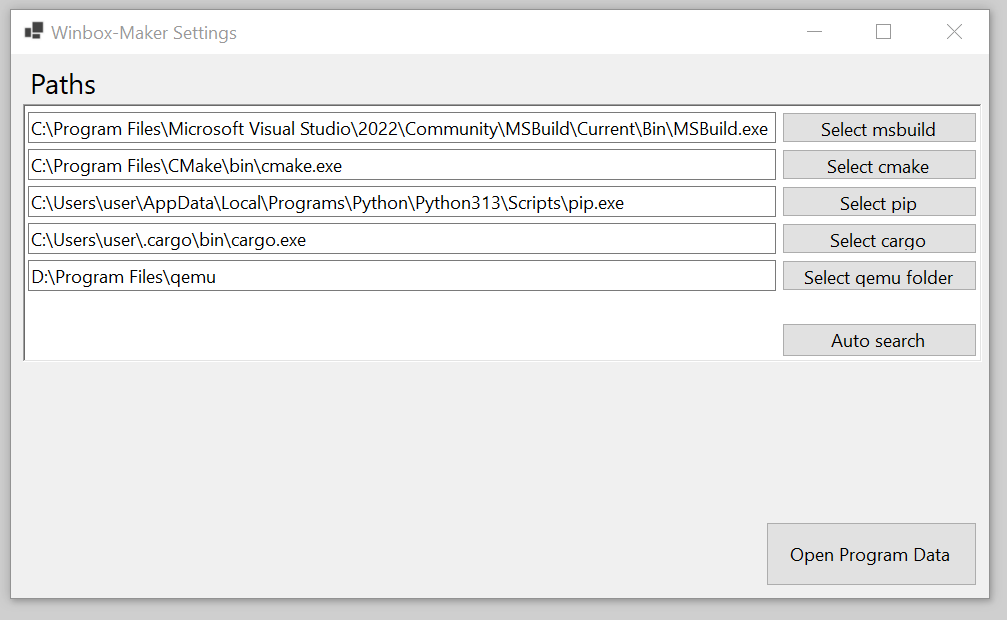
you can select the executable file by clicking "select" in the app section, but if you use automatic compilation of the project from the source code when building winbox,
you will not be able to select the file this way. in this case, just enter the file name manually
winbox Maker is aimed at creating a windows image with access to one application and without the ability to exit it. it also allows you to change / disable the bootloader logo and change / disable the cursor, which allows you to get a device whose behavior will not make it clear that it runs on windows
winbox maker also disables key combinations to exclude the possibility of closing the application or switching to any system menu
however, by changing the configuration of winbox maker, you can achieve some other behavior
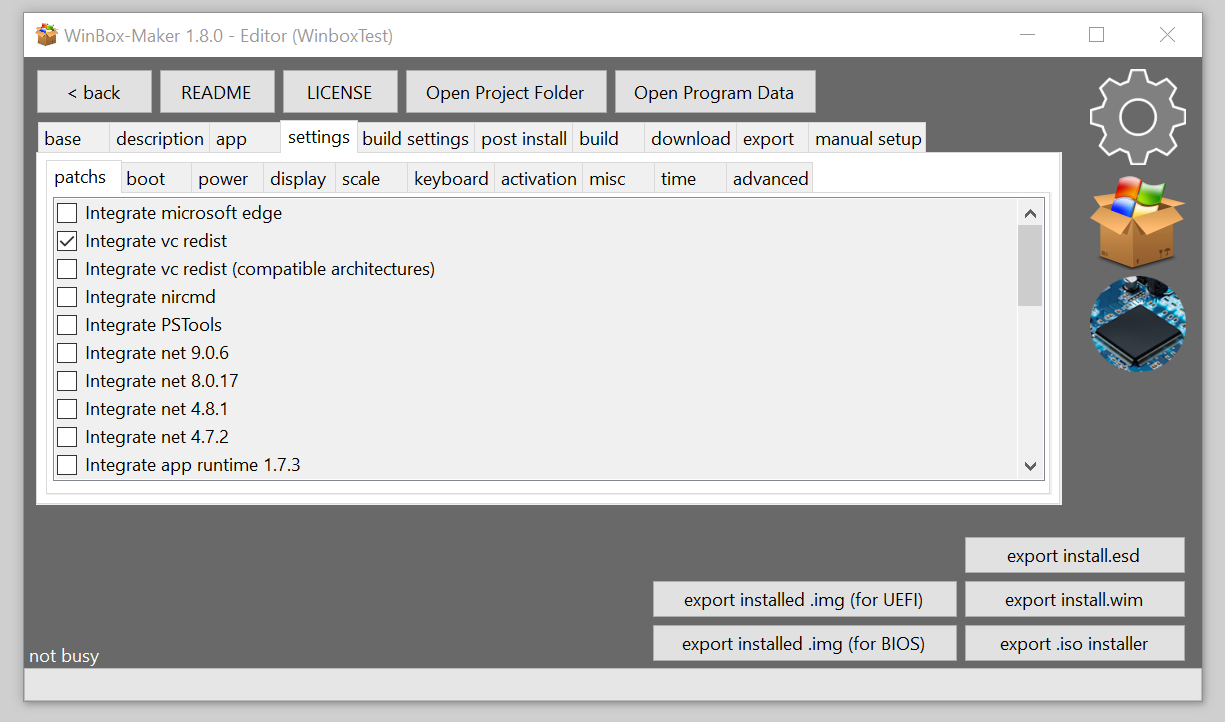
winbox maker provides tools for embedding software into the final windows image. such as the net framework and visual C++ redist and others
in this program, many settings/tweaks are actually made several times in different ways. this was done because windows has different versions where one of the solutions may not work. if you look at the source code and see that some solution (for example, disabling the lock screen) was made in an unreliable way, then know that the program uses several solutions to the same problem and you can find them in the source code and make sure that everything is reliable
please note that if you use the windows component removal functions (for example, you delete SysWOW64), then you may have problems with things like the net framework and other windows features. it is better not to delete anything, but simply block access to unused functions if your device does not have serious restrictions on the amount of memory
the program is an alternative: Edge Device Image Builder / Windows Configuration Designer
- please note that immediately after installation, the system may be in an "uninitialized" state (while the SetupComplete.cmd script has not yet been executed and the user has not been created) and the device with the system in this state should NEVER fall into the hands of the user before the first power-on. since the device can be prepared for the first time when it is turned on and the user can see the windows logo. if the device is turned off during the execution of SetupComplete.cmd, this may damage it and require reinstalling. Also, if the recovery menu was turned off but not deleted from the system, it may still be available before executing SetupComplete.cmd for this reason, the device MUST be turned on at least once before being transferred to the user if you are installing the system via an iso installer or deploying install.wim via dism. if you exported *.img with an already installed system (via the built-in winbox maker function that installs the system on qemu), then this is not so important because SetupComplete.cmd has already been executed after installation on qemu
- if you use the "Evaluation" version of windows as the basis, then the system, being inactive, will shut down every hour
- if instead of a working system you get a blue login screen with the inscription "other user", then try using another iso image as a base (for example, an image that is not originally iot) and simply check the box force make iot enterprise
- if you are going to build the program thoroughly, you will also need to download the blobs folder separately from google drive (due to the file size limit on github)
- it is recommended that the winbox maker project and the source and output iso paths be on a fast SSD! otherwise, it may cause severe computer freezes during the assembly process. if it is not possible to use an SSD, it is recommended not to use computer during the build process of the winbox maker project
- when you burn the installation ISO to a USB stick via rufus or a similar program, DO NOT USE the windows installation customization feature, as this will cause conflicts with those tweaks that already exist in winbox and it may work incorrectly
- if your application uses file picker from windows, then this is a backdoor! since if you write "cmd" in the path bar, the command line will open, which is unacceptable for devices in kiosk mode
- the project may contain prebuild and postbuild events, and since the program runs on behalf of the administrator, it can be quite dangerous if you do not fully trust the project you are building. Before building an unknown winbox maker project, be sure to check the contents of the events tab
- after the first launch of the operating system created through winbox maker, let the computer run for about two minutes. do not turn it off at this time and do not touch it. otherwise, it may cause windows to crash and require a system reinstall
- when you first boot up the system, you will probably see the windows logo even if you have disabled/changed it, just let the computer boot for the first time and work for a couple of minutes
- if you are using the "downloading" function, it is better to download files to the "winbox_temp/files" directory, refer to the documentation to understand which "winbox_resources" directories are duplicated in "winbox_temp", if you still decide to use "winbox_resources" do not forget to add download paths to ".gitignore"
- if the program freezes when opening the winbox maker project, most likely the old windows image was not unmounted from a temporary directory last time (for example, due to a failure in the build process), wait until winbox maker starts working, it may take some time.
- DO NOT USE the launch of the application "after the desktop" except for debugging. Not only is it not safe and will allow you to access the system, but it also currently does not work well and may not be compatible with other settings
- when exporting img, make sure that you have the 64-bit version of qemu installed and that it is selected in the winbox maker settings. otherwise, it will most likely "crash"
- if you do not need postinstall duplication, you can turn it off on the img export settings tab, or you can disable automatic shutdown at the end of installation on qemu, in which case you will need to turn off the VM yourself after installation (when you see your application), For example, you can use this in conjunction with first boot action > reboot to desktop to get to the desktop in qemu and make additional settings, then turn off the VM and get a locked down image without access to the desktop, but with additional settings made from the desktop
- after creating the image and deploying it for the first time on real hardware, I STRONGLY recommend making sure that windows hotkeys really don't work (unless you purposefully decide to keep them working using the "Do not disable hotkeys by changing the *" options), at least check combinations such as alt+f4 and ctrl+alt+del to make sure that they are ignored by the system
- at the moment, the custom boot logo installation only works on UEFI systems (you also need to turn off secure boot) (it may also not work at all for reasons unknown to me)
- it is better not to use the function of replacing the boot logo in winbox maker, the right solution would be to make your own UEFI with your own boot logo (BGRT) or change an existing one. windows will automatically use the UEFI logo. also, if the computer is in a public place, it is better not to make a UEFI menu
- if you used the "Do not disable hotkeys by changing the layout" option on a non-enterprise version of windows, it is likely that the keyboard shortcuts will still work because keyboard filter will not work
- please note that when installing in .img, some actions will be performed twice. once when you first set up on qemu and the second time when you turn it on for the first time on a real device. among such actions: a postinstall script and a .reg file run from the user (those in setup completed are not subject to duplication since setup completed is executed only when it is actually turned on for the first time (on qemu)) this was done because, for example, the driver installer that you can put in postinstall may not want to install the driver without actually connected hardware, or it may install and double-launch it to install it in any case, and if it works, it will be installed immediately in img, installing a custom boot logo via hackBGRT (perhaps it will reset, although this is unlikely), disabling services, changing bcd settings, and others will be performed twice, the first time when you turn on qemu for the first time and the second time when you turn on a real device for the first time (the same thing happens if you use the "export initialized install.wim" option)
- please note that if you use the "export initialized install.wim" option or export .img, this will actually launch qemu and require you to go through the standard Windows installation, this will make it impossible to build completely using the CLI unless you automate the installer
- the "export initialized install.wim" option does not work if you export .img, as it literally would not make any sense, but would require double-running the Windows installer (however, when exporting a different format, it works because. the wim is contained within)
- it is recommended to use "Windows 10 Enterprise" or "Windows 10 IoT Enterprise" (not Evaluation) specifically, otherwise some things probably won't work, such as disabling the login animation and disabling keyboard shortcuts in the system itself (keyboard filter) (winbox maker disables combinations in two ways. by changing the keyboard layout, it will still work)
- if you install a script as your application .bat or .cmd then it will run in hidden mode (without console)
- your program from the winbox_resources/program folder on the target system is located in C:\WinboxProgram
- all build events work from the project folder
- in the post-build event, you get the path to the output file as an argument to your script
- the win-mounted event is triggered when the Windows image is mounted and all winbox maker patches have already been applied to it. this event can be used to apply additional patches to Windows through the winbox_temp/wim_mount directory
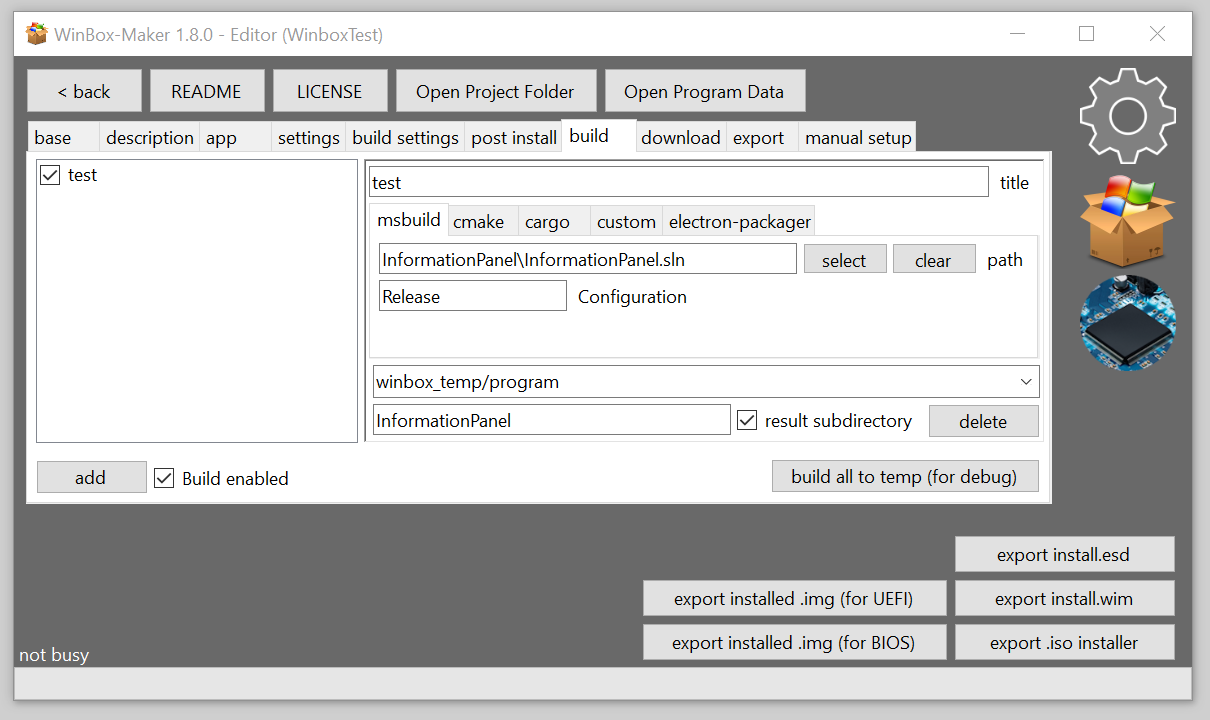
- in the "build" tab, you can configure the automatic build of your application along with winbox. for this, its source code must be located in the "winbox_resources/sources" folder (subfolders are allowed) please note that the build system is selected by switching tabs in the submenu
- if you are using a windows image other than "enterprise" and "IoT Enterprise", then use the "force make "IoT Enterprise" " function. this will force windows to "IoT Enterprise" and the logon window will not be visible. otherwise, the logon window will be visible
- If you are using the "force make "IoT Enterprise" " function, then you must also use the product key from the "IoT Enterprise" editorial office
- if you are using the export of already installed windows via qemu, then you will need to manually go through all the steps of the installer before starting the installation, and then only wait until the virtual machine closes itself. when it closes by itself, you will receive a ready-made .img file with the windows system already installed
- please note that the shutdown during installation on qemu is triggered BEFORE the event when the system is first turned on, which is set in winbox maker > settings > boot. that is, if you set the flag yourself that you need to turn off the computer when you first start the system, then the first time it turns off on qemu and the second time it turns off when you first start the system on a real machine. since these two events are completely independent
- shutdown during .img export is triggered BEFORE the first boot action. The first boot action will be triggered the first time it is turned on on the target machine
- if you use the "Disable all boot UI" option instead of separate "Disable boot logos", etc, then the boot circle and status will not be displayed at any time, but the boot logo will be displayed only if the BGRT table transmitted from UEFI or modified by the custom logo function is available. if the "Hide boot logo" is used, the boot logo will be hidden even if the BGRT table with a custom logo is available
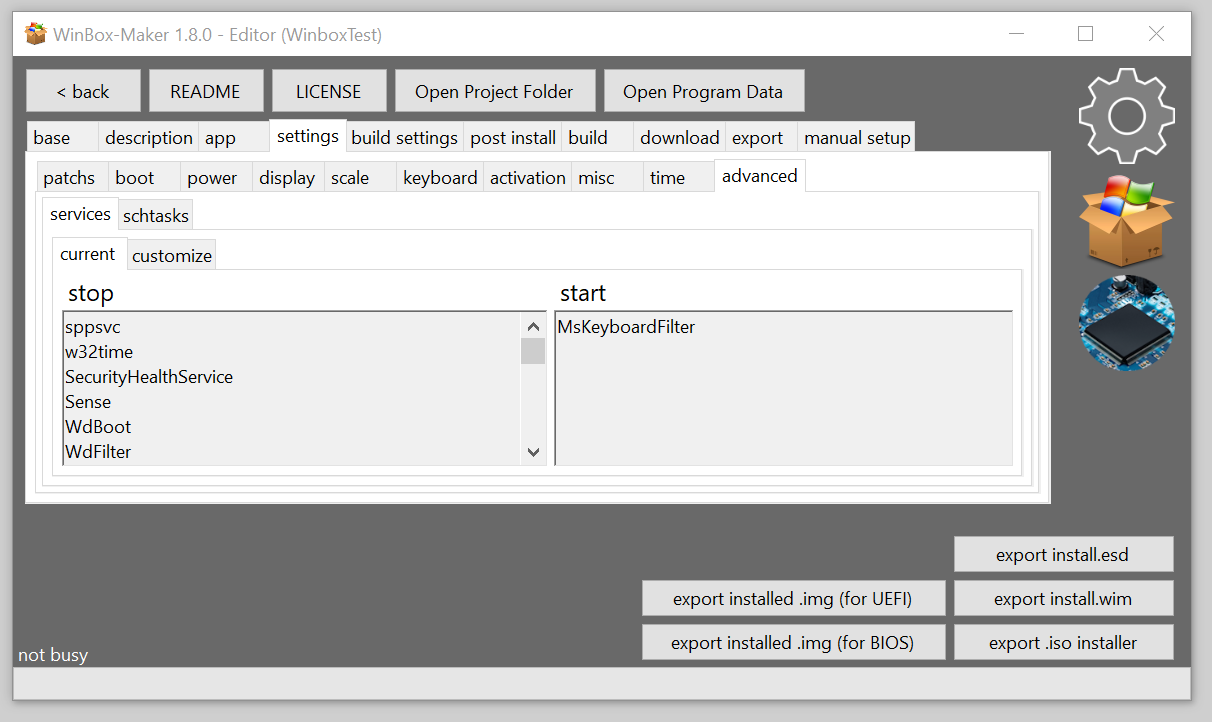
- if the system image you created refuses to load and freezes, and after a forced reboot it appears on the "Other user" login screen, then most likely the problem is that your windows image cannot disable any service that winbox maker is trying to disable by default. boot into WinPE and look at the DISK:\WinboxResources\setup.log file and see which service cannot be disabled, then remove it from the disabled list on the "settings>advanced>services>customize" tab
- base - select the base Windows image that will be used to create a custom Windows image
- description - enter the names of the project and its description, this information will be included in the final *.wim file and will also serve as the name for the output file
- app - choose what your Windows image will do. This can be the launch of a single web page or a custom application
- settings - configure your windows image and embed the components that are necessary for your application to work
- build settings - the settings that are performed at the stage of image assembly and can be used even in the manual setup mode
- post install - install the scripts and registry files that will be applied to the system when it is first turned on. This can be used to change the system configuration or install software
- events - execute cmd commands on the host machine during the build process. this can be used, for example, to copy files to the project directory or for anything else. to make this work, don't forget to activate the events you use in the checkmark!
- build - build your app together with Winbox. when using this, you can make the "winbox_resources/program" directory empty and specify a name *.exe file in "app" tab manually. in order for this to work, don't forget to activate the checkmark function near the "add" button!
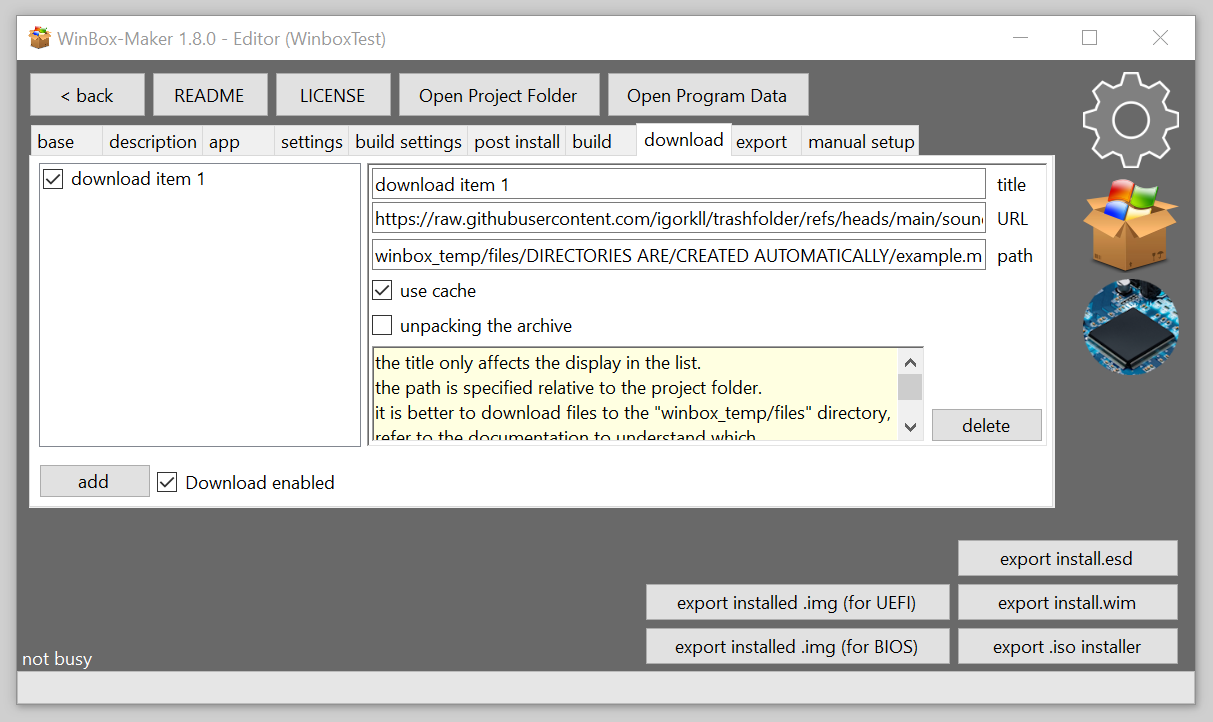
- download - allows you to download files during the build stage. It allows you to unpack archives automatically. please note that the download path is set relative to the project folder. it is better to download files to the "winbox_temp/files" directory, refer to the documentation to understand which "winbox_resources" directories are duplicated in "winbox_temp", if you still decide to use "winbox_resources" do not forget to add download paths to ".gitignore"
- export - export settings
- delete - allows you to delete files and windows components
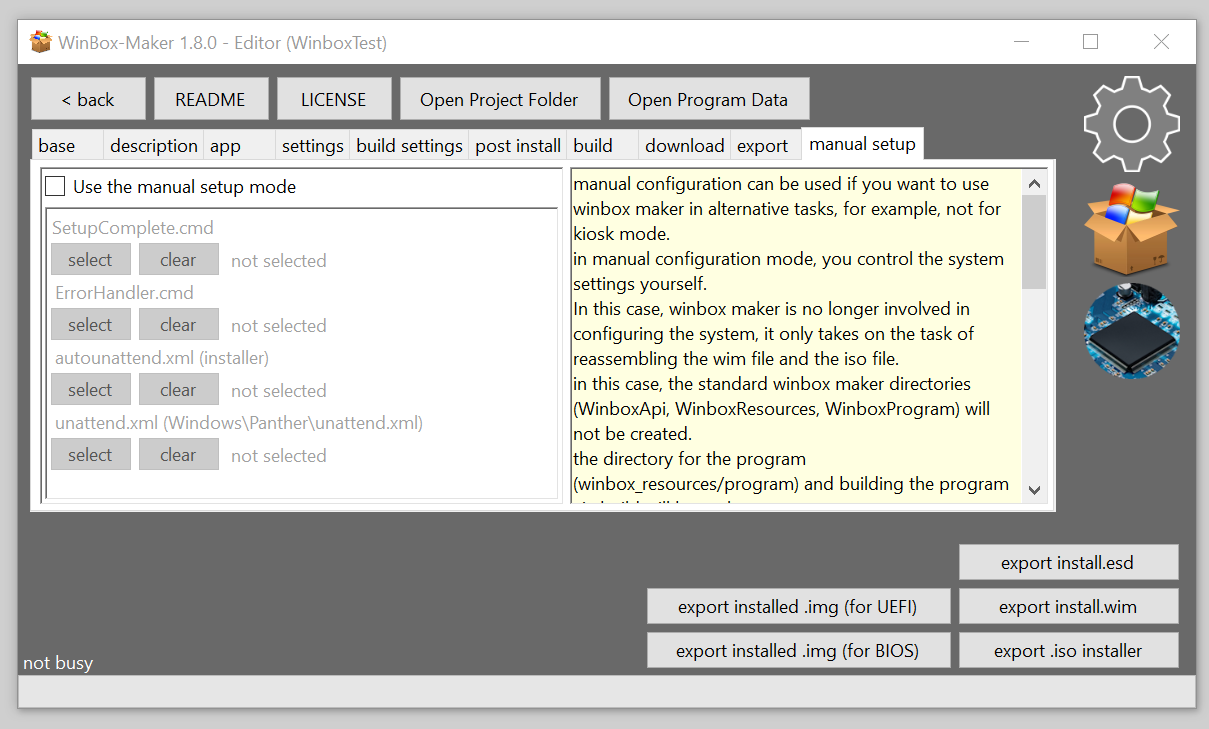
- manual setup - it allows you to use winbox maker in manual configuration mode, in which case the settings from winbox maker will be unavailable and you will set the system configuration yourself
- Integrate nircmd - adds nircmd to the image and registers it in the PATH. This is necessary to control some windows functions from your kiosk application without calling winapi directly
- Integrate PSTools - adds PsTools to the image and registers it in the PATH. this is necessary so that your kiosk application can run the exe on behalf of the system, for example, to circumvent some restrictions of WinRT (I used this to switch the bluetooth status without having a trusted digital signature)
- explorer.exe (the desktop is completely inaccessible)
- BSOD display (if the device goes into a BSOD, it will just reboot without displaying a BSOD)
- alt+f4
- ctrl+alt+del
- all keyboard shortcuts with Windows button
- telemetry
- windows defender
- windows updates
- UAC
- task manager
- creating screenshots
- sticky keys
- check disk
- hibernation and fast loading
- oobe
- firewall
- system recovery menu
- automatic entry into recovery mode in case of sudden power outage
- windows boot manager menu
- sfc
- snipping tool
- creating dumps in case of bsod
- system logging
- system sounds
- smart screen
- checking the digital signature of drivers (it may not work on new versions of Windows)
- lock screen
- logon animation (it only works normally in the enterprise version)
- w32time
- MpsSvc
- SecurityHealthService
- Sense
- WdBoot
- WdFilter
- WdNisDrv
- WdNisSvc
- Superfetch
- OneSyncSvc
- OfficeClickToRun
- OneDrive
- Cortana
- SyncHost
- CompatTelRunner
- UsoSvc
- wlidsvcNetwork
- WpnUserService
- ClickToRunSvc
- VSS
- edgeupdate
- edgeupdatem
- wbengine
- wuauserv
- RemoteRegistry
- WSearch
- SysMain
- WerSvc
- shellhwdetection
- SSDPSRV
- TermService
- napagent
- WinDefend
- wlidsvc
- DiagTrack
- dmwappushservice
- Dosvc
- XboxGipSvc
- XblAuthManager
- XblGameSave
- XboxNetApiSvc
- WaaSMedicSvc
- wscsvc
- wisvc
- PhoneSvc
- SessionEnv
- UmRdpService
- svsvc
- TapiSrv
- SDRSVC
- WbioSrvc
- Wecsvc
- ClipSVC
- WpnService
- PushToInstall
- WinRM
- workfolderssvc
- WwanSvc
- AarSvc
- cbdhsvc
- CloudBackupRestoreSvc
- CDPUserSvc
- ConsentUxUserSvc
- PimIndexMaintenanceSvc
- UnistoreSvc
- wercplsupport
- PcaSvc
- RasMan
- DevicePickerUserSvc
- DevicesFlowUserSvc
- BcastDVRUserService
- MessagingService
- UdkUserSvc
- UserDataSvc
- AppXSvc
- CscService
- CSC
- \Microsoft\Windows\Application Experience\Microsoft Compatibility Appraiser
- \Microsoft\Windows\Application Experience\ProgramDataUpdater
- \Microsoft\Windows\Autochk\Proxy
- \Microsoft\Windows\Customer Experience Improvement Program\Consolidator
- \Microsoft\Windows\Customer Experience Improvement Program\KernelCeipTask
- \Microsoft\Windows\Customer Experience Improvement Program\UsbCeip
- \Microsoft\Windows\AppID\SmartScreenSpecific
- \Microsoft\Windows\Application Experience\AitAgent
- \Microsoft\Windows\Application Experience\StartupAppTask
- \Microsoft\Windows\ApplicationData\appuriverifierdaily
- \Microsoft\Windows\ApplicationData\appuriverifierinstall
- \Microsoft\Windows\Device Information\Device
- \Microsoft\Windows\Diagnosis\Scheduled
- \Microsoft\Windows\DiskDiagnostic\Microsoft-Windows-DiskDiagnosticDataCollector
- \Microsoft\Windows\LanguageComponentsInstaller\Installation
- \Microsoft\Windows\LanguageComponentsInstaller\Uninstallation
- \Microsoft\Windows\Maintenance\WinSAT
- \Microsoft\Windows\Maps\MapsToastTask
- \Microsoft\Windows\Maps\MapsUpdateTask
- \Microsoft\Windows\Mobile Broadband Accounts\MNO Metadata Parser
- \Microsoft\Windows\MobilePC\HotStart
- \Microsoft\Windows\MUI\LPRemove
- \Microsoft\Windows\NetTrace\GatherNetworkInfo
- \Microsoft\Windows\Power Efficiency Diagnostics\AnalyzeSystem
- \Microsoft\Windows\RAC\RacTask
- \Microsoft\Windows\RemoteAssistance\RemoteAssistanceTask
- \Microsoft\Windows\RetailDemo\CleanupOfflineContent
- \Microsoft\Windows\SettingSync\BackgroundUploadTask
- \Microsoft\Windows\SettingSync\BackupTask
- \Microsoft\Windows\SettingSync\NetworkStateChangeTask
- \Microsoft\Windows\Setup\EOSNotify
- \Microsoft\Windows\Setup\EOSNotify2
- \Microsoft\Windows\Setup\SetupCleanupTask
- \Microsoft\Windows\Speech\SpeechModelDownloadTask
- \Microsoft\Windows\SystemRestore\SR
- \Microsoft\Windows\Time Synchronization\SynchronizeTime
- \Microsoft\Windows\Windows Error Reporting\QueueReporting
- \Microsoft\Windows\WindowsBackup\ConfigNotification
- \Microsoft\Windows\WS\License Validation
- \Microsoft\Windows\WS\WSRefreshBannedAppsListTask
- \Microsoft\XblGameSave\XblGameSaveTask
- \Microsoft\XblGameSave\XblGameSaveTaskLogon
- \Microsoft\Windows\Settings
- \Microsoft\Windows\Shell
- \Microsoft\Windows\Explorer
- \Microsoft\Windows\Media Center\ActivateWindowsSearch
- \Microsoft\Windows\Media Center\ConfigureInternetTimeService
- \Microsoft\Windows\Media Center\DispatchRecoveryTasks
- \Microsoft\Windows\Media Center\ehDRMInit
- \Microsoft\Windows\Media Center\InstallPlayReady
- \Microsoft\Windows\Media Center\mcupdate
- \Microsoft\Windows\Media Center\MediaCenterRecoveryTask
- \Microsoft\Windows\Media Center\ObjectStoreRecoveryTask
- \Microsoft\Windows\Media Center\OCURActivate
- \Microsoft\Windows\Media Center\OCURDiscovery
- \Microsoft\Windows\Media Center\PBDADiscovery
- \Microsoft\Windows\Media Center\PBDADiscoveryW1
- \Microsoft\Windows\Media Center\PBDADiscoveryW2
- \Microsoft\Windows\Media Center\PvrRecoveryTask
- \Microsoft\Windows\Media Center\PvrScheduleTask
- \Microsoft\Windows\Media Center\RegisterSearch
- \Microsoft\Windows\Media Center\ReindexSearchRoot
- \Microsoft\Windows\Media Center\SqlLiteRecoveryTask
- \Microsoft\Windows\Media Center\UpdateRecordPath
- \Microsoft\Windows\UpdateOrchestrator\Schedule Scan
- \Microsoft\Windows\UpdateOrchestrator\USO_UxBroker
- \Microsoft\Windows\DiskCleanup\SilentCleanup
- \Microsoft\Windows\Backup\ScheduledBackup
the following keys and combinations have been disabled via keyboard filter (can be disabled and customized)
- Alt+F4
- Alt+Space
- Alt+Tab
- Alt+Win
- Application
- BrowserBack
- BrowserFavorites
- BrowserForward
- BrowserHome
- BrowserRefresh
- BrowserSearch
- BrowserStop
- Ctrl+Alt+Del
- Ctrl+Esc
- Ctrl+F4
- Ctrl+Tab
- Ctrl+Win
- Ctrl+Win+F
- F21
- LaunchApp1
- LaunchApp2
- LaunchMail
- LaunchMediaSelect
- LShift+LAlt+NumLock
- LShift+LAlt+PrintScrn
- Shift+Ctrl+Esc
- Shift+Win
- Windows
these keys were disabled by changing the keyboard layout (it can be disabled and customized in the future (I'm going to embed sharpkeys directly into the utility))
- calculator key
- mail key
- media select key
- messager key
- my computer key
- logitech itouch key
- logitech shopping key
- logitech webcam key
- left/right alt keys
- left/right windows keys
- power/sleep/wake key
- printscreen key
- f1 - f24 keys
- web back, favorites, forward, home, refresh, search, stop keys
- disabled all hotkeys
- disabled updates
- page translation is disabled
- synchronization is disabled
- manual configuration can be used if you want to use winbox maker in alternative tasks, for example, not for kiosk mode.
- in manual configuration mode, you control the system settings yourself.
- In this case, winbox maker is no longer involved in configuring the system, it only takes on the task of reassembling the wim file and the iso file.
- in this case, the standard winbox maker directories (WinboxApi, WinboxResources, WinboxProgram) will not be created.
- the directory for the program (winbox_resources/program) and building the program via build will be useless.
- you will be able to integrate packages via winbox_resources/packages and drivers via winbox_resources/drivers, and the GPU driver installation function via the installer file should also work.
- you can still use the "delete", "events", and "downloading" tabs, their functionality is fully preserved in manual configuration mode.
- img export should work soon, but the option to turn off VM and sysprep after installation will not be available, you must handle this yourself
- the "settings" and "app" tabs become completely inaccessible.
- you can still replace and add files in the system and iso using the winbox_resources/files or winbox_resources/iso_files directories.
- it is possible to build a user application from sources in manual configuration mode, but it will end up in the winbox_temp/program directory and will not be added to the automation system image, although you can copy it via build event - win mounted
- in manual configuration mode, you cannot integrate the cursor through the winbox_resources/cursor directory, and you also cannot integrate vc redist, net framework, and app runtime through their corresponding directories. to do this, save your installers to files and use the setup completed script.
- in the "manual setup" mode, you can use the integration of the reg file into the image at the build stage (before the first boot of the system), the option is located on the "build settings>registry" tab
- the "build settings" tab still works in manual setup mode, but some functions are disabled in manual setup mode, but can be enabled by a special check mark "allow in manual setup mode".
- files - working
- program - not working (although the result of the automatic build of the user application can be moved to this directory in winbox_temp, the files will not be copied to the image)
- drivers - working
- nvidia_drivers - working
- amd_drivers - working
- intel_drivers - working
- driver_installers - working
- packages - working
- cursor - not working
- sources - it works, but the build result will not be automatically placed in the system image
- iso_files - working
- boot_files - working
- vc_redist - not working
- net - not working
- net_framework - not working
- app_runtime - not working
- recovery_files - it only works if reassembly recovery is enabled in manual setup mode
- winbox.wnb - the main project file. contains all settings and paths
- .gitignore - it is created by default in the project if it is not present, so as not to commit unnecessary files if you create the project in the git repository. it won't be overwritten if you make changes there, but it will be created if you delete it
- winbox_build - a folder for saving builds. You don't have to use it, but it's the path to save default images (added to by default .gitignore)
- winbox_images - directory for basic windows images (added to by default .gitignore)
- winbox_temp - it is used during the image build process (added to by default .gitignore)
- winbox_temp/files - temporary files that will be added to the project. it is relevant within a single build process. It is used to add downloadable files to the project
- winbox_temp/program - temporary directory for the application. it can be used from "build" and from "downloading"
- winbox_temp/drivers - a temporary directory for drivers, used for unpacking by nvidia and amd drivers, and can also be used to download drivers
- winbox_temp/nvidia_drivers - similar to the same directory in "winbox_resources" but there is only one build. it can be used from the "downloading" function
- winbox_temp/amd_drivers - similar to the same directory in "winbox_resources" but there is only one build. it can be used from the "downloading" function
- winbox_temp/intel_drivers - similar to the same directory in "winbox_resources" but there is only one build. it can be used from the "downloading" function
- winbox_temp/driver_installers - similar to the same directory in "winbox_resources" but there is only one build. it can be used from the "downloading" function
- winbox_temp/packages - similar to the same directory in "winbox_resources" but there is only one build. it can be used from the "downloading" function
- winbox_temp/iso_files - similar to the same directory in "winbox_resources" but there is only one build. it can be used from the "downloading" function
- winbox_temp/boot_files - similar to the same directory in "winbox_resources" but there is only one build. it can be used from the "downloading" function
- winbox_temp/vc_redist - similar to the same directory in "winbox_resources" but there is only one build. it can be used from the "downloading" function
- winbox_temp/net - similar to the same directory in "winbox_resources" but there is only one build. it can be used from the "downloading" function
- winbox_temp/net_framework - similar to the same directory in "winbox_resources" but there is only one build. it can be used from the "downloading" function
- winbox_temp/app_runtime - similar to the same directory in "winbox_resources" but there is only one build. it can be used from the "downloading" function
- winbox_temp/recovery_files - similar to the same directory in "winbox_resources" but there is only one build. it can be used from the "downloading" function
- winbox_temp/usertemp - the user's temporary directory. there is a single build and can be used for user files during the build.
- winbox_resources - a folder for your resources that are needed to build the system. these files should end up in the git repository
- winbox_resources/files - files from this directory will be moved to the root of the disk on the installed system with replacement
- winbox_resources/program - the directory for your application that will be used in kiosk mode. make this directory empty if you are using automatic compilation of the project from the source code using winbox maker
- winbox_resources/drivers - the directory with the drivers with which the image should be built
- winbox_resources/nvidia_drivers - put the driver installers for your nvidia graphics cards here
- winbox_resources/amd_drivers - put the driver installers for your AMD graphics cards here
- winbox_resources/intel_drivers - put the driver installers for your intel graphics cards here (for example, for any hd graphics)
- winbox_resources/driver_installers - you can put the driver installers for some hardware here, and maybe winbox maker will be able to extract the driver to embed it in the image, or maybe not. depends on the installer format. if this doesn't help, try installing the driver yourself, or add the installer to post install and use the script to quiet install when you first turn it on. for installers with a known type (nvidia, amd, etc.), it is better to use the appropriate directories (although this is no different at the moment, more correct algorithms for installing such drivers may be added in the future)
- winbox_resources/packages - you can add the .cab or .msu packages to this directory
- winbox_resources/cursor - the directory where you can upload custom cursor files (.cur for different states)
- winbox_resources/sources - the source code of your application for building using winbox maker
- winbox_resources/iso_files - iso image modification files. they are copied and replaced into the iso image (NOT THE ROOT OF THE SYSTEM, BUT THE ISO. use "files" to modify the system files)
- winbox_resources/boot_files - copies the replacement files to the mounted boot.wim in the windows installer
- winbox_resources/vc_redist - you can put installers of additional visual C++ redist packages here to embed them in the image
- winbox_resources/net - you can put the installers of additional .net packages here to embed them in the image
- winbox_resources/net_framework - you can put the installers of additional net framework packages here to embed them in the image
- winbox_resources/app_runtime - you can put the installers of additional app runtime packages here to embed them in the image
- winbox_resources/recovery_files - copies the replacement files to the mounted winRE.wim in the windows
winbox maker images have a local API that can be used by an application loaded in winbox maker. this can be used to control some aspects of the system from your user application.
- C:\WinboxApi\reboot_to_desktop.bat - call this file from your application to reboot to the windows desktop. after reboot, your application will start again. this can be used for debugging or configuration. DO NOT USE this feature in the release build. since this allows you to get into the system interface, which may be unsafe for public kiosks (available only in the "instend of the desktop" application launch mode)
- C:\WinboxApi\reboot_to_recovery.bat - reboots in recovery (if it is in the system (Winbox maker deletes it by default) and it is enabled (Winbox maker turns it off by default)) I recommend using custom recovery or modifying stock recovery using winbox maker tools so that the solution is safe and you get what you want.
- C:\WinboxApi\reboot_to_advanced_options.bat - opens advanced options from where you can already access recovery. this menu looks almost the same as the standard windows recovery menu, but it opens without restarting. I DO NOT RECOMMEND using this in production, if you have made your recovery for your own purposes and want to reboot there, use reboot_to_recovery.bat
custom cursor files (winbox_resources/cursor) (in future updates, I'm going to make it possible to decide for myself which file will be cur and which ani.)
- AppStarting.ani
- Arrow.cur
- Crosshair.cur
- Hand.cur
- Help.cur
- IBeam.cur
- No.cur
- NWPen.cur
- SizeAll.cur
- SizeNESW.cur
- SizeNS.cur
- SizeNWSE.cur
- SizeWE.cur
- UpArrow.cur
- Wait.ani
- the path to the file .wnb is for automatically starting conversion from the command line. if it points to a directory, it will convert all files .wnb in this directory
- the path for exporting the output file, if it points to a directory, exports it there under the default name for this *.wnb. if this argument is not specified, it will be exported with the default name to the winbox_build directory next to the *.wnb file. if you just specify the file name here, the file will be created with the specified name in the winbox_build directory (do not specify a specific path here if you specified the first argument as a directory for converting multiple ones *.wnb because this will cause one file to be overwritten by multiple projects)
- /i - exports the .iso installer
- /w - exports the install.wim file
- /d - exports the install.esd file
- /r - exports the .img file with Windows already installed for BIOS-based systems (installation via qemu)
- /e - exports the .img file with Windows already installed for UEFI-based systems (installation via qemu)