How to develop a driver for NuttX #9
Description
In this guide I'll explain how to develop a driver for Nuttx.
Before of start with the guide, I think it's recommendatory to understand how NuttX manage the devices and peripheral.
In Nuttx it's forbidden to access directly to the low level interface(I2C, GPIO, UART...) in the App. So to have access to this resources which are basically, you must access throw a driver.
Theses drivers allow to use the device in a very easy way, because allow you to use it in a " very high level" and it's quite straight forward to use for a Linux user.
So when you want to use a sensor in your App, you just need to open and read the data from the sensor.
This is an example of an App that reads temperature and humidity from the HIH6130 sensor every 0.5 secs (In this guide I going to take this sensor as example of development):

In the next guide I will explain detailed how to develop an App.
.C file development:
Go to nuttx/drivers/sensors and create hih6130.c (or the name of the driver that you want to develop)

The white square libraries are the basics for every driver.
The red square is the configuration that must be checked to make the driver run. In this case I2C and the HIH6130 sensor check at the menuconfig(This check is done before compilation time).
This sensor use I2C, so at this part we add the directions of the device and the registers, and configuration stuff. This sensor is quite simple, so we only have a command.

The next part of the code is a struct that contains the relevant information of the device, such as communication interface, configuration data, collected data.. You can add any option that you consider necessary.
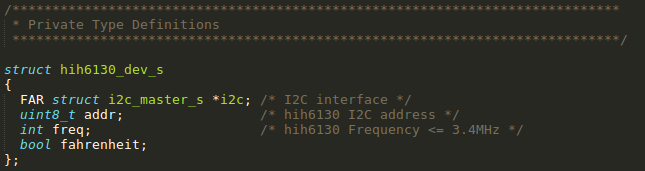
In this case, we have the I2C configuration and interface, also the option that allow you to choose between fahrenheit or celsius result.
Theses are the prototypes of the private functions that we're going to use.
The functions in the white square are the basic driver functions. Theses functions are called when you open,read,write...

This struct links the function with action over the file, it's very important to respect the positions.

There is a thing that is important to know about the file functions: When you open a file in the App the permissions that you can give to that file are the functions that you're using. I mean, if you don't use a write function, when you open it you cant ask write permission.
So now we know which are the basic functions we are going to see with more detail each function:
Register function:
This function is the first that you will call when you initialize a driver, and it's usually call at the boot time. It's the only public function of a driver.

This is the basic structure of a registration function, first we take enough memory to the device, then we add the configuration that we need to run it properly. In some device you can do an extra check to now if it's correctly connected and if the connection fails free the memory and don't continue with process.
In this case this functionality it's not implemented.
The final step is the registration of the device in the system, giving a path and the permissions.
Open function:
This function is call when you do the open action of the device.
Some drivers start the devices when it's call this function, in this case is not neccesary and the only thing that it do its show a debug message and return a OK.

Close function:
This function is call when you do the close action of the device.
Here you can free the resources that you're using with the device, for example the memory that you reserve previously.
But also in the majority of the drivers they don't implement anything inside.

IOCTL function:
For the configuration of the device you have two options: This function or the write function.
But this function allow you to use easily ioctl commands, and if for linux user it's more straightforward to use it.
So in this example the use of it, it's quite simple. We have the option to choose between Celsius or Fahrenheit degrees at the output.
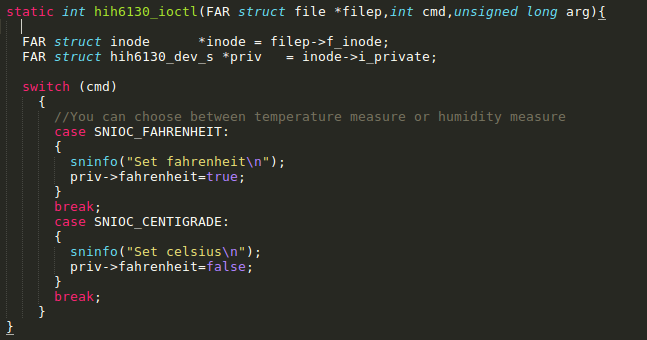
The commands that you can use, are in ioctl.h (nuttx/include/nuttx/sensor). Also you can add the commands that you want to use with your driver.
Read function:
This function is call when you want to read the data that offer the sensor.
First we initialize the data structure, then we connect the buffer with a local structure.

Then when call to the function humidity_temp() which connects with the I2C functions and then organize the data receive from the bus and add to the data structure.
Finally the this function return the size of the data recollected and the variable add as argument for buffer will get the data and humidity data.
In the next images we can see the function humidity_temp() which do the hard work and i2c read function.


Write function:
In this driver we don't need to "write" anything to the sensor, because we just want to read the data that offer us, but other driver are for actuator devices, so it's neccesary to send a order.
This function and the read function are the main functions of a driver.

Here we can see an example from another driver, which takes the write order from the arguments.
Finally you can add other functions to the driver, but this is the basic stuff to make it run correctly, and respecting the nuttx structure.
.h file development
Now we go to nuttx/include/nuttx/sensors and we create hih6130.h.
In this we declare the structure of data to return and the public functions, also the configuration options are set here.
Configuration files
Once we have done both files, it's necessary to add to the system path.
So go to nuttx/drivers/sensors/kconfig and add theses lines:

This make appear the sensor in the menuconfig, allowing you to choose it.
Then go to nuttx/drivers/sensors/make.defs and add the next line:

Now everything it's done. The next step is #3