Root Webhook template for creating a Chat Bot using DialogFlow and the Root API.
The full Root api documentation can be found here
This is not an official Root project.
Open the project in your favorite IDE and edit the index.js file.
The following information will need to be added:
- Your Root CLIENT_ID
- Your Root CLIENT_SECRET
root-chatbot-webhook-nodejs requires Node.js v8.9.4 (LTS) to run.
Install the dependencies and start the express server:
$ cd root-chatbot-webhook-nodejs
$ npm install
$ npm startThe Webhook will now be running locally on http://localhost:300.
In order to test the webhook from your rest client, use the below endpoint and request object:
Endpoint: http://localhost:3000/get-insurance-quote
Request Object:
{
  "result": {
    "parameters": {
      "device": "iPhone 6s 64GB LT"
    }
  }
}Follow the below steps in order to create a simple DialogFlow component and link it to our root-chatbot-webhook:
The DialogFlow Agent is essentially your Chat Bot.

Your Agent's welcome intent is essentially the message that will launch your Chot Bot. Here you can also configure more useful and intuitive response message that will help to retrieve the first bit of information from your user.

An Entity in DialogFlow is essentially a way of describing data elements expected from a user's message to your chat bot. In our case, we will only be creating a simple device Entity that will capture the entire device name. I would suggest that you expand upon this later in order to make your chat bot more user friendly. E.g. Consider breaking up the device name into Manufacturer, Model, Memory etc.
Add the device Entity and create some example device names that are found in the Root API.

NB: Ensure that you select the 'Allow Automated expansion' box that will assist with training and expansion of your intent.
Here is where your Chat Bot magic lies. Start to think like a user interacting with your Insurance Chat Bot.
This is the first piece of information that your Chat Bot is expecting. For simplicity sake, we would like to receive the Device name from the user. Add as many "User expressions" as you can think of, but be sure to indicate that the device text is of type @device.
Set the devie parameter to 'Required' and add a prompt message to request the details if the member fails to supply them.

We would now like our ChatBot to query our webhook in order to provide useful quote information to our users. This can be done through a webhook.
At this point your application needs to be hosted somewhere. Alternatively, you can create a secure url to your localhost server using ngrok.
For now, we will set up a webhook directly to our /get-insurance-quote endpoint. However, you should explore the possibilities of redirecting webhook requests to different api endpoints based on the 'action name' of your intent.

We now simply need to indicate that we would like our configured intent to use a Webhook fulfillment to respond to our users.

It is now time to test our Chat Bot. Dialog Flow provides a nifty tool to test your Chat Bot while it is being created. You can find the Chat Bot on the right of your DialogFlow console.
In order to launch our Chat Bot, we use the 'Default Welcome Intent' which we configured earlier. Hopefully you provided a useful response that will immediately promt the user to provide information about what they are looking for. i.e A response that will lead the user to request for an insurance quote for their device.

NB: The response in our chat bot above is not intuitive at all and does not prompt the user for information in a conversational manner.
Now we can start to interact with our Chat Bot by sending it messages that our Chat Bot expects. These message structures are configured in our QuoteIntent above.
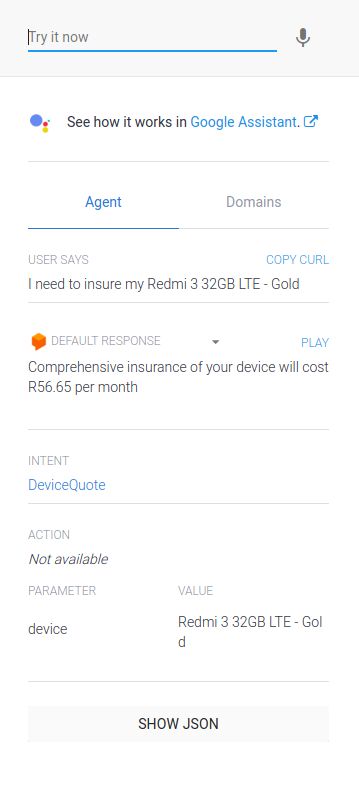
If configured correctly, this should lead to our webhook being used and a calll to the Root API being made in the background. As you can see above, our webhook provided a conversational reply with the details of the monthly premium to our Chat Bot (and thus to our user).
NB: If this call fails, a few things may be wrong:
- Your Chat Bot does not understand the user's message
- The device provided to the Chat Bot is not available in the Root API (However we should see a friendly webhook response)
- Our webhook is not running or has not been configured correctly (Be sure to check your webhook console or logs).

